28. Max for Live Devices
Live comes with a selection of custom-designed, built-in Max for Live devices. These devices include instruments and effects.
Because Max for Live devices are based on Max, you can edit and customize them in the Max editor — unlike native Live devices. You can read more about this in the Max for Live chapter.
To learn the basics of using devices in Live, check out the Working with Instruments and Effects chapter.
Note that different editions of Live have different feature sets, so some devices covered in this reference may not be available in all editions.
28.1 Max for Live Instruments
28.1.1 DS Clang

DS Clang consists of two separate tones, white noise and a filter, allowing you to create a variety of cowbell, clave and noise percussion sounds.
The Tone A/B sliders let you set the volume for each cowbell tone independently.
The Filter control sets the high-pass and band-pass filter cutoff, allowing you to change the color of the sound. At higher values, the signal has more high-frequency content.
The Noise slider allows you to set the amount of white noise applied to the signal.
When the Clave switch is activated, you can add repeats to the clave sound using the Repeat slider.
You can use the Pitch parameter to change the pitch of the instrument. The Decay knob sets the length of the sound, while the Volume control adjusts the overall level of the instrument.
To preview the sound of the instrument with its current settings, click anywhere in the upper half of the display.
28.1.2 DS Clap
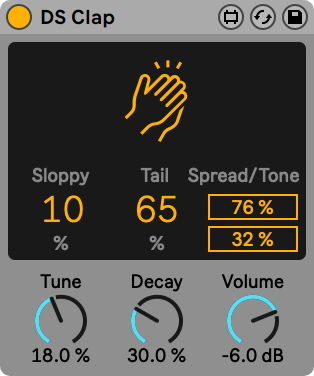
DS Clap is a mix of filtered noise and an impulse running through panned delay lines, that allows you to create a range of sounds from a tight electronic clap to a more organic, humanized handclap.
The Sloppy control adjusts the delay time between the two delay lines, so you can set how tightly or loose the panned claps play together. Tail adds filtered noise to the impulse of the clap.
The Spread slider sets the stereo width of the clap. 0% yields a mono signal while 100% creates a widened stereo image. The Tone slider adjusts the color of the clap. At higher values, the signal has more high-frequency content.
You can use the Tune parameter to change the pitch of the clap. The Decay knob sets the length of the clap, while the Volume control adjusts the overall level of the instrument.
To preview the sound of the instrument with its current settings, click anywhere in the upper half of the display.
28.1.3 DS Cymbal
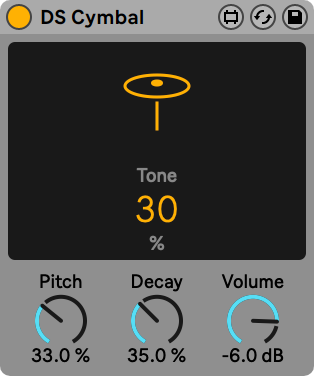
DS Cymbal combines sine and pulse waveforms with high-passed noise, making it possible to recreate a variety of timbres, from a thin ride cymbal to a heavy crash.
The Tone slider in the display sets the high-pass filter cutoff, allowing you to change the color of the cymbal. At higher values, the signal has more high-frequency content.
You can use the Pitch parameter to change the pitch of the cymbal. The Decay knob sets the length of the cymbal, while the Volume control adjusts the overall level of the instrument.
To preview the sound of the instrument with its current settings, click anywhere in the upper half of the display.
28.1.4 DS FM
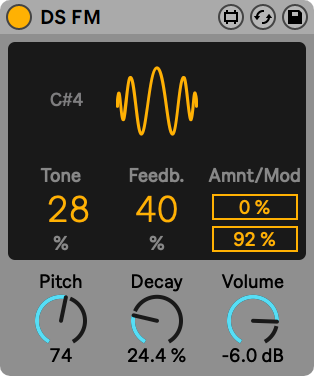
Inspired by a classic Japanese FM synthesizer, DS FM lets you create a variety of effects, from static bursts to metallic lasers.
The Tone slider in the display sets the low-pass filter cutoff, allowing you to change the color of the drum. At higher values, the signal has more high-frequency content.
Feedb. adjusts the amount of feedback applied to the FM algorithm. Greater values yield more noise.
Amnt sets the amount of FM modulation, while the Mod slider blends between different modulation types.
The Pitch parameter provides global pitch control. The Decay knob sets the length of the drum, while the Volume control adjusts the overall level of the instrument.
To preview the sound of the instrument with its current settings, click anywhere in the upper half of the display.
28.1.5 DS HH
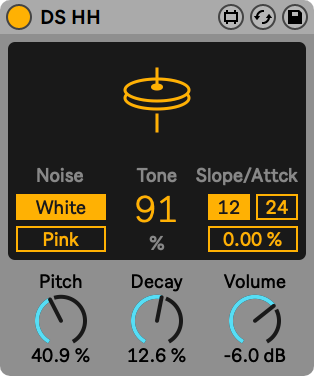
DS HH is a blend of noise and sine waveforms, with which you can produce any number of sounds, from sharp closed hats to sizzling open hats.
The Noise toggle lets you choose between two noise types: white or pink.
The Tone slider in the display sets the high-pass filter cutoff, allowing you to change the color of the hat. At higher values, the signal has more high-frequency content.
The pitched portion of the sound is filtered through a resonant high-pass filter. The filter can be switched between 12 and 24 dB slopes, and the attack time can be set via the Attack slider.
You can use the Pitch parameter for global pitch control. The Decay knob sets the length of the hat, while the Volume control adjusts the overall level of the instrument.
To preview the sound of the instrument with its current settings, click anywhere in the upper half of the display.
28.1.6 DS Kick
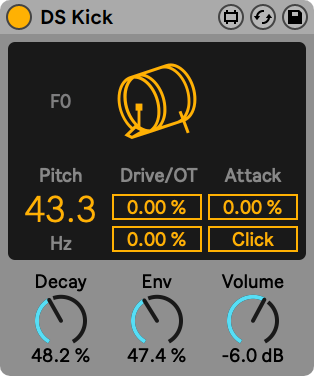
DS Kick is a kick drum synth with a modulated sine wave.
The Pitch slider lets you tune the kick in Hz. You can shape the kick sound by adding distortion via the Drive slider, or adding harmonics using the OT slider.
The Attack parameter smooths the sound of the sine wave. The Click switch adds a click sound to the kick, creating a sharper transient.
The Decay knob sets the length of the kick. Env can be used to set the pitch modulation. The Volume control adjusts the overall level of the instrument.
To preview the sound of the instrument with its current settings, click anywhere in the upper half of the display.
28.1.7 DS Sampler
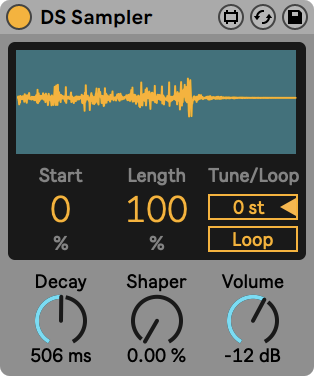
DS Sampler makes use of your own samples to create a drum synth module.
You can load a sample by dragging and dropping it onto the upper half of the display. The Start control adjusts the position of the sample start, while the Length slider sets the sample playback length.
You can use the Tune slider to tune your sample by +/- 48 semitones. The Loop switch toggles the sample loop on and off.
The Decay knob sets the decay time of the sample’s amplitude. The Shaper parameter adds distortion to produce a punchy and gritty sound. The Volume control adjusts the overall level of the instrument.
28.1.8 DS Snare
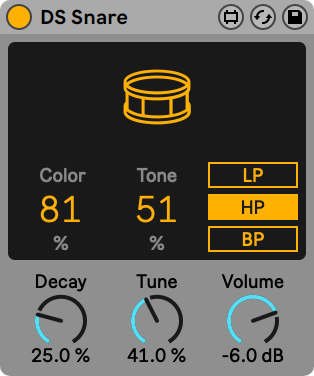
DS Snare consists of a pitched oscillator and noise, providing a snare palette ranging from a traditional acoustic snare sound, to the gated noise snare often heard in electronic dance music.
The Color parameter controls the tone of the pitched signal, while the Tone parameter controls the presence of the noise signal.
You can apply one of three different filter types to the noise signal: low-pass, high-pass, or band-pass.
The Decay knob sets the length of the snare, while the Tune parameter provides global pitch control. The Volume control adjusts the overall level of the instrument.
To preview the sound of the instrument with its current settings, click anywhere in the upper half of the display.
28.1.9 DS Tom
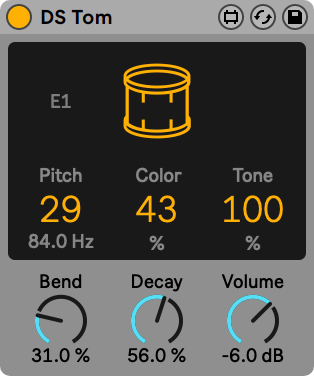
DS Tom combines an impulse with various pitched oscillator waveforms, allowing you to synthesize toms with various timbral qualities, from deep and thunderous to sharp and tappy.
You can use the Pitch slider to tune the tom in Hz. The Color parameter controls the filter gain and cutoff, while the Tone slider controls the level of resonant band-pass filters to mimic the tuning of the drum membrane.
The Bend parameter adjusts the pitch envelope. The Decay knob sets the length of the tom, while the Volume control adjusts the overall level of the instrument.
To preview the sound of the instrument with its current settings, click anywhere in the upper half of the display.
28.2 Max for Live Audio Effects
28.2.1 Align Delay
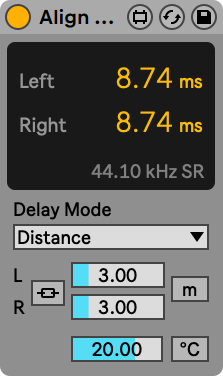
Align Delay is a utility delay for incoming signals that can be set in samples, milliseconds, or meters/feet.
Using the Delay Mode drop-down menu, you can choose between three delay modes: Time, Samples, and Distance.
Time mode sets the delay in milliseconds and can be used to adjust time between lasers and AV work, or as a subtle stereo maker.
Samples mode sets the delay in samples and can be used to compensate for latency introduced by other devices.
Distance mode sets the delay in meters or feet, either option can be toggled by using the m/ft button next to the left and right delay sliders. Distance mode can be used to adjust PA system alignment or monitor to main PA alignment.
You will also see a Celsius/Fahrenheit Temperature option in Distance mode. Matching the temperature setting to the current temperature in the room you are using Align Delay in allows for more precise delay adjustment as the sound will travel differently in warm and cold environments.
With Stereo Link engaged, the left channel’s settings are applied to the right channel and the right channel will appear greyed out. Changing the settings for the left channel will apply the changes to both sides.
28.2.2 Envelope Follower
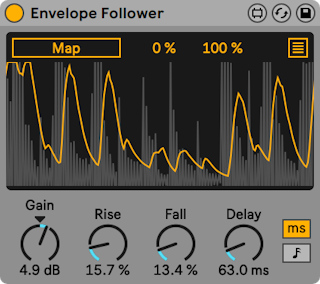
Envelope Follower uses a well-known technique which involves capturing a signal, smoothing and reshaping its amplitude course in order to obtain a more or less continuous curve, and finally mapping the curve to one or more control parameters. The “auto-wah” effect is perhaps the most well-known application of the envelope following technique.
Activate the Map switch and click on a parameter in Live to assign that parameter as a mapping target. To assign an additional mapping target, click on the button at the top-right of the display, click any of the unassigned Map switches and click on another parameter in Live. A total of eight parameters can be assigned. To unassign a parameter, click on the button to the right of its Map switch. For each modulated parameter, the Min and Max sliders let you scale the resulting output range after the modulation is applied.
You can use the Gain knob to set the gain applied to the incoming signal.
The Rise parameter smooths the attack of the envelope, while the Fall control smooths the release of the envelope.
The Delay control sets the delay time of the envelope. The switches to the right of the Delay control toggle the delay mode between time-based and tempo-synced beat divisions.
28.2.3 LFO
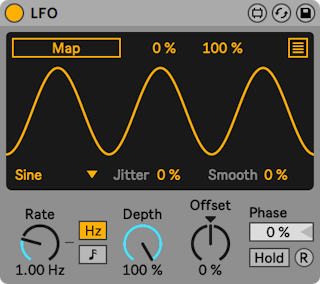
LFO is a parameter modulation LFO for Live-specific parameters and third party plug-in parameters.
Activate the Map switch and click on a parameter in Live to assign that parameter as a mapping target. To assign an additional mapping target, click on the button at the top-right of the display, click any of the unassigned Map switches and click on another parameter in Live. A total of eight parameters can be assigned. To unassign a parameter, click on the button to the right of its Map switch. For each modulated parameter, the Min and Max sliders let you scale the resulting output range after the modulation is applied.
You can choose from one of seven different waveforms: sine, sawtooth up, sawtooth down, triangle, rectangle, random and binary noise.
The Jitter slider adds randomness to the waveform, while the Smooth control smooths value changes.
The Rate control specifies the LFO speed. The switches to the right of the Rate control toggle between frequency in Hertz and tempo-synced beat divisions.
Depth sets the overall intensity of the LFO. Offset changes the starting point, or initial phase of an LFO, so that it begins at a different point in its cycle.
The phase of the oscillator can be shifted using the Phase control.
To hold the current output value, activate the Hold switch.
You can click the R (Retrigger) button to re-trigger the phase of the LFO.
28.2.4 Shaper
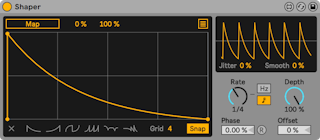
Shaper is a multi-breakpoint envelope which generates modulation data for musical expression.
Activate the Map switch and click on a parameter in Live to assign that parameter as a mapping target. To assign an additional mapping target, click on the button at the top-right of the display, click any of the unassigned Map switches and click on another parameter in Live. A total of eight parameters can be assigned. To unassign a parameter, click on the button to the right of its Map switch. For each modulated parameter, the Min and Max sliders let you scale the resulting output range after the modulation is applied.
You can create a breakpoint by clicking anywhere in the display. You can also delete a breakpoint by Shift-clicking on it. Hold down the Alt (Win) / Option (Mac) key while dragging to create curved segments.
To clear the display, press the Clear button in the bottom left corner. To the right of the Clear button, you can choose from one of six breakpoint presets.
You can adjust the size of the grid via the Grid slider. When Snap is enabled, all breakpoints that you create or reposition will snap to grid lines.
The smaller display on the top right provides an oscilloscope-style view of the output signal. The Jitter slider adds randomness to the waveform, while the Smooth control smooths value changes.
The Rate control specifies the LFO speed. The switches to the right of the Rate control toggle between frequency in Hertz and tempo-synced beat divisions.
Depth sets the overall intensity of the LFO. The phase of the oscillator can be shifted using the Phase control.
You can click the R (Retrigger) button to re-trigger the phase of the LFO. Note that re-trigger is not available if the Rate control is set to Sync mode.
The Offset control adjusts the center point of the envelope output. At 0%, the output is centered. Positive values shift the output upward, while negative values shift it downward. The horizontal line in the oscilloscope display indicates the center and can be a helpful visual reference when adjusting Offset.
28.3 Max for Live MIDI Effects
28.3.1 Envelope MIDI
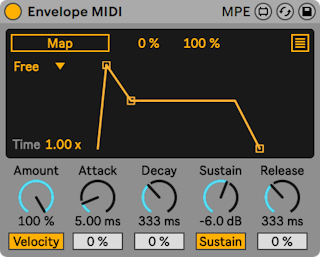
Envelope MIDI is an ADSR device that you can control any Live parameter with.
Activate the Map switch and click on a parameter in Live to assign that parameter as a mapping target. To assign an additional mapping target, click on the button at the top-right of the display, click any of the unassigned Map switches and click on another parameter in Live. A total of eight parameters can be assigned. To unassign a parameter, click on the button to the right of its Map switch. For each modulated parameter, the Min and Max sliders let you scale the resulting output range after the modulation is applied.
The Loop Mode drop-down lets you choose from one of four loop modes:
- Free: The trigger rate is unaffected.
- Sync: The trigger rate is defined by the song tempo. When Sync mode is active, you can set the trigger rate via the Sync Rate drop-down.
- Loop: The trigger rate is defined by the envelope time.
- Echo: This creates repetitions of the original envelope. When Echo is active, you can adjust the Envelope Echo Time and amount of Envelope Echo Feedback.
The Time slider sets the global envelope time.
When the Velocity switch is enabled, the envelope is modulated by note velocity. The Amount control determines the intensity of the modulation.
The Attack control sets the attack time of the envelope. The Attack Slope slider adjusts the shape of the Attack envelope segment.
The Decay control sets the decay time of the envelope. The Decay Slope slider adjusts the shape of the Decay envelope segment.
The Sustain control sets the level reached at the end of the Decay stage. The Sustain Mode switch toggles the Sustain function on or off.
The Release control sets the release time of the envelope. The Release Slope slider adjusts the shape of the Release envelope segment.
You can adjust the Attack, Decay, Sustain and Release parameters by clicking and dragging the envelope display.
28.3.2 Expression Control
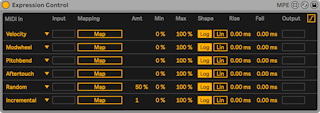
Expression Control is a parameter modulation device that allows for a wide variety of internal MIDI mappings. The MIDI controller’s Velocity, Modulation Wheel, Pitch Bend, Aftertouch and Keytrack can each be mapped to one destination.
Activate a Map switch and click on a parameter in Live to assign that parameter as a mapping target.
You can set independent modulation intensities for each mapping via the Min and Max sliders.
The Log and Lin switches toggle between logarithmic and linear shapes.
The Rise slider smooths the attack of the envelope, while the Fall slider smooths the release of the envelope.
The Output displays show the output level for each mapping.
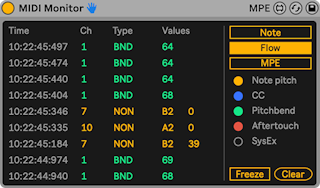
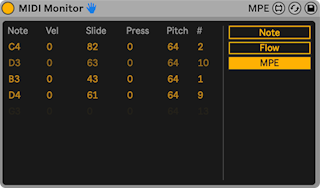
28.3.3 MIDI Monitor
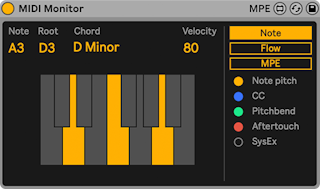
MIDI Monitor is a utility MIDI device that displays incoming MIDI and MPE data.
MIDI data can be viewed in either the Note display or Flow diagram.
In the Note display, incoming MIDI notes are shown along with their root note and related chords (if played) on a keyboard layout. Note velocity is also shown.
The Flow diagram populates a list of incoming MIDI notes and data (such as pitch bend and aftertouch messages) in a continuous stream as notes are played. The Freeze toggle can be used to freeze or unfreeze the display, while the Clear button clears the entire display.
MPE data can be viewed in the MPE display. Incoming note, velocity, slide, pressure and per-note pitch data are shown in a continuous stream as notes are played.
28.3.4 MPE Control
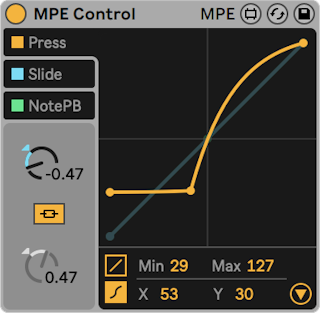
MPE Control is a Max for Live MIDI effect that allows shaping and transforming incoming MPE (MIDI Polyphonic Expression) signals, and offers distinctive adjustment options for each MPE data source. It is typically used in conjunction with another device to fine-tune the effect MPE data has on mapped parameters. MPE Control also allows converting MPE signals to global MIDI, making it possible to use an MPE controller with non-MPE enabled instruments.
Before we get into the details of how you can use the MPE Control effect to shape the incoming MPE data, let’s have a look at the difference between MPE and standard MIDI messages. MPE enables MIDI Control Change (or MIDI CC) messages to be sent on a per-note basis, thus allowing you to articulate each note individually. Without MPE, those messages are sent globally, meaning that all notes are affected by the MIDI CC being used. For more detailed information on MPE check out the Editing MPE chapter.
While MPE already allows a lot more musical expression than standard MIDI data, MPE Control gives you the ability to shape the MPE signals to a greater extent using curves, making it possible to play even more expressively. Let’s say you are using the Expression Control device and mapped its Slide MIDI input to the Filter Freq knob in Operator. Any incoming MPE slide data will affect the filter frequency. You can then use MPE Control to fine-tune the signal further, so that only very high slide values will reach a high frequency cutoff.
In MPE Control, the incoming MPE signals can be transformed via two types of curves that can be smoothed for consistent rise and fall times. There are three signal sources available: Press (pressure), Slide, as well as NotePB (per-note pitch bend), and each can be adjusted individually.
The curve of the selected MPE source is shown in the foreground of the display, making that curve and its respective controls available for editing. By default, all MPE sources are switched on, but they can be deactivated separately by clicking on the toggles next to their names.
For each MPE source, you can choose between two types of curve settings in the bottom left corner of the display: linear or S-shaped. The linear curve has two breakpoints, while the S-shaped curve has three breakpoints.
Choosing the linear setting lets you adjust the curve in two ways. You can use either the Curve control knob or click and drag the curve directly in the display. In addition to adjusting the curve, you can also modify the minimum and maximum values using the Min and Max sliders, or by dragging the breakpoints at the ends of the curve.
The linear setting provides one curve, creating a smooth ramp for the chosen modulation source, either “compressing” the data, making it easier to stay in the lower range of values, or “expanding” it, making it easier to reach higher values with less input.
When choosing the S-shaped curve, a third breakpoint is added to the middle of the curve’s line, separating the curve into two distinct segments. This breakpoint is movable, allowing complete control over the crossover point between the two segments, giving you the possibility to create much more radical curves. The two segments are linked together by default. Toggling the Curve Link button separates the segments from each other, so that they can be individually compressed or expanded using the two independent Curve dials.
Note that the position of the breakpoint separating the two segments can be adjusted either by directly clicking and dragging the breakpoint, or by using the X-Y controls at the bottom of the display. The X-Y controls are only active when using the S-shaped curve.
Clicking on the triangular button in the bottom right of the visualization will unfold the advanced settings panel.

All of the three modulation sources include the Smooth toggle which enables smoothing for the currently selected source. Specific Rise and Fall values for each of the curves can be set independently via the respective controls, and additional controls are available depending on the source you are editing.
28.3.4.1 Press
The Press source can be used to alter MPE pressure data, which, similarly to polyphonic aftertouch, is sent on a per-note basis when pressure is applied to a controller’s key or pad after it was initially struck.

Press includes a Default toggle, which gives you the option to set a default MPE value to use with MIDI notes that do not contain MPE data. You can also choose to send the MPE pressure data to the Slide instead of the Press source by using the Swap to Slide toggle. This is useful when, for example, you want to adjust the modulation via the vertical axis, but are using a controller which only supports polyphonic aftertouch.
The Press to AT setting converts the MPE pressure data to monophonic aftertouch, so that non-MPE instruments can be modulated via an MPE controller.
28.3.4.2 Slide
The Slide source modifies MPE slide data (transmitted as MIDI CC 74), which corresponds to the vertical position of the finger on the controller key or pad.

Slide also includes a Default toggle for use with non-MPE data, as well as a Centered switch which is useful when playing pad-based MPE controllers. When Centered is switched on, MPE slide data is transformed so that hitting the center of the pad generates a modulation value of zero, and the modulation value increases progressively as the finger slides away from the center alongside the vertical axis.
By default, Slide is set to Abs mode, which means that MPE slide values are interpreted as absolute. Switching the mode to Rel (relative) will set the slide values to start in the middle of the range, regardless of where the finger is on the key or pad. They can then only be modified by further sweeping the finger up and down while holding a note. In the Ons (onset) mode, MPE slide values will only be updated with a Note On. Note that onset mode will automatically deactivate smoothing.
The Slide to Mod option transforms MPE slide messages to Mod Wheel (CC1) messages, allowing to modulate non-MPE enabled instruments with an MPE controller.
28.3.4.3 NotePB
The NotePB source modifies the MPE per-note pitch bend data, which is produced by horizontal movement on the controller’s keys or pads. Pitch bend by definition only affects the pitch or pitches being produced.

In the NotePB advanced settings, you can adjust the Pitch Range, which is useful in cases where the hardware controller and the instrument’s pitch bend range do not match. For example, a setting of 2x allows mapping an MPE controller with a +/- 48 semitone pitch bend range to an instrument whose pitch bend range is +/- 24 semitones. If the Note Pitch Bend MIDI CC is mapped to anything other than pitch, using higher values helps to cover a larger modulation range with a smaller movement.
When the NotePB to PB switch is switched on, MPE per-note pitch bend messages are translated to standard MIDI messages, which makes it possible for MPE-enabled MIDI controllers to still send MIDI information to instruments that do not receive MPE messages.
28.3.5 Note Echo
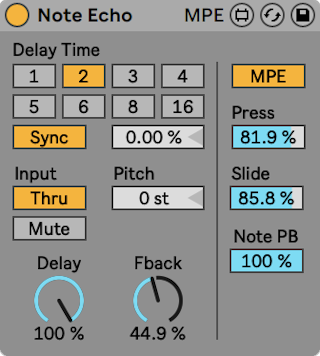
Note Echo is an echo delay effect that creates additional MIDI notes at specific time intervals with decreasing velocity.
Activate the Sync switch, which allows using the Delay Time beat division chooser. The numbered switches represent time delay in 16th notes. For example, selecting ”4” delays the signal by four 16th notes, which equals one beat (a quarter note) of delay.
Changing the Delay Time field percentage value shortens and extends delay times by fractional amounts, thus producing the ”swing” type of timing effect found in drum machines.
If the Sync switch is off, the delay time reverts to milliseconds. To edit the delay time, click and drag the Delay Time slider up or down, or click in the field and type in a value.
The Input switches lets you toggle between Thru/Mute playback modes. When Thru is active, both the MIDI note and echo are played back. When Mute is active, the MIDI note is muted and only the echo is audible.
Pitch sets the transposition amount applied to the note with each repeat of the echo.
Delay sets the amount of velocity applied to the echo. The Fback parameter defines how much of the channel’s output signal feeds back into the delay line’s input.
Switching on the MPE toggle allows incoming MPE data to be echoed alongside MIDI notes and velocity data. Otherwise, MPE data is filtered out.
With the MPE toggle switched on, the Press, Slide, and Note PB sliders become active and define the feedback amount for the pressure, slide and per-note pitch bend data respectively. Setting the feedback amount to lower than 100% will cause the echoed MPE data to progressively decay with each repetition.
28.3.6 Shaper MIDI
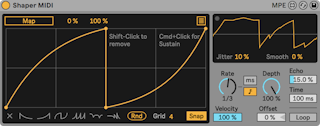
Like Shaper, Shaper MIDI uses multi-breakpoint envelopes to generate mappable modulation data. Shaper MIDI can also be triggered dynamically using MIDI notes/velocity.
Activate the Map switch and click on a parameter in Live to assign that parameter as a mapping target.
To assign an additional mapping target, click on the Multimap button at the top-right of the display. You can select any of the unassigned Map switches and click on another parameter in Live to assign it as a mapping target. A total of eight parameters can be assigned. To unassign a parameter, click on the button to the right of its Map switch.
For each modulated parameter, the Min and Max sliders let you scale the resulting output range after the modulation is applied.
You can create a breakpoint by clicking anywhere in the display. You can delete a breakpoint by Shift-clicking on it. Hold down the Alt (Win) / Option (Mac) key while dragging to create curved segments.
To clear the display, press the Clear button in the bottom left corner. To the right of the Clear button, you can choose from one of six breakpoint presets and one random breakpoint generator.
You can adjust the size of the grid via the Grid slider. When Snap is enabled, all breakpoints that you create or reposition will snap to grid lines.
The smaller display on the top right provides an oscilloscope-style view of the output signal. The Jitter slider adds randomness to the waveform, while the Smooth control smooths value changes.
The Rate control specifies the envelope modulation speed. The switches to the right of the Rate control toggle between frequency in Hertz and tempo-synced beat divisions.
Depth sets the overall intensity of the envelope modulation. The velocity sensitivity of the modulation depth can be adjusted using the Velocity control.
The Offset control adjusts the center point of the envelope output. At 0%, the output is centered. Positive values shift the output upward, while negative values shift it downward. The horizontal line in the oscilloscope display indicates the center and can be a helpful visual reference when adjusting Offset.
Echo adjusts the amount of the envelope echo, while the Time control sets the echo time in milliseconds.
Activating the Loop switch will loop the modulation envelope as long as a MIDI note is held.