2. First Steps
2.1 Learn About Live
Live comes with a set of interactive lessons to take you step by step through the key features of the program. The lessons are organized in a table of contents, which can be opened directly in the program via the Help menu. We highly recommend following the lessons. Many users have told us that the lessons helped them become familiar with the program very quickly.
We also recommend that you read the Live Concepts chapter, which encapsulates everything that Live is and can do, and is therefore a worthwhile read for both beginners and experienced users. The remaining chapters of this manual serve as in-depth reference for the material introduced in Live Concepts.
2.1.1 Using the Info View and Index
Live’s Info View displays the name and function of whatever you place the mouse over.
You can show or hide Info View by using the view control toggle in the bottom left corner of Live’s window or by using the ? key.
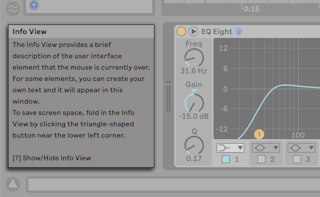
If you require more information on a specific user interface element or topic, please consult this reference manual. The index, found at the end of the manual, contains the names of all user interface elements and will lead you to the relevant section.
2.2 Setting up Preferences
Live’s Preferences window is where you can find various settings that determine how Live looks, behaves and interfaces with the outside world. This window is accessed from the Preferences command, which in Windows is available in the Options menu and in macOS is available in the Live menu. Preferences can also be accessed with the Ctrl, (Win) / Cmd, (Mac) shortcut.
Live’s Preferences are distributed over several tabs:
2.2.1 Look | Feel
In the Look/Feel tab, you can modify various settings related to Live’s appearance. This includes the language and behavior, and track and clip colors, and other display customization settings.
- The Language and Behavior section contains options for language, “Don’t Show Again” warnings, follow behavior for the Arrangement View and clips, user interface labels, scrub areas for the Arrangement View and clips, and pen tablet mode. On Windows, there are additional options to allow the system’s sleep mode, multiple instances of Live, and a HiDPI mode for high-resolution screens.
- The Track And Clip Colors section contains options for automatic track color assignments, clip color assignments, and a reduced color palette for those with certain color deficiencies.
- The Display Customization section contains options for the built-in color scheme, or “Theme” of Live’s interface, a global zoom slider, and other visual elements such as brightness, color intensity, color hue, and grid line intensity. On Windows, this section also includes a HiDPI mode for high resolution monitors.
2.2.2 Audio
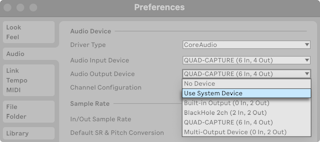
The Audio Preferences are used to set up Live’s audio connections with the outside world via an audio interface. This includes access to individual input/output devices, sample rate and latency settings, and a testing section for audio interface calibration.
On macOS, you can use the Use System Device option in the audio input/output choosers in Live’s Audio Preferences to set the input and output devices in Live to match what is selected in the macOS Sound System Preferences. This way, you can use the same devices for both Live and your operating system.
We suggest taking the time to follow the program’s built-in Setting up Audio I/O lesson, which will walk you through all the steps required to set up and optimize the settings for any given system. To access the lesson, use the Help View command from the Help menu.
2.2.3 Link | Tempo | MIDI
The Link/Tempo/MIDI Preferences are used to help Live recognize external devices for three separate and distinct purposes:
- Syncing the program with external devices, either via Ableton Link, Tempo Follower, or MIDI. Please see the Synchronizing with Link, Tempo Follower, and MIDI chapter for details.
- Playing MIDI notes. To learn how to route an external device into Live for MIDI input, or how to send MIDI to an external device, please see the Routing and I/O chapter.
- Controlling parts of the interface remotely. This subject is covered in detail in the MIDI and Key Remote Control chapter.
2.2.4 File | Folder
The File/Folder Preferences are used to configure settings related to data handling, custom Max for Live paths, and Live’s decoding cache.
2.2.5 Library
The Library Preferences allow you to specify a default location for various types of installed files, including Packs and your User Library, as well as whether or not samples and other files are self-contained when saving Sets.
2.2.6 Plug-Ins
The Plug-Ins Preferences allow you to set the location of plug-in folders, specify which folders you want Live to use, and modify the display behavior of plug-in windows.
2.2.7 Record | Warp | Launch
The Record/Warp/Launch Preferences allow customizing the default state for new Live Sets and their components, as well as selecting options for new recordings.
2.2.8 Licenses | Maintenance
The Licenses/Maintenance Preferences are used to manage authorization, automatic updates, and usage data.
2.3 The Main Live Screen
Most of your work in Live happens in the main Live screen. This screen consists of a number of views, and each view manages a specific aspect of your Live Set, which is the type of document that you create and work on in Live. If you have multiple monitors (or even one very large monitor), you can open a second window to display all of Live’s views at the same time.
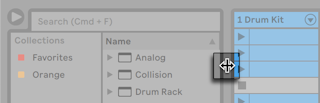
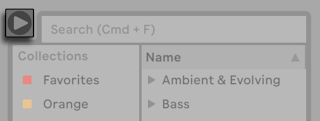
Each one of the selector buttons at the screen borders calls up a specific view; clicking this one, for instance, opens and closes Live’s browser:
You can run Live in Full Screen Mode by selecting the Full Screen command from the View menu. Full Screen Mode can also be toggled by pressing F11 (Win) / CtrlCmdF (Mac). On Windows and versions of OS X prior to 10.9, you can leave Full Screen mode by clicking a button that appears in the lower right corner of the screen.

When using OS X version 10.9 or higher, Live uses the operating system’s native full screen controls. You can turn Full Screen Mode on by clicking the arrows in the top right corner.
When in Full Screen Mode on OS X version 10.9 or higher, Live’s menus will appear when moving your mouse pointer to the top of the screen. You can turn Full Screen Mode off by clicking the arrows on the right side of the menu bar.
Enabling the Second Window option via CtrlShiftW (Win) / CmdShiftW (Mac) or in the View menu opens a second window that will display an alternate collection of Live’s views.
If Live’s browser is open, you can adjust the main window’s horizontal split by dragging.