38. Computer Audio Resources and Strategies
Real-time audio processing can be a demanding task for general-purpose computers, which are usually designed to run spreadsheets and surf the Internet. An application like Live requires a powerful CPU and a fast SSD. This chapter will provide some insight on how you can avoid and solve computer resource issues when using Live.
38.1 Managing the CPU Load
To output a continuous stream of sound through the audio hardware, Live has to perform a large number of calculations every second. If the processor can’t keep up with what needs to be calculated, the playback and recording of audio can have gaps or clicks.
Various factors can impact the overall CPU performance: - Clock speed — This affects how many instructions a CPU can perform each second, and is usually measured in GHz. - Architecture — This determines how efficiently a CPU executes instructions and interacts with other components of the computer. - Cache memory performance — This affects how quickly a CPU can retrieve data from memory. - System bus bandwidth — This determines the rate at which data travels through the system bus, which is the shared communication channel for the computer’s components. - Temperature — If the CPU overheats, it will use thermal throttling to slow down the processing rate.
Live requires a multi-core processor, which allows the processing load from things like instruments, effects, and I/O to be distributed across the computer’s available cores.
To read more about reducing the CPU load, see these guides for Mac and Windows.
38.1.1 The CPU Load Meter
The CPU meter in the Control Bar tracks the audio processing load within Live. To determine this load, Live calculates the time it needs to process one audio buffer. This value is then compared to the time it takes to actually play one audio buffer. For example, a value of 50% on the CPU meter means that Live is processing one audio buffer twice as fast as it takes to play the buffer. Values over 100% are possible if the calculation takes more time than it does to play one audio buffer.
Live expects that the audio thread will have the highest priority; however, the final prioritization of threads is done by the operating system, which means Live’s processing can get interrupted if other threads take precedence. This is why other applications can cause CPU spikes in Live’s CPU meter.
Note that the CPU meter takes into account only the load from processing audio, but not other tasks the computer performs, such as managing Live’s user interface.

The CPU meter can display the average or current (peak) CPU usage, or it can be switched off entirely. Use the triangle button at the right of the CPU meter to open its drop-down menu. You can also right-click the meter to access this menu.
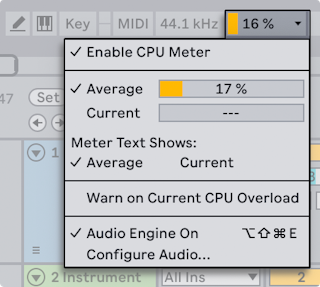
By default, Average is enabled, which means the meter shows the average percentage of the CPU currently processing audio, rather than the overall CPU load. You can enable the Current option to display the total current CPU usage.
When both are enabled, you can view the average and current CPU loads in the drop-down menu. In the CPU meter, the average load is shown in a lighter shade, while the current load is shown in a slightly darker shade of the same color (the actual color varies depending on which theme you are using).
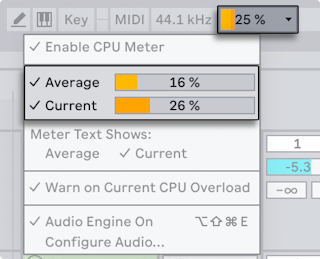
Note that only one percentage value from either the average or current level is shown at a time in the CPU meter. You can use the Meter Text Shows option to set which one is displayed.
CPU load warnings in the Overload indicator are switched off by default. You can enable them by selecting Warn on Current CPU Overload in the drop-down menu, or use the CPU Overload Indicator option in the Overload indicator’s context menu. The state of these options is shared, so enabling one also activates the other.
38.1.2 CPU Load from Multichannel Audio
One source of constant load on the CPU is the process of moving data between it and the audio hardware (built-in or external). This can be minimized by disabling any inputs and outputs not currently in use via the Input and Output Config buttons in Live’s Audio Settings.
Live does not automatically disable unused channels because the drivers for certain audio hardware can produce an audible glitch or disturbance whenever an audio configuration change is requested.
38.1.3 CPU Load from Tracks and Devices
Generally, every track and device used in a Set incurs some amount of CPU load. That being said, Live avoids wasting CPU cycles on tracks and devices that are not actively being used at any given time.
For example, dragging devices into a Set when playback is not running does not significantly increase the CPU load. The load only increases once you start playing clips or feed audio into effects. When there is no incoming audio, the effects are essentially deactivated until audio is passed through them. If the effect produces a tail, such as a reverb or delay, it isn’t internally deactivated until after all the corresponding calculations are completed.
While this behavior is useful for reducing the average CPU load of a Set, it cannot reduce the peak load. If you want to stress test a Set before, say, a live performance, you can play back a clip in every track simultaneously with all devices active. If the CPU meter’s Current level does not approach or exceed 100%, it is likely that the processing load will remain stable during the performance.
You can also see each track’s impact on the CPU load by enabling the Performance Impact indicators for the mixer. You can enable these via the Show/Hide Mixer Config menu at the bottom right of Live’s window or the Mixer Controls submenu within the View menu.
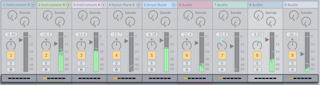
Every track has its own Performance Impact indicator with six rectangles that light up from left to right to represent the relative impact of that track on the CPU load. If you see a particular track with a significant impact, you can freeze it to reduce its processing load, or try deactivating some devices on the track to see how the impact is affected.
38.1.4 Track Freeze
Using the Freeze Track command can help in managing the CPU load incurred by devices and clip settings. This command works by creating a sample file for every Session and Arrangement clip on a selected track. Once the track is frozen, the clips play back the frozen sample files instead of repeatedly calculating their processor-intensive device and clip settings in real time.
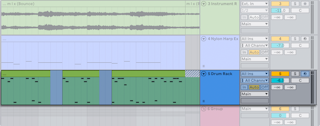
The Freeze Track command is available from the Edit menu and from the context menu of tracks and clips. You can also run the command for a selected track via the shortcut CtrlAltShiftF (Win) / CmdOptionShiftF (Mac).
Note that you can only freeze tracks that hold clips, so it is not possible to freeze a Group Track, a return track, or the Main track.
Normally, freezing happens very quickly. But if you freeze a track that contains an External Audio Effect or External Instrument that routes to a hardware effects device or synthesizer, the freezing process happens in real time. Live automatically detects if real-time freezing is necessary, and if so, you will be presented with several options for managing the process. Please see the section on real-time rendering for an explanation of these options.
Once a track is frozen, you will not be able to adjust any device or clip settings as the Device and Clip View areas also become frozen. If you want to change some settings, or if the processing load is no longer an issue, you can select the track and choose Unfreeze Track from the Edit menu or the track’s context menu.
If you know you no longer plan to make further edits to a track’s device or clip settings, you can use the Bounce Track in Place command to commit your changes to new audio clips and free up some processing. Note that while Group Tracks cannot be frozen, they can be bounced to audio, which can help reduce their CPU load.
Although it is not possible to change device and clip settings, many editing functions remain available to tracks that are frozen. Launching clips can still be done freely, and mixer controls such as volume, pan, and the sends are still available. You can also:
- Cut, copy, paste, duplicate, and trim clips.
- Draw and edit mixer automation and mixer clip envelopes.
- Consolidate clips.
- Record Session View clip launches into the Arrangement View.
- Create, move, and duplicate Session View scenes.
- Drag frozen MIDI clips into audio tracks.
When performing edits on frozen tracks that contain time-based effects, such as reverb or delay, it is possible that the audible result may be different once the track is unfrozen. This is because the applied effects on the track are not actively calculated at all, and therefore cannot change their response to reflect edited material. Once the track is unfrozen, all effects are recalculated in real time.

Frozen Arrangement tracks play back any relevant material that extends beyond the lengths of their clips, such as the tails from time-based effects. These frozen tails appear in the Arrangement as crosshatched regions located adjacent to their corresponding clips. They are treated by Live as separate, temporary clips that disappear once the track is unfrozen. When moving a frozen Arrangement clip, it is a good idea to select any corresponding tail as well so that the two pieces remain together once dragged.
For frozen Session clips, only two loop cycles are included in the frozen sample file. This means that frozen clips with unlinked clip envelopes that run longer than two cycles may play back differently than expected after the second cycle is reached.
Dragging a frozen clip to the drop area in the Session or Arrangement View creates a new frozen track containing that clip. If the dragged clip is partially selected in the Arrangement, the new frozen track will contain only the selected portion of the clip.
The samples created by the Freeze Track command are stored in the Current Project folder under /Samples/Processed/Freeze. If the Set has not yet been saved, the folder location will be specified by the Temporary Folder. Please note that freeze files for tracks that contain an External Instrument or External Audio Effect are discarded immediately when unfreezing.
Besides using the Freeze Track command to conserve CPU resources on tracks containing many devices, you can also use it when sharing Sets between computers. Computers that are a bit low on processing power can be used to run large Live Sets as long as any CPU-intensive tracks are frozen. This also means that computers lacking certain devices used in one Live Set can still play the Set when the relevant device tracks are frozen.
38.2 Managing the Disk Load
A disk’s read/write speed can affect Live’s performance. If the disk cannot read or write audio quickly enough, you may hear audio dropouts and see the Overload indicator flash.
The amount of disk traffic Live generates is roughly proportional to the number of audio channels being read or written simultaneously. For example, a track playing a stereo sample causes more disk traffic than a track playing a mono sample.
If you have several audio clips layered on different tracks, such as a set of vocal tracks, you can add them to a Group Track and then bounce that group in place. That way, you can combine the audio clips in the group into a single bounced file, which can reduce disk traffic.
Running audio clips in RAM Mode can also help reduce the disk load. In RAM Mode, Live loads the audio referenced by the clip into the computer’s memory rather than reading it from disk in real time.
You can find additional suggestions for avoiding disk overload in this knowledge base article.
38.3 The Overload Indicator
The Overload indicator in the Control Bar lights up whenever there is a current disk load issue, or a CPU issue if CPU warnings are enabled.

If the disk cannot read or write audio quickly enough, the indicator displays “Disk.”
By default, CPU warnings for the indicator are disabled, but you can turn them on via the Warn on Current CPU Overload option in the CPU meter’s drop-down menu or the CPU Overload Indicator option in the Overload indicator’s context menu. The state of these options is shared, so enabling one also activates the other. Once enabled, the Overload indicator displays “CPU” whenever the processor is overloaded.
Both disk and CPU load issues can cause audio dropouts or crackles during playback or when recording audio. See this troubleshooting guide for more details.