1. Introduction
Ableton Push is an expressive instrument for music-making that you can use to play and edit melodies, beats, and samples. With its standalone functionality, you can easily capture ideas both in and out of the studio. Push seamlessly fits alongside other Ableton products: you can transfer Sets between Push and Live, as well as access Sets from Move and Note via Ableton Cloud.
Push also functions as a flexible hub where you can control and record a wide range of acoustic and electronic instruments simultaneously. On stage, Push serves as a powerful instrument for real-time playing, step sequencing, and clip launching, with or without a computer.
You can use this manual to get familiar with Push’s fundamental workflows, or as a general reference for Push’s features and controls. There are also a number of Learn Push videos that can help you get started with the hardware.
1.1 What’s in the Box?
Push comes with a power supply, USB-C cable, getting started guide, safety and warranty information booklet, and decorative poster.
A copy of Live Intro is included with the hardware. You can also purchase Push bundled with Live Standard or Suite, or authorize an existing license in Standalone Mode. The Live edition you use determines which features you’ll have access to on Push.
1.2 Hardware Overview
This section contains an overview of Push’s controls and hardware connections.
You can also view the complete Tech Specs for Push on ableton.com.
1.2.1 Controls
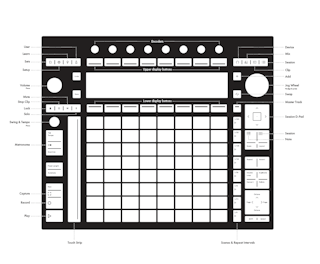
1.2.2 Connections

- Audio Output: 2 x 6.35 mm balanced audio outputs.
- Audio Input: 2 x 6.35 mm balanced audio inputs. You can switch between line (balanced) and instrument level (unbalanced).
- ADAT In and Out: Connect an ADAT extender to access an additional 8 inputs and outputs.
- MIDI In and Out: Connect MIDI devices via MIDI Type A 5-pin socket to 3.5 mm cables.
- USB-A: Connect MIDI controllers or class-compliant MIDI interfaces.
- External Power: Power and charge Push, DC 20V 3A.
- USB-C: Use Push as a control surface for Live.
- Dynamic Ports: Switch between pedal input and CV output. Up to four CV outputs are accessible with break-out cables.
- Headphones: 1 x stereo 6.35 mm output.
- Power Button: Press to turn Push on and off.
1.3 Push Configurations
Push comes in two configurations. The first configuration includes a processor, battery, and an SSD hard drive, which allows you to use Push as a standalone instrument. The second does not come with those components, so Push must be connected to a computer to make music using Live.
In terms of features, there is no difference between Push units with or without a processor, the only difference is that units with a processor can be used to make music without being connected to a computer.
You can purchase an upgrade kit from the Ableton webshop to convert a Push unit without a processor into a standalone instrument at any time.
For the sake of brevity, we will be referring to Push throughout this manual without making a distinction between standalone units and units without a processor unless explicitly necessary.
2. Setup
Push has two modes of operation: Standalone Mode and Control Mode. In Standalone Mode, Push can be used without a computer. In Control Mode, you can connect Push to a computer to use it as a control surface for Live.
To power on Push, plug in the included power supply and press the yellow button on the back of the hardware.
Push starts in Standalone Mode the first time it is powered on. A short onboarding tutorial will guide you through some of its features.
You can press and hold the power button for three seconds to turn Push off.
If you encounter any issues with the hardware, press and hold the power button for ten seconds to force Push to turn off.
2.1 Connecting Push to a Computer
Turn on Push and connect the hardware to your computer via the USB-C cable. When using Push in Control Mode, make sure the power supply is also connected to ensure maximum display brightness and prevent battery drainage. For more details, see the Push USB power FAQ.
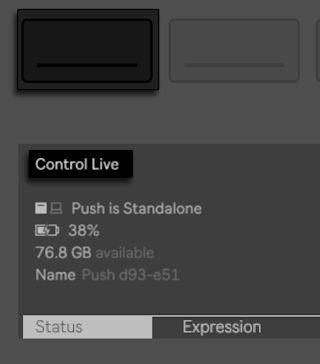
Press the Setup button to access the Status tab:
Here you can see whether Push is currently set to Standalone Mode or Control Mode. Press the Control Live display button to switch to Control Mode, then open Live on your computer if it isn’t already open.
Push will be automatically detected as a control surface in Live. Note that Push is supported for use with Live 11.3 or later.
2.2 Setup Menu
Use the Setup menu to configure various hardware settings, connect to Wi-Fi, update Push’s software, and more.
2.2.1 Status Tab

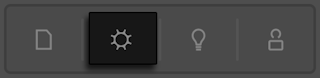
In the Status tab, you can switch between Standalone and Control Mode, adjust the display light and LED brightness, and enable Wi-Fi and Link.
Use the corresponding display button to use Push in Standalone or Control Mode.
Under the Standalone/Control Mode entry, you can see the current battery level. The battery icon updates to indicate when Push is charging.
The battery typically lasts for about 2.5 hours of use. When the battery level drops below 7%, a battery icon appears on Push’s display, regardless of which view is currently open. If the battery runs out while you are using Push, the current Set will be saved automatically and the hardware will shut down safely.
You can see the available amount of space left on the SSD for standalone units, as well as the unique name for your unit.
Display Light adjusts the brightness of Push’s display, while LED Brightness adjusts the brightness of the pads and buttons. The default (and recommended) setting for both controls is 100%.
Enabling Wi-Fi lets you use Push as a hotspot, connect with other Link-enabled devices, and download Packs and Push software updates without a computer. You can also transfer files between Push and a computer, and use Ableton Cloud to access synced Sets from Move and Note.
Use the corresponding upper display button to turn Wi-Fi on or off. When on, a list of available Wi-Fi networks appears. Use the first encoder to select one, and press the Connect display button to initiate the connection. You will then be prompted to enter the Wi-Fi password.
You can navigate through the available text characters using the jog wheel or Session D-pad. Press the jog wheel or the center button of the Session D-pad to select a character. Nudge the jog wheel right or left to move the cursor. Use the Delete display button and the Space display button to delete characters and insert spaces as needed. Press the Done display button once you have finished entering the password. Alternatively, you can press the X display button to return to the Status tab without entering the password.
Once the Wi-Fi connection is established, the network name is highlighted in green. As long as Wi-Fi is enabled, Push will reconnect to the selected network automatically whenever the hardware is powered on.
To forget a connected Wi-Fi network, hold the Shift button; this causes the Connect option to change to Forget.
Enable the Hotspot On option to create a Wi-Fi network from Push. You can then connect your computer to the hotspot to transfer files or use Push as a stable Link hub.
When the hotspot is enabled, Push creates a network and generates a password. On the device you want to connect, select the network and enter the password. Once connected, you can transfer files to and from Live and use Link. Note that while using Push as a hotspot, you will not be able to access the internet on the connected device.
Use the rightmost encoder to turn Link on or off. When on, Push will stay in time with other Link-enabled devices. Press the corresponding display button to enable Play Sync. This synchronizes both the playback position and the tempo. Start and stop commands triggered from other Link-enabled devices will cause the playback on Push to start or stop at the corresponding point in time.
2.2.2 Expression Tab

You can configure how Push’s pads respond to per-note pitch bend messages and choose from three Expression Modes: MPE, Poly Aftertouch, and Mono Aftertouch.
By default, the Expression Mode is set to MPE, which includes the following options:
Note Pitch Bend — Per-note pitch bend is automatically enabled for Live devices that support it. For devices that do not, sliding your finger horizontally on a pad will retrigger notes (i.e., glissando) by default. You can customize this behavior using the corresponding encoder. When set to On, per-note pitch bend is always enabled. When set to Off, it is always disabled.
In Tune Location – Determines how pitch bend is initiated when the pad is touched. When set to Finger, the location where you first place your finger on the pad has zero pitch bend, and sliding horizontally causes the pitch to bend. When set to Pad, the center of the pad always has zero pitch bend, and placing your finger elsewhere immediately bends the pitch based on the distance from center.
In Tune Width – Determines how quickly pitch bend changes happen when moving a finger horizontally on the pad. The available width range is from 0 mm to 20 mm. When set to a small width, such as 3 mm, pitch bend changes occur faster as you move your finger across the pad. A larger width, such as 15 mm, causes the pitch to bend more gradually.
Slide Height – Sets the vertical range for the pads anywhere between 10 mm to 16 mm.
Set the Expression Mode to Poly Aftertouch if you only want to send aftertouch messages for each note; this means that varying finger pressure is registered for each pad. Alternatively, you can use Mono Aftertouch if you want all notes to respond to the same finger pressure.
2.2.3 Sensitivity Tab

Adjusting the sensitivity settings for incoming note velocity lets you specify how the pads respond to different finger pressures. The following parameters can be configured using the corresponding encoders:
Threshold — Determines how much force is needed to trigger a pad. At low values, a lighter touch triggers the pad, while higher values require more force.
Drive — Pushes all values in the velocity curve to the outer extremes. High values produce higher velocities more quickly. Low values make it harder to reach high velocities without pressing the pads forcefully.
Compand — Simultaneously expands and compresses note velocity. Positive values push incoming velocities to the outer boundaries of the curve, shifting them to the higher and lower extremes of the overall range. Negative values constrain velocities to the mid-range.
Range — Sets the overall range of how much force is required for a pad to reach full note velocity. The other parameters work relatively within the specified range.
The Drive and Compand parameters can be used to create more complex velocity curves, which can be useful for different playing styles.
You can press the Reset display button to return all parameters to their default values.
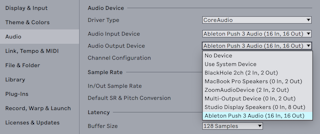
2.2.4 Audio Tab

Various settings are available for Push’s built-in audio interface and ADAT expansion.
You can select a sample rate between 44,100 and 96,000 Hz, as well as a buffer size between 128 and 2048 samples.
The buffer size affects the overall amount of latency. Smaller values result in lower latency, while larger values increase it. The default setting is 128, which is also the recommended size for most scenarios. If you experience audio dropouts or crackles, try using a higher buffer size to resolve the issue, but keep in mind this will also introduce additional latency.
For each audio input, you can choose from three preamp types:
- Line — Balanced, with +4 dBu nominal, +18 dBu maximum, and a 0 dB signal path gain.
- Instrument — Unbalanced, with -2 dBu nominal, +12 dBu maximum, a +6 dB signal path gain, and high input impedance (Hi-Z).
- High — Unbalanced, with -22 dBu nominal, -8 dBu maximum, and a +26 dB signal path gain.
The incoming audio level for each input is displayed in the meter next to its preamp type.
Note that recorded audio files have a bit depth of 24-bit and use the WAV file format.
By default, the Main track uses outputs 1 and 2 for the Main output and Cue Out, which are routed to both your headphones and speakers. You can use the Outputs encoder to change how the digital outputs in Live are routed to Push’s analog outputs. This lets you access outputs 3 and 4 for cueing or create an external effects loop. All of Push’s line outputs are balanced.
Use the rightmost encoder to select the clock source: Internal or ADAT In. Choose ADAT In to synchronize Push to the clock from a connected device via ADAT.
Check out this Knowledge Base article to view the complete technical specifications of Push’s audio interface.
2.2.5 MIDI Tab

You can connect class-compliant MIDI devices to Push’s USB-A port, or use the MIDI In and Out ports to send or receive MIDI to and from external hardware.
Once connected, you can configure the available settings for each MIDI port:
Input
- Track — Allows Push to receive MIDI notes and CC messages. You can, for example, play notes on an external keyboard to trigger instruments on Push.
- Sync — Allows Push to receive MIDI clock. Use this to synchronize Push’s tempo and transport with an external drum machine or synthesizer.
- Remote — Enables incoming MIDI control from external devices. This lets you adjust parameters on Push using custom MIDI mappings from a controller.
Output
- Track — Allows Push to send MIDI notes and CC messages. This lets you use Push’s pads or clips to trigger notes on external devices.
- Sync — Allows Push to send MIDI clock. Use this to synchronize the tempo and transport of an external drum machine or synthesizer with Push.
- Remote — Enables Push to send feedback to connected devices. You can, for example, update LEDs or motorized faders on supported controllers.
Push’s MIDI In and Out ports are pre-configured to receive and send out MIDI notes. If you are using a MIDI device via the USB-A port, make sure that Track is enabled for Input to send MIDI from your device to Push. If you want to send MIDI to your device from Push, make sure that Track is enabled for Output. Enabling both Input and Output for Track simultaneously may result in a MIDI feedback loop. If you want to activate both, it’s recommended to try this setup first in a test project to assess any potential issues.
When Sync is enabled for the input of a MIDI port, you can activate External Sync to synchronize Push with a connected device. Adjust the Sync Delay amount to compensate for any timing issues between the devices.
Note that natively supported control surfaces for Live are recognized by Push in Standalone Mode.
2.2.6 Pedals & CV Tab

Push’s Pedal 1 and 2 jacks can be configured for use with footswitch pedals or as CV outputs.
In addition to sending trigger and sustain messages, the Pedal jacks can also output CV, Trigger, Clock, and Gate signals to modular gear. To do this, set each Pedal jack to CV Out using the corresponding encoders.
Each Pedal jack is stereo and can be used with a male TRS to dual female TS splitter cable to access a total of four CV outputs. Some ADAT extenders can also be used for CV output.
The voltage range is 0-10 V, the effective resolution is 12 bits, and the frequency range is DC-20kHz.
When using CV Out, Pedal 1 represents outputs 5 and 6 on Push, while Pedal 2 represents outputs 7 and 8.
2.2.7 Preferences

You can customize how your projects are set up with specific Set workflows and track behaviors.
Workflow determines how scenes and clips behave when pressing the Duplicate and New buttons or using the up and down arrows on the Session D-pad. There are two available options: Scene and Clip.
Which option you choose depends on how you like to organize your musical ideas. In Scene Workflow (which is the default), musical ideas are organized and navigated in scenes. In Clip Workflow, only the currently selected clip is in focus.
In Scene Workflow:
Duplicate creates a new scene containing all the currently playing clips, and seamlessly switches to playing them back. This is the same behavior as the Capture and Insert Scene command in Live’s Create menu.
New also creates a new scene that contains all the currently playing clips, except for the clip in the selected track. Instead, an empty clip slot is prepared in that track, allowing you to create a new idea.
The up and down arrows move up or down by a single scene. Pressing the center button of the Session D-pad triggers the selected scene. Hold Shift and press the center button of the Session D-pad to trigger the selected clip.
In Clip Workflow:
Duplicate creates a copy of the currently selected clip in the next clip slot, while continuing playback of any currently playing clips in other tracks. You can hold Shift while pressing Duplicate to create a new scene containing all the currently playing clips.
New prepares an empty clip slot on the currently selected track. Clips in other tracks are not affected.
The up and down arrows move up or down by a single scene. Pressing the center button of the Session D-pad triggers the selected clip. Clips in other tracks are not affected. Hold Shift and press the center button of the Session D-pad to trigger the selected scene.
The Exclusive Arm and Exclusive Solo options determine whether multiple tracks can be armed or soloed simultaneously. By default, both options are set to On, meaning that only one track can be armed or soloed at a time. Use the corresponding encoders to switch these options to Off if you want to arm or solo multiple tracks.
The Select on Launch option determines whether a track is automatically selected when its clips are launched.
2.2.8 Software Tab

In the Software tab, you can authorize your Live license on standalone units, enable usage data sharing, update Push’s software, download crash reports, and reset the hardware to its factory settings.
2.2.8.1 Authorizing Your Live License on Push
You can authorize any Live license that you own to use on Push in Standalone Mode. To do so, press the Authorize display button to open a dialog with the following URL: http://push.local/authorize
Enter this URL into a browser on your computer or phone, making sure the device is connected to the same Wi-Fi network as Push.
A six-digit code will appear on Push’s display. Enter this code on the web page and click Authorize.
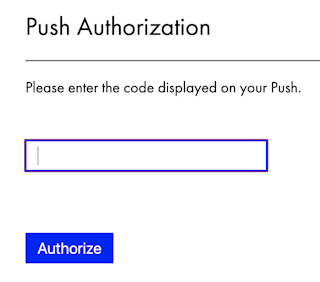
You will be redirected to ableton.com, where you can sign in to your User Account and select the Live license you want to authorize.
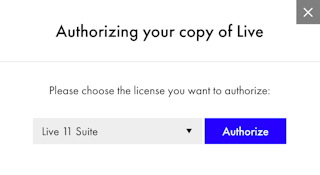
If you select a Live Standard or Suite license, the hardware may need to restart in order to complete the authorization.
Once authorized, the updated Live license and associated User Account are shown in the Software tab. You can then access all the features that are a part of your license, as well as download any of its included Packs.
You can authorize a different Live license at any time by following the same steps as needed.
Using your Live license on Push is included as part of the End User License Agreement. This means that authorizing Live on Push does not use any additional unlocks from the license’s authorization allowance.
2.2.8.2 Send Usage Data
When this option is enabled, crash reports (from standalone use only) and statistics data are sent to Ableton. This data is anonymous and does not contain any personal information regarding your license or User Account.
Note that the Send Usage Data toggle is not shown in the Software tab when using Push with beta versions of Live.
2.2.8.3 Updating Push’s Software
Standalone units run on a dedicated software, which is periodically updated with new features and improvements. This software also includes the firmware for the hardware.
When a new software update is available, an asterisk is added to the Software tab. You can press the Update display button to download and install the latest version. Make sure the power supply is connected when updating.
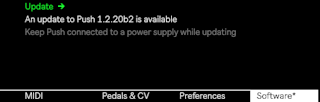
A progress bar is displayed while the update is installing. If needed, you can cancel the process before it completes using the highlighted display button on the right. Once the installation is complete, the hardware will restart to apply the changes.
2.2.8.4 Advanced Options
You can access a few advanced options in the Software tab by holding down the Shift button.

Press the Legal Info display button to open a dialog with the following URL: http://push.local/legal
Enter this URL into a browser on your computer or phone, making sure the device is connected to the same Wi-Fi network as Push, to view two legal documents: Third Party Licensing Information, and End User License Agreement and Third Party URLs and Logos.
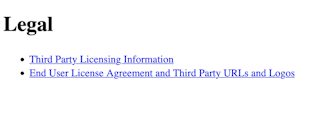
These documents are for reference only and do not need to be downloaded or saved.
Press the Crash Info display button to open a dialog with the following URL: http://push.local/crash
Enter this URL into a browser on your computer or phone, making sure the device is connected to the same Wi-Fi network as Push, to download crash reports generated in Standalone Mode.
After opening the URL, a six-digit code appears on Push’s display. Enter this code on the web page to initiate the download. The downloaded zip folder includes the most recently generated crash reports.
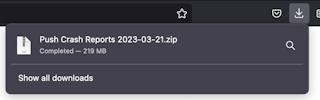
You can then send the crash reports to Ableton Technical Support for troubleshooting.
Press the Reset Push display button to restore Push to its default factory settings. Your user data, Sets, and Live authorization will be removed. This process can take some time, so make sure the power supply is connected before resetting.
3. Connectivity
Push has been designed with connectivity in mind. With a built-in audio interface, various hardware connections, plus Link synchronization and Ableton Cloud integration, Push is a central hub for your entire music-making setup.
3.1 Audio Connectivity
Push has a built-in audio interface that can also be used with Live.
Connect Push to your computer using the USB-C cable and open Live’s Audio Settings. You can then select Push as an input or output device.
3.1.1 Connecting Speakers and Headphones
You can connect your studio monitors to Push using the Out 1 and 2 ports. Use Out 1 for the left speaker and Out 2 for the right.
Connect your headphones to the Headphones port.
Both Out ports and the Headphones port are 6.3 mm.
3.1.2 Adjusting Volume
You can adjust the main output (Out 1 and 2), headphones output, Main track, and Cue volume using the Volume encoder to the left of Push’s display. When Push is first switched on, the volume of the main output is selected by default.
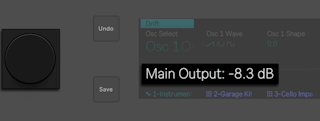
You can cycle through the other volume options by pressing the encoder. You can tap the Volume encoder to see which volume option it is currently set to. Hold the Shift button and then turn the Volume encoder to adjust the volume in smaller increments.
3.2 Hardware Connectivity
Push offers various hardware port connections so you can easily hook up and use your favorite gear alongside it.
3.2.1 Connecting MIDI Devices
You can connect class-compliant MIDI devices to the USB-A port, or connect MIDI Type A 5-pin socket to 3.5 mm cables to the MIDI In and Out ports.
3.2.2 Connecting Pedals and CV Out
You can use the Pedal 1 and 2 ports to connect footswitch pedals to Push. These ports can also be used to send CV data out to modular gear.
Pedal 1 gives you hands-free control of Push’s recording functionality. A single tap of the footswitch will toggle the Record button, thus switching between recording/overdubbing and playback of the current clip. Quickly double-tapping the footswitch is the same as pressing the New button. Pedal 2 acts as a sustain pedal.
Note that certain footswitches may behave “backwards”; for example, notes may sustain only when the pedal is not depressed. Footswitch polarity can usually be corrected by connecting the footswitch to the port while depressing it, but we recommend using footswitches with a physical polarity switch.
Each Pedal jack is stereo and can be used with a male TRS to dual female TS splitter cable to access a total of four CV outputs.
When using CV, Pedal 1 represents outputs 5 and 6 on Push, while Pedal 2 represents outputs 7 and 8.
3.2.3 Connecting ADAT
Audio interfaces and extenders that support ADAT can be connected to the optical ports. This allows you to add 8 additional inputs and outputs, so you can record more than two audio sources simultaneously, set up multi-channel audio installations and more.
When using ADAT, you can access input and output channels 9-16 in the Track Mix Mode settings.
3.3 Using Link on Push
Ableton Link is a technology that keeps devices in time over a wired or wireless network. It’s built into all Ableton products, as well as a growing number of third-party apps and hardware devices.
To use Link on Push, make sure that your unit is connected to the same network as any other devices that you want to sync with. This can either be a local network, Push’s hotspot, or an ad-hoc (computer-to-computer) connection. Then enable the Link option in the Status tab of the Setup menu. You can also activate Play Sync if you want to synchronize both the playback position and the tempo.

The first device to join a Link session sets the initial tempo for all the others. After that, any participant can adjust the tempo and the rest will follow. If multiple participants attempt to change the tempo simultaneously, each device will try to follow in real time, but the last registered tempo change will determine the updated BPM.
When Play Sync is enabled, participants can start or stop the transport on their devices to affect the playback position for all the others.
Note that the metronome’s recording count-in cannot be used when Link is enabled.
Link generally works without issues as soon as it’s enabled and provides reliable synchronization in most scenarios. If you run into any problems, check out this Link Troubleshooting FAQ.
3.4 Activating Ableton Cloud on Push
When Ableton Cloud is enabled, you can access synced Sets from Move and Note directly on Push in Standalone Mode.
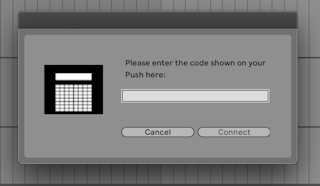
To activate Cloud, open a web browser on a computer connected to the same Wi-Fi network as Push and go to http://push.local/cloud. Enter the code that appears on Push’s display and click Authorize Ableton Cloud.
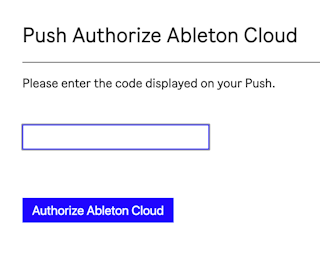
You will then be prompted to log into your ableton.com account and accept the Ableton Cloud Terms of Service and Privacy Policy.
Once Cloud is enabled, any synced Move and Note Sets will appear in the Cloud label within the Set Library.

Note that Sets can be synced from Move or Note to Push but not the other way around. After you make changes to a synced Set and press the Save button on Push, the Set is saved locally in the Set Library under a new name.
When using Push in Control Mode, Ableton Cloud can be activated via the Cloud label in Live’s browser.
4. Building A Live Set
You can create an entire Set, from adding tracks and devices to setting the tempo and meter, directly on the hardware.
4.1 Using the Browser
To add tracks or browse and load devices, press the Add button at the right of the display to enter Browse Mode.

In the display, you will see a menu for adding devices and tracks. You can then use the jog wheel or Session D-pad to navigate through menus and make selections.

If you select Device, you will see all of the available content in your license, including Pack content, your User Library, and the Current Project folder (which will contain any recorded samples that are in the Set).

You can navigate each menu using the jog wheel or Session D-pad. To select a device, press the jog wheel or the center button of the Session D-pad. When navigating in a submenu, you can nudge the jog wheel to the left to get back to the previous menu.
Selecting MIDI, Audio, or Return Track lets you add a default track or browse the sounds and devices that are available for each type of track.

In a Track menu, you can use the same navigation options mentioned above: use the jog wheel or Session D-pad to navigate and select devices and use the jog wheel to navigate between menus and submenus.
As you navigate through submenus, you can also use the leftmost encoder to switch between previous submenus.

You can leave Browse Mode by pressing the display button above the X on the left side of the display.
By default, sound preview for devices is switched off, but you can enable this by pressing the second upper display button from the left.

When Preview is enabled, you will hear a sound snippet of devices from the Core Library and official Live Packs as you scroll through the list of presets.
4.1.1 Collections
As in Live, you can organize presets, samples, and Sets in different labels by using the Collections library on Push.
You can press the display button above Favorites to add or remove highlighted devices to the Favorites label.

To access the other Collection labels, use the encoder above the Favorites display button.

You can view all of the Collections labels in the Devices menu.


4.2 Working with Devices and Tracks
Select a device in Browse Mode using the jog wheel or Session D-pad and add it to a track.

Press the display button above the device’s name to view all of the available parameter tabs for that device.

You can then access the individual tabs using the corresponding lower display buttons.
To add additional devices to the track, press the Add button again to go back to Browse Mode. On MIDI tracks, MIDI effects will be inserted before an instrument or Instrument/Drum Rack and audio effects after. On Audio tracks, you can only add audio effects.
To delete a device, hold the Delete button and press the display button above the device’s name.
You can mute a device by holding the Mute button and then pressing the display button above the device’s name. This can be helpful if you want to mute a specific device without muting the entire track. When a device is muted, its parameters will be grayed out in the display. To unmute a device, hold Mute and press the display button above its name again.

To move a MIDI or audio effect to a different position in the track’s chain of devices, press and hold the display button above the effect’s name then use any of the encoders to move the device to a new position and release the display button.

4.2.1 Hot-Swap Mode
To switch out devices on a track, press the Swap button to enter Hot-Swap Mode.

In the display, what you will see depends on which browser category the original device came from. For example, if the selected device is a Drift bass preset, the folder for Drift’s bass presets will be shown.
As in Browse Mode, you can use the jog wheel or Session D-pad to navigate through and select devices. Unlike Browse Mode, however, selecting a device does not automatically close Swap Mode and go back to the Device View. This means you can continue selecting and trying out sounds until you find what you’re looking for.In addition to using the jog wheel and Session D-pad, you can also use the Load Next and Load Previous buttons to automatically switch between devices without having to individually select them first.
When a device is selected in Hot-Swap Mode, you can play the pads to test out the new sounds. You can also enable Preview to hear a sound snippet of each device as you scroll through the list of presets.
When selecting a new device or using the Load Next or Load Previous buttons, the device is automatically added to the track, replacing the original one. To add the original device back to the track, you can select it from the device menu again.
To exit Hot-Swap Mode, press the Swap button again or the display button above the device name.
4.2.2 Track Options
You can access additional track options by holding Shift and then pressing the display button under the track name.

Use the corresponding lower display buttons to select an option. Rename lets you rename the track.
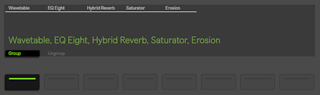
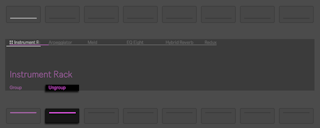
To group tracks, hold the Shift button and press the lower display button for each track you want to include, then press the Group display button.
You can use the Freeze option to save on CPU resources for intensive tracks. When a track is frozen, a sample file is created for each clip in the track, and these files are used during playback instead of recalculating the track’s device and clip settings in real time.
Flatten replaces any original clips and devices on the track with the sample files that are created by freezing. It is important to keep in mind that what you hear after freezing a track is exactly what you will get when flattening, so if you still want to change any of the device parameters, make sure to do so before using the Flatten option.
You can also select a new color for the track by choosing from the available colors on the pads.

4.3 Working with Racks
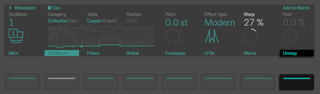
A Rack is a flexible tool for combining different instruments and effects. You can use Racks to create parallel device chains on a single track. This lets you build dynamic instruments with unique processing for each element. You can also assign key parameters from all devices in a Rack to its macros. This makes it easy to tweak and automate them using the Rack’s parameter banks.
There are three types of Racks, each suited for a specific purpose:
Instrument Racks can contain a single set of devices or several parallel chains. Each chain receives the input signal at the same time, then processes it serially from left to right through its own devices. Use Instrument Racks to build layered presets.
Drum Racks provide parallel chains arranged as pads. Each pad is assigned to a specific MIDI note and responds only to input from that note. Pads can also be added to one of sixteen choke groups. Use Drum Racks to trigger individual drum hits or instruments.
Effect Racks are available for both MIDI and audio effects: MIDI Effect Racks can be placed on MIDI tracks, while Audio Effect Racks can be used with MIDI and audio tracks. Use Effect Racks to create complex processing chains.
Instrument and Drum Racks can contain any device, including other Racks. Their signal paths are arranged in this order: MIDI effects → instruments → audio effects. Effect Racks can contain MIDI effects, audio effects, or other Effect Racks of the same type.
You can load Racks onto tracks from their respective categories in the browser. To group existing devices on a track into an Instrument or Effect Rack, hold the Shift button and press the upper display buttons for the devices you want to include, then press the Group display button.
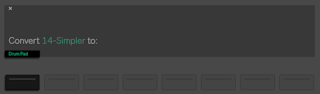
To group all devices on a track into a Drum Rack, press the Convert button, then press the Drum Pad display button.
On Push’s display, Racks have special icons that distinguish them from individual devices.


To expand an Instrument or Effect Rack and reveal its devices, press its upper display button. This unfolds the Rack and displays the currently selected chain. When a Rack is unfolded, an underline appears on the display that extends to the end of the enclosed devices.

You can expand a Drum Rack to reveal the individual devices for each pad by pressing its lower display button.

Press a Drum Rack pad’s lower display button to access its specific parameters, then use the encoders to adjust them.
If a Rack contains multiple device chains, you can hold its upper display button to access all of them. Use a chain’s lower display button to select it and view its parameters.
To remove a Rack from a set of devices, hold Shift and press its upper display button, then press the Ungroup display button.
4.3.1 Using Macros
Each Rack includes a set of macros — these are customizable controls with no fixed device mappings. You can assign parameters from any device in the Rack to its macros. Mapped parameters can be adjusted or automated using the Rack’s parameter banks. Macros provide a versatile way to shape your presets.

Once you have some macros set up for a Rack, you can expand their creative uses with unique variations and randomization.
4.3.1.1 Mapping Macros
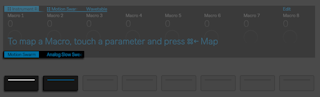
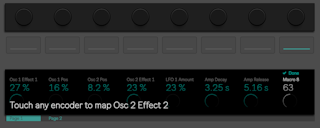
To map a parameter to a macro, tap the encoder for the parameter you want to assign, then press the Map display button to enter Macro Map mode.
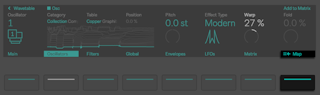
Touch an encoder to map the parameter to the corresponding macro.
To map a device activator or other toggle-based control, hold its corresponding upper display button to bring up the Map option.
You can also map multiple parameters to the same macro. To do so, touch the encoder for a macro with an existing assignment when creating a new mapping in Macro Map mode. Mapping several parameters to a macro lets you adjust them simultaneously with one encoder.
When a single parameter is mapped to a macro, the macro uses the parameter’s name. When several parameters are mapped to the same macro, the default macro name is used, e.g., Macro 1.
Macros can be renamed via the editing options as needed.
For macros with multiple mapped parameters, the Min and Max values revert to 0–127 unless all parameters share the same value type and range.
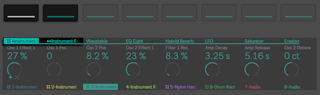
You can map up to sixteen macros. In Macro Map mode, the first eight macros are shown in the Page 1 parameter bank, and the remaining eight appear on Page 2. Use the lower display buttons to switch between banks.
Press the Done display button to exit Macro Map mode and return to the Device View.
In the Device View, you can toggle between parameter banks using the Rack display buttons. One circle icon before the Rack’s name indicates the first bank, and two circles indicate the second.
To remove a parameter from a macro in the Device View, touch its encoder, then press the Unmap display button.
4.3.1.2 Editing Macro Assignments
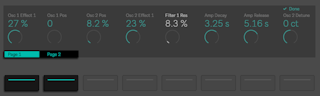
Once macros are mapped, you can edit them. To do so, touch the encoder for the macro you want to change, then press the Edit display button.
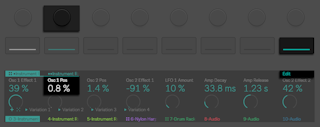

Use the first encoder to switch between all macros. The mapped parameter for the selected macro is shown under Macro Mappings. If a macro has multiple mappings, all are shown.
You can adjust the macro’s value using the third encoder and update its name via the Rename display button.
To remove the assignment for the selected macro, press the Delete Map display button.
Min and Max set the overall range for the macro’s values. By default, the lowest and highest possible values are used, but you can adjust these to constrain parameter changes to a specific range.
Press the Done display button to return to the Device View.
4.3.1.3 Randomizing Macros
If you want to quickly try out different combinations of parameter values to find something new or surprising, you can randomize macros. To do so, use the jog wheel to select the Randomize Macros option in a Rack’s parameter bank, then press the jog wheel to generate new values for all mapped controls.

If needed, you can press the Undo button to revert the macro values back to their previous state.
4.3.1.4 Macro Variations
You can store a snapshot of the parameter values for all macros as a variation. This is useful for saving and recalling specific device states. For example, you can set up several variations using different dry/wet levels for mapped audio effects to create new tonal characteristics for the same instrument.
In a Rack’s parameter bank, use the jog wheel to select the Add Variation option, then press the jog wheel to create a snapshot of the current macro values. This adds the variation to the parameter bank.

You can create multiple variations, each with its own set of parameter values, and use the jog wheel to select them. You can also randomize macros to generate new parameter values, then store them as additional variations. This is an easy way to design subtle sonic changes for presets.

Selecting a variation and then nudging the jog wheel to the right brings up a few editing options. You can rename, delete, or overwrite the variation as needed.

4.4 Tempo and Meter
You can use the Swing and Tempo encoder to adjust the swing amount and tempo for your Set.

You can tap the encoder to see if it is currently set to Swing or Tempo, then press the encoder to change between Swing and Tempo. When Tempo is selected, turning the encoder adjusts the tempo in increments of one BPM. Hold Shift and turn the encoder to shift the tempo in increments of .1 BPM.
When Swing is selected, turning the encoder sets the swing amount for quantized or repeated notes using 1% increments anywhere between 0% - 100%.


You can also set the tempo by repeatedly pressing the Tap Tempo button at your desired tempo.

Press and hold the Metronome button to access the metronome and time signature settings for your Set.


You can choose the count-in length for the metronome using the corresponding encoder. The sound of the metronome can be set to Classic, Click, or Wood.
The Rhythm parameter sets the beat division at which the metronome ticks. When set to Auto (the default), the tick interval follows the time signature’s denominator.
To set the time signature for the Set, use the two corresponding encoders.
5. Managing Sets, Projects, Presets, and Packs
In Standalone Mode you can create, save, view, or open Sets, as well as transfer Sets to Live and vice versa for a seamless workflow in or out of the studio. You can also download Packs and save presets to your User Library when in Standalone Mode.
5.1 Working with Sets and Projects
The type of document that you create and work on when using Push is called a Live Set. You can think of this as a single song or project. Live Sets are saved inside Project folders, along with all of the various components of the Set: clips, device presets, samples, etc.
When you first turn on Push, a new empty Set will be loaded by default.
You can also create a new Set by pressing the Sets button, and then pressing the display button above + New Set.

Alternatively, you can hold the Session button underneath the Session D-pad and then press the New button to create a new Set.

5.1.1 Saving Sets
Press the Save button to save the current Set directly to Push’s hard drive when in Standalone Mode.

When you save a new Live Set, a Project folder is created that contains the Set and any referenced user samples. The Set/Project folder will be named automatically. Note that you can rename your Sets and Projects as needed.
Note: Push does not collect samples from Ableton Packs or the Core Library. When opening Sets in Live that were created on Push, make sure that you have the same Pack and Live content installed on whichever computer you are using.
5.1.2 Save a Set as a New Version
To save a new Set inside of the Project folder where your current Set is located, hold the Shift button and press Save. This allows you to create new variations of a Set, without taking up much space on Push’s hard drive, as the samples will only be stored in one Project folder for all variations.

5.1.3 Save a Set as a New Project
To save your Set in a new Project folder, hold the Duplicate button and press Save. This can be useful when you want to use your current work as a starting point for a new piece, or for separating tracks from one Set into another. All of the referenced samples and recording will be copied into the new Project folder.

5.1.4 Viewing and Opening Sets
Press the Sets button to access your saved Sets from Standalone Mode. Note that if you are in Control Mode, you will see recently opened Sets from Live and any demo Sets included in Packs when you press this button.

You can navigate through Sets in the same way as navigating devices when in Browse Mode.

You can scroll through Sets using the jog wheel, or navigate through them one at a time via the Session D-pad.

Highlight the Set you would like to open and press the jog wheel or the center button of the Session D-pad to load it.
5.1.5 Sorting Sets
By default, the most recently modified Set is shown at the top of the list. Use the third encoder to switch between sorting the Sets by date or name, and press the display button directly under the encoder to switch between ascending and descending sorting.

5.2 Saving Device Presets
You can save any custom presets to your User Library on Push to easily access them again in other Sets.
Press the Device button to enter Device View.

Hold the Save button and press the display button above a device or Rack to save it as a preset in your User Library.

Presets are automatically named after the device that was used to create them, and saved in the same folder category as the original device. Any successive presets created in the same device have an additional “-1” suffix added to their name.
To access your User Library on Push:
- Press the Add button at the right of the display to enter Browse Mode.
- In the display, you will see the option to add devices and tracks. Press the jog wheel or the center button of the Session D-pad to select Device.
- Use the jog wheel or Session D-pad to navigate to the User Library.

- Press the jog wheel or the center button of the Session D-pad to select the User Library.

5.3 Deleting and Renaming Content
Content that you create and store on Push can be deleted or renamed.
Highlight the device or Set you would like to modify in Browse Mode or the Set Library, and then nudge the jog wheel to the right to show that item’s context menu. Turn the jog wheel to highlight either the Delete or Rename option, and press the jog wheel to select it. You can exit the menu by pressing the display button above the X shown in the upper left corner of the display.

When you select Delete, you can either delete the file permanently by pressing the jog wheel, or cancel the process by pressing the display button above the X shown in the upper left corner of the display.

When you select Rename, you can navigate through the available text characters using the jog wheel or Session D-pad. Press the jog wheel or the center button of the Session D-pad to select the characters. You can nudge the jog wheel right or left to move the cursor. You can press the display button above X to leave the renaming text entry screen, or press the display button above Delete or the display button below Space to edit the text entry. Press the display button above Done when you have finished renaming the file.

5.4 Installing and Managing Packs
You can download and install any Live Packs that are part of your Live license to use in Standalone Mode. First make sure that you are connected to a Wi-Fi network; see the Wi-Fi section of the Setup chapter for more details.
5.4.1 Installing Packs
To quickly access your Packs, press the Add Button and then press the upper display button above Packs.

You will then see a list of all Packs that are currently installed on Push, as well as any additional Packs that can be downloaded. To install a Pack, first use the jog wheel or Session D-pad to navigate to and select Available Packs.

The Available Packs page shows you all Packs that are included as part of your authorized Live license.

To download a Pack, select it with the jog wheel or Session D-pad. While it’s downloading, you can press the jog wheel or Session D-pad again to pause the download if needed.
Once a Pack has been downloaded, you can install it by pressing the jog wheel or the center button of the Session D-pad again. You can cancel the installation by pressing the display button below the Cancel option shown in the lower right corner of the display.
5.4.2 Managing Packs
To delete an uninstalled or paused Pack download, highlight it with the jog wheel, then nudge the jog wheel to the right. The Delete Download option will appear, and you can press the jog wheel to remove the download, or cancel the process by pressing the display button above the X shown in the upper left corner of the display.

To uninstall a Pack, highlight it with the jog wheel, then nudge the jog wheel to the right. The Uninstall option will appear, and you can press the jog wheel to uninstall the Pack, or cancel the process by pressing the display button above the X shown in the upper left corner of the display.

5.5 Continuity Between Push and Live
You can develop songs continuously between Push and Live: any Set you make in Standalone Mode on Push can be opened on or transferred to your computer. You can also transfer Sets back to Push to continue your work away from your studio, as long as you use native devices, freeze any tracks containing plug-ins, and collect all of your samples into the Project folder.
Note: Push does not collect samples from Ableton Packs or the Core Library. When opening Sets in Live that were created on Push, make sure that you have the same Pack and Live content installed on whichever computer you are using.
5.5.1 Pairing Push with Live
Make sure that both Push is in Standalone Mode and connected to the same Wi-Fi network as your computer. By default, the Show Push option in Live’s Library Settings will be set to On.

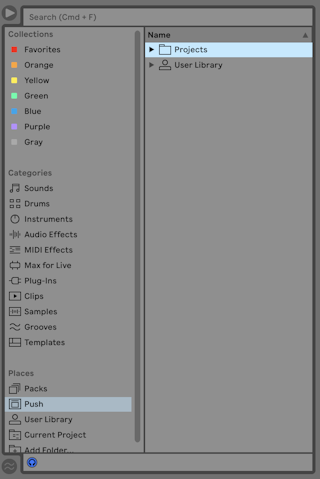
You will see a new Push label in the Places section of Live’s browser.

When you click on the label, you will see any available Push units within range. The Push name for the device is also shown. If there are multiple Push units in range, you can find the specific “Push xxx-xxx” name in the Status Tab of Push’s Setup menu; that way you can confirm exactly which unit will be paired. Click on the Connect button to pair Push with Live.

On Push, a six-digit code will be displayed; enter this code in the dialog window that appears in Live, and then press OK to continue the pairing process. Alternatively, you can press Cancel to exit the process.
Once you’ve successfully paired Push with Live, all of your saved Sets from Standalone Mode and your User Library will appear in Live’s browser. As long as Push is paired with Live, you can view any new Sets or changes that you make to existing Sets in Standalone Mode in Live’s browser by switching away from the Push label in Places and then back again to refresh the list of files.
You can unpair Push and your computer by right-clicking on the Push label in Places and selecting Disconnect.

5.5.2 Open Sets from Push in Live
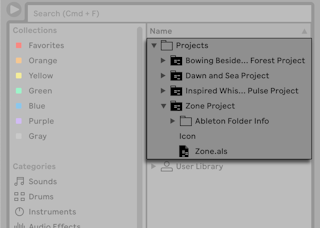
To download and open a Set from Push, unfold the Projects folder located within the Push label. Next, unfold an individual Project folder to show its contents, and then double-click on the .als file that you would like to open.
The entire Project folder contents will be downloaded to a temporary location and the Set will be opened as the current project. Once your Set has been opened in Live, it is a separate copy from what is stored on Push. This means that when you change and then save the Set in Live, those updates do not get automatically saved to the Set on Push, but must be manually transferred back.
You can save the Set locally by using the Save Live Set command in Live’s File Menu. You will be asked to choose a directory location, and the Project folder containing the Set and related files will be saved there.
5.5.3 Transferring Files from Live to Push
To transfer Sets to Push, drag and drop the entire local Project folder (not just the .als file) onto the Projects folder within the Push label in Live’s browser. You can also drag and drop Project folders directly onto the Push label in Places.
A dialog will appear reminding you to freeze any tracks that contain plug-ins and use the Collect All and Save command from Live’s File menu before transferring the Set. You can press Continue when you’re ready to confirm the transfer.
You can also drag and drop individual samples and presets onto the Push label or into the User Library folder within the Push label to send them to your User Library on Push.
5.5.4 Managing Files
It is also possible to manage files in the Push label using Live, just as you would with your local files in Live’s browser. You can:
Move a file by dragging and dropping it.
Delete a file by first selecting it, and then either using the file’s context menu’s Delete command, or pressing the Delete key on your keyboard.
Rename a file by first selecting it, and then using the file’s context menu’s Rename command, or the keyboard shortcut CtrlR (Win) / CmdR (Mac).
Create a new folder within an existing folder by using that folder’s context menu’s “New Folder” command.
6. Playing and Programming Beats
Push’s 8x8 pad grid can be used in different layouts for playing and step sequencing beats, as well as adjusting your drum sounds and rhythms.
To create beats using Push, first make sure you are in Note Mode by pressing the Note button.
Then add a Drum Kit to a MIDI track by pressing the Add button at the right of the display to enter Browse Mode.
Select Device by pressing the jog wheel or the center button of the Session D-pad.
Use the jog wheel or Session D-pad to navigate to the Drums category, and then press the jog wheel or the center button of the Session D-pad to select it. Now you can use the jog wheel or Session D-pad to navigate through and load one of the Drum Rack presets.

When working with a Drum Rack, Push’s 8x8 pad grid can be configured in three different layouts: Loop Selector, 16 Velocities, and 64 Pads. You can press the Layout button to select and cycle between these options.

6.1 Loop Selector Layout
When the Loop Selector layout is enabled, the pads are divided into three sections, allowing you to simultaneously play, step sequence, and adjust the length of your clip.

The 16 Drum Rack pads are laid out on the bottom left side of the pad grid, in a 4x4 arrangement, allowing for real-time playing.
Controls in the display match the color of the track, while pads in the Drum Rack appear in various colors that indicate the following:
The track’s color — this pad contains a sound.
Gray — this pad is empty.
Green — this pad is currently playing.
White — this pad is selected.
Dark blue — this pad is soloed.
Darker version of the track’s color— this pad is muted.
When working with Drum Racks that contain a larger number of pads, use the touch strip or Octave Up/Down buttons to move up/down by 16 pads.

Hold Shift while using the touch strip or Octave Up/Down buttons to move by single rows in the Drum Rack.
To add steps to a sequence, select a Drum Rack pad and then press the pads in the sequencer where you want the steps to go. As soon as a step is added to the sequencer, playback will begin.

You can build up a pattern by selecting different Drum Rack pads and adding steps to the sequence.
To add steps to the sequencer without triggering the Drum Rack pad’s sound, hold Select and then press the pad you want to sequence.
You can delete steps by pressing the corresponding pads in the sequencer. To delete all the steps that belong to a specific Drum Rack pad, hold the Delete button and then press that pad.
If you want to see all of the steps that have been added to the loop, press the Clip button to enter Clip View.


In Clip View, you can also press and hold a pad or group of pads within a step to bring up various editing controls, such as Nudge, Length, Velocity, etc. in the display, which you can adjust using the encoders.
You can use the loop length controls on the bottom right side of the pad grid to set the length of the loop, as well as specify which part of the loop you can see and edit in the Drum step sequencer.
Each loop length pad corresponds to a page of steps, and the length of a page depends on the step resolution. When working at the default 16th note resolution, two pages of steps are available at a time, for a total of two bars.
To change the loop length, hold one of the loop length pads and then tap on the other one where you would like the loop to end. You can also set the loop length to exactly one page by quickly double-tapping on your preferred loop length pad.
Note that the page you see is not necessarily the page you hear. When you set the loop length, the pages will update so that the current play position (which is indicated by the moving green pads) always remains visible.
In some cases, you may want to switch off this auto-follow behavior. For example, you may want to edit a single page of a longer loop, while still having the loop play for the entire loop length. To do this, single-tap the loop length pad that corresponds to that page. This will lock the view to that page without changing the loop length. You can navigate to the previous or next page using the Page Left and Page Right buttons.
Holding the Layout button gives you momentary access to the 16 Velocities layout. This lets you use the pads at the bottom right side of the grid to set the velocity for a drum pad. You can also lock the layout in place by holding Shift and pressing the Layout button. To unlock the 16 Velocities layout, press the Layout button again.
6.2 16 Velocities Layout
The 16 Velocities layout is similar to the Loop Selector layout in that you can sequence steps using the Drum Rack pads and sequencer, however the loop length controls at the bottom right of the pad grid are replaced with velocity pads.
Press the Layout button to switch to the 16 Velocities layout. In this mode, the bottom right 16 pads represent 16 different velocities for the selected Drum Rack pad.
You can play the different velocity pads in real-time. You can also play them when using the Repeat button to add repeated notes at varying velocities. Velocity pads can be added to the step sequencer, which will add notes at the selected velocity to the sequence. You can change the velocity of steps by holding the corresponding pads in the sequencer and then choosing one of the velocity pads.

Holding the Layout button gives you momentary access to the loop length controls so that you can set or adjust the clip’s loop length as needed. You can also lock the loop length controls in place by holding Shift and pressing the Layout button. To unlock the loop length pads, press the Layout button again.
6.3 64 Pads Layout
You can also use the entire 8x8 pad grid for real-time drum playing. There will be pads available on the grid for however many filled Drum Rack pads there are, up to 64 in total. This is useful when working with very large drum kits, such as those created by slicing. To switch to 64 Pads mode, press the Layout button again.

Note: when moving between 64 Pads mode and the Loop Selector or 16 Velocities layouts, the 16 pads available for step sequencing will not change automatically. You may still need to use the touch strip or Octave Up/Down buttons in order to see the specific 16 pads you want.
Holding the Layout button gives you momentary access to the loop length controls via the top row of the pad grid. You can also lock the loop length controls in place by holding Shift and pressing the Layout button. To unlock the loop length pads, press the Layout button again.
6.4 Loading Individual Drums
You can enter Hot-Swap Mode to load or replace individual pads within a loaded Drum Rack. Make sure the Drum Rack track is selected by pressing its corresponding lower display button so that you can view the Rack’s devices in the display.
By default, the entire Drum Rack will be selected. To select an individual pad instead, tap that pad on the grid. You can press the device’s corresponding upper display button to toggle between the device’s parameters and choke group and transposition settings. Note that the square icon next to the device’s name represents a pad.

Now, when you enter Hot-Swap Mode by pressing the Swap button, you can load or replace the sound of only the selected pad. The selected pad will flash on the grid to indicate it is selected for swapping.
In Hot-Swap Mode, the device category that the original sample is from will automatically be selected. For example, if you press a Drum Rack pad containing a kick sample, you will see the Kick category after pressing Swap. You can also tap on another pad within the Rack on the grid to select it instead, and the device category will be updated to match.
In addition to using the jog wheel and Session D-pad to navigate and make selections, you can also use the Load Next and Load Previous buttons to automatically switch between devices without having to individually select them first.
In a performance situation, you may want to select a pad without triggering it. To do this, press and hold the Select button while tapping a drum pad on the grid, or one of the 16 Velocity pads if in the 16 Velocities layout.

You can also select without triggering by pressing the lower display button for the Drum Rack’s track. This will expand the Drum Rack and allow the individual pads to be selected via the other lower display buttons. You can navigate to the previous or next pad via the left and right arrow keys on the Session D-pad.

6.4.1 Additional Pad Options
To copy the devices from one Drum Rack pad to another, hold the Duplicate button and press the pad you’d like to copy; then, while still holding Duplicate, press the destination pad to paste the copied devices. Note that this will replace the destination pad’s devices (and thus its sound) but will not replace any existing notes already recorded for that pad.
When a single pad is selected, press the corresponding upper display button to toggle between the device parameters and choke group and transposition settings. You can adjust the choke group assignment via the first encoder or transpose the pad via the second encoder.
When working with drums, Push’s pads can be colored individually. To change a pad’s color, hold Shift and tap the pad. Then tap one of the pads on the outer ring to choose that color for the selected pad.
Note: your custom pad colors will be saved and reloaded with your Live Set, but will not be visible within Live, they only appear on Push’s pad grid.

6.5 Step Sequencing Beats
You can tap a pad to select it and enable it for step sequencing in either the Loop Selector or 16 Velocities layouts.
To sequence notes, tap the pads in the step sequencer area to place notes from the selected Drum Rack pad in the clip wherever you want them.

By default, each step sequencer pad corresponds to a 16th note, but you can change the step size via the Scenes buttons.

During playback, the currently playing step is indicated by the moving green pad in the step sequencer. When Record is enabled, the moving pad will be red. Tapping a step that has been added to the sequencer will delete it. You can press and hold the Mute button while tapping a step to mute it. Press and hold the Solo button while tapping a pad to solo that sound.

You can also adjust the velocity and micro-timing of individual notes, as described in the section on automating in a step sequencer.
To delete the entire sequenced pattern, press the Delete button. To delete all the steps that belong to a specific Drum Rack pad, hold the Delete button and then press that pad. Note that holding Delete while pressing a pad that has no recorded steps in the current pattern deletes all of the devices from that pad.

To copy a page of steps, hold Duplicate and press the loop length pad for the page you want to duplicate, then press the loop length pad for the destination page. Note that this will not remove any existing steps in the destination page, but will add the copied ones on top. If you want to remove all of the steps on a page before pasting copied ones, hold Delete and tap the loop length pad for that page. Any existing MPE data for the copied steps will also be pasted to the new page.
The pad colors in the step sequencer area indicate the following:
Gray — this step doesn’t contain a note.
The clip’s color — this step contains a note. Higher velocities are indicated by brighter pads.
Lighter version of the clip’s color — this step contains a note, but the note is muted.
Unlit — the right two columns of pads will be unlit if triplets are selected as the step size. In this case, these pads are not active; only the first six pads in each row of steps can be used.
6.6 Playing Expressive Beats
Live 11.3.2 now includes MPE Drum Kits specifically designed to take full advantage of Push’s MPE-enabled pad grid. The MPE-Analog Kit and MPE-Synth Lab Kit are part of the Core Library, and you can also find MPE Kits in the Session Drums Club and Session Drums Studio Packs.
As an example, let’s check out the Session Drums Club Pack. Press the Add button to enter Browse Mode. Then press the Packs upper display button and select Available Packs. Navigate to the Session Drums Club Pack, then download and install it. Once installed, the Pack’s contents are automatically displayed.

Go to the Drums folder and select MPE Kits. Here you will see all of the Drum Racks that feature MPE mappings.

Select and load your preferred preset. You will see that the pad grid has a certain color scheme specific to the Drum Rack’s contents. Pads that contain kicks and toms have the track’s color, whereas pads with snares, hi-hats, and other percussion elements are shaded in different variations of the track’s color. This way you can see at a glance which pads contain similar kit elements.
MPE Kits have different articulations mapped to the Slide dimension. You can play the pads as you would with any other Drum Rack, however, instead of triggering the same sample for each pad with every tap, you can also tap your finger vertically up and down on specially mapped pads to trigger sample variations.
For example, the Snare & Press pad in the MPE Kit-Dark Plate Reverb preset contains two elements, a snare hit and a snare press. If you tap the corresponding pad directly in the middle, you will hear both sounds at once. If you tap starting at the bottom of the pad, you will only hear the snare hit, and as you start tapping upwards, you will begin to hear the snare press sound. Tapping vertically on the Hihat Closed pad in the same kit opens the pedal of the hi-hat, starting from a tightly closed pedal at the bottom of the pad, to a semi-open one at the top.
Some MPE Kits have been designed to include subtle articulation changes, while others offer more dramatic and experimental mappings, resulting in a wide range of expressive possibilities.
7. Playing and Programming Melodies and Harmonies
Push’s pads have been designed to capture the nuances of expressive playing. This means you can easily add variation and feel to your melodies and harmonies using MPE or aftertouch.
When a MIDI track containing an instrument is selected, the 8x8 pad grid is automatically configured to play notes in the 64 Notes layout. By default, every note on the grid is in the key of C major. The bottom left pad plays C1. Moving upward, each pad is a fourth higher. Moving to the right, each pad is the next note in the C major scale.

You can switch between octaves using the Octave Up and Octave Down buttons.

To play triads, try out the following shape anywhere on the grid:

7.1 Playing in Other Keys
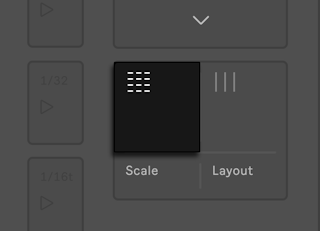
You can press the Scale button to switch to a different key and scale.

You will see the available keys and scales in the display. Use the upper and lower display buttons to select the key. Use the encoders or the Session D-pad to select a scale.

The leftmost encoder changes the layout of the pad grid:
4ths – When moving up to the next pad vertically, each pad is a fourth higher.
3rds – When moving up to the next pad vertically, each pad is a third higher.
Sequential – When moving to the right, each pad is in order based on the selected scale.
The leftmost lower display button switches the pad grid between the In Key or Chromatic modes. When set to In Key, only the notes that are part of the selected key will be available on the pads. When set to Chromatic, all notes can be played; however, pads that contain notes that are not part of the key will be unlit.
The rightmost lower display button toggles Fixed on or off. When Fixed is on, the notes of the pad grid remain in the same position when you change keys, e.g. the bottom-left pad will always play C (unless the key does not contain a C, in which case the pad will play the nearest note to C). When Fixed is off, the notes on the pad grid shift so that the bottom-left pad always plays the root note of the selected key.
Scale options are saved with the Set and are defaulted to whenever the Set is loaded.
7.2 Playing Expressive Melodies and Harmonies
There are three different expression options for Push’s pads: MPE, Poly Aftertouch, and Mono Aftertouch, which can be selected in the Expression tab of the Setup menu.
By default the pads are configured to enable MPE, which lets you access three expressive dimensions for each individual pad: pressure, slide and per-note pitch bend.
Pressure – refers to the amount of finger pressure that is received after the initial note is struck; this is also commonly referred to as “aftertouch.” You can play and hold a note on a pad, then change the amount of finger pressure to affect the sound. This is done by routing pressure data to different modulation destinations (such as the filter cut off or resonance) in MPE-capable devices.
Slide – refers to vertical finger movement on the pad. You can play and hold a note on a pad, then move your finger up or down to affect the sound. You can also strike a pad at different locations on the Y-axis to trigger different results with each strike. Slide modulation data can be routed to various destinations in MPE-capable devices.
Per-note pitch bend – refers to horizontal finger movement on the pad that initiates pitch bend messages for each note. This option is commonly displayed as “NotePB” in Live devices. You can play and hold a note on a pad, then move your finger left or right to bend the pitch. Depending on the In-Tune Width settings, the pitch bend can vary from extreme to subtle, and even vibrato-like effects can be achieved. You can also bend the pitch from one pad to another; similarly to the fretboard on a guitar. When using the In Key scale option, the pitch bend will always be in key. When using the Chromatic scale option, the pitch bend will be in half steps. By default, per-note pitch bend is automatically enabled for Live devices that can receive per-note pitch bend data. If a device does not have per-note pitch bend, then you can slide your finger horizontally on a pad to retrigger notes (aka glissando).
Explore and combine these three dimensions when playing pads to create a wide range of expressive and unique sounds.
There are also many MPE-capable instruments and effects in the Core Library that you can use to take full advantage of the expressive pads. For example, Drift, a new subtractive synthesizer introduced in Live 11.3, has multiple modulation routings that can receive pressure, slide and per-note pitch bend data. For even more expressive possibilities, check out MPE Control, a MIDI effect that lets you shape incoming MPE data using curves to further influence a device parameter’s response to pressure, slide, and per-note pitch bend data.
7.3 Step Sequencing Melodies and Harmonies
In addition to playing and recording notes in real time, you can also step sequence your melodies and harmonies. Press the Layout button to switch to the Melodic Sequencer.

When using the Melodic Sequencer, you can place notes on all eight rows of pads. You can adjust the loop length and access additional step sequencing options via the loop length controls.
When the In Key scale option is selected, each row of pads corresponds to one of the available pitches in the set key. When the Chromatic scale option is selected, notes that are in the key are lit, while notes that are not in the key are unlit. The root note of the key is accessible on the white row of pads at the bottom of the grid.
Each column of pads represents a step in the resolution set by the Scenes buttons.
Pressing a pad in a column will add a note to the corresponding step, and also start playback if transport isn’t already running. The step sequencer moves from left to right during playback. When a clip is playing, a moving column of green pads acts as a playhead and moves across steps and pages as they are played. When recording, the moving column of pads is red.
Each step can play more than one note. You can press pads within the column to add additional notes to the step. Selected notes are represented by a lighter version of the clip’s color.
You can delete a note by pressing its corresponding pad. To delete the clip, and therefore the entire pattern of steps across all pages, press the Delete button. You can also press and hold the Mute button while tapping a pad to mute the pad without deleting it.
To copy a page of steps, hold Duplicate and press the loop length pad for the page you want to duplicate, then press the loop length pad for the destination page. Note that this will not remove any existing steps in the destination page, but will add the copied ones on top. If you want to remove all of the steps on a page before pasting copied ones, hold Delete and tap the loop length pad for that page. Any existing MPE data for the copied steps will also be pasted to the new page.
You can press the Clip button to view all of the notes in the sequence in Clip View.

In Clip View, you can also press and hold a pad or group of pads within a step to bring up various editing controls, such as Nudge, Length, Velocity, etc. in the display, which you can adjust using the encoders.

As with the 64 Notes pad grid layout, pressing the Octave Up or Octave Down buttons shifts the range of available notes by an octave. You can hold the Shift button and press the Octave Up or Down buttons to shift the range by one note in the scale. The updated range will be shown in the display as you move up or down.
You can also use the touch strip to change the octave range. Hold Shift and then slide your finger up and down the touch strip to switch between octaves, or slide your finger along the touch strip without holding Shift to move between notes in the scale.
7.3.1 Loop Length Controls
You can use the loop length controls to set the length of the loop, as well as specify which part of the loop you can see and edit in the Melodic step sequencer.
Hold the Layout button to momentarily display the loop length pads on the top row of the grid. To lock the Loop Selector in place, hold Shift and then press Layout. To unlock the Loop Selector, press the Layout button again. The locked/unlocked state will be stored for each track.
Each loop length pad corresponds to a page of steps, and the length of a page depends on the step resolution. In the Melodic Sequencer, one page of eight steps is available at a time, for a total of two beats.
To change the loop length, hold one of the loop length pads and then tap on the other one where you would like the loop to end. You can also set the loop length to exactly one page by quickly double-tapping on your preferred loop length pad.
Note that the page you see is not necessarily the page you hear. When you set the loop length, the pages will update so that the current play position (which is indicated by the moving green pads) always remains visible.
In some cases, you may want to switch off this auto-follow behavior. For example, you may want to edit a single page of a longer loop, while still having the loop play for the entire loop length. To do this, single-tap the loop length pad that corresponds to that page. This will lock the view to that page without changing the loop length. You can navigate to the previous or next page using the Page Left and Page Right buttons.

To then turn auto-follow back on, reselect the loop by pressing the first and last loop length pads that you want included in the clip. (Note that single-tapping a page that is outside of the current loop will immediately set the loop to that page.) You can also turn auto-follow back on by holding either the Page Left or Page Right button.
The pad colors in the loop length row indicate the following:
- Unlit – this page is outside of the loop.
- Gray – this page is within the loop, but is not currently visible in the step sequencer.
- White – this page is visible in the step sequencer section, but is not currently playing.
- Green – this page is currently playing.
- Red – this page is currently recording.
7.4 Melodic Sequencer + 32 Notes
The Melodic + 32 Notes layout combines step sequencing and real-time playing capabilities. This layout provides access to multiple octaves and steps on a single page, making it ideal for sequencing chords and harmonies. It is also well suited for sequencing longer phrases.

If the pad grid layout is currently set to the Melodic Sequencer, press the Layout button to switch to the Melodic Sequencer + 32 Notes layout. If the pad grid is set to the 64 Notes layout, press the Layout button twice.
7.4.1 32 Notes
You can use the bottom half of the pad grid to play notes in real-time, as well as select them for step sequencing. Each pad corresponds to one of the available pitches in the currently selected scale. Pressing a pad will select and play the note. To select a pad without triggering it, press and hold the Select button while tapping a pad.
The pad colors indicate the following:
- The track’s color – this is the root note of the scale.
- A lighter shade of the track’s color – this pad is selected.
- Green – this pad is currently playing.
- White – this note is in the scale, but is not the root note.
Pressing the Octave Up or Octave Down buttons shifts the range of available notes by an octave. You can hold the Shift button and press the Octave Up or Down buttons to shift the range by one note in the scale. The updated range will be shown in the display as you move up or down.
You can also use the touch strip to change the octave range. Hold Shift and then slide your finger up and down the touch strip to switch between octaves, or slide your finger along the touch strip without holding Shift to move between notes in the scale.
As in the 64 Notes layout, the notes in the bottom half of the pad grid can be set to a specific key or scale using the In Key or Chromatic modes.
7.4.2 Sequencer
Tapping a step in the top half of the pad grid adds all selected notes to that step. Holding multiple steps will add selected notes to all of those steps. Steps containing notes are lit in the color of the clip.
Holding a step lets you view notes contained within it, which are indicated in the bottom half of the pad grid by the lighter version of the track’s color. Tapping any of these selected notes will remove them from the step.
To copy notes from one step to another, hold the Duplicate button and press the step you want to duplicate, then press the destination step.
The pad colors in the step sequencer indicate the following:
The clip’s color – this step contains a note.
Green – this step is currently playing.
White – the step is selected.
Light gray – this step contains a note, but the note is muted.
Gray – this pad is empty.
Unlit – the right two columns of pads will be unlit if triplets are selected as the step size. In this case, these pads are not active, only the first six pads in each row of steps can be used.
You can adjust the loop length and access additional step sequencing pages via the loop length controls. Hold the Layout button to momentarily access the loop length pads in the fifth row of the pad grid. To lock the Loop Selector in place, hold Shift and then press Layout. To unlock the Loop Selector, press the Layout button again. The locked/unlocked state will be stored for each track.
To copy a page of steps, hold Duplicate and press the loop length pad for the page you want to duplicate, then press the loop length pad for the destination page. Note that this will not remove any existing steps in the destination page, but will add the copied ones on top. If you want to remove all of the steps on a page before pasting copied ones, hold Delete and tap the loop length pad for that page.
8. Recording MIDI
You can record MIDI in real time when playing Push’s pads or using external instruments to add notes into clips — with or without a fixed bar length. You can also record repeated notes to add rhythmic variation and apply quantization to better align notes to the grid. It is also possible to play notes without recording and capture your ideas into new clips.
In Note Mode, MIDI tracks are automatically armed for recording when selected. In Session Pad Mode, tracks must be armed manually. To do this, either press the track’s display button twice quickly, or hold the Record button and then press the track’s display button. A circle icon next to the track’s name indicates that the track is armed.

8.1 Real-time Recording
You can record notes in an armed track in real-time by pressing the Record button and then playing the pads.

If you want to record with a click track, press the Metronome button. The button will pulse when the metronome is activated. You can adjust the metronome volume by pressing the Volume encoder and selecting the Cue Volume option.
Press the Record button to begin recording. If you’ve enabled a recording count-in in the metronome settings, you’ll see a count-in bar move across the top of the display and flash in time with the tempo.

The Record button will flash during count-in and then turn solid red as recording starts.
Now any notes that you play on the pads will be recorded to the selected clip. Pressing Record again will stop recording but will continue playing back the clip. Pressing Record a third time will enable overdub mode, allowing you to record more notes into the clip while it plays back. Subsequent presses continue to toggle between playback and overdub. During playback, a small progress bar will appear under the track name in the display to show the playback position of each playing clip.
The pads are velocity sensitive, but if you want to temporarily override the velocity sensitivity, press the Accent button. When Accent is enabled, all played or step-sequenced notes will be at full velocity (127), regardless of how hard you actually tap the pads.

If you press and release Accent quickly, the button will stay on. If you press and hold, the button will turn off when released, allowing for momentary control of accented notes.
Note that using the Accent button will override the velocity pads in the Drum Sequencer when using the 16 Velocities layout.
Pressing New stops playback of the currently selected clip and prepares an empty clip slot so that you can record a new clip on the track. By default (i.e. when using Scene Workflow mode), pressing New creates a new scene with duplicates of all playing clips from other tracks and, if the transport is running, continues playing them back seamlessly. This behavior can be changed so that when pressing New, only an empty clip slot is prepared on the currently selected track and other clips are not affected. To do this, switch to Clip Workflow mode in the Setup menu.

8.2 Fixed Length Recording
Press the Fixed Length button to set the size of new clips to a predetermined length.

Press and hold Fixed Length to set the recording length.

When Fixed Length is switched off, new clips will be recorded until you press the Record, New or Play/Stop buttons.
When Fixed Length is on, an empty clip of the selected length will be created and recording will start at the beginning of the clip, in accordance with Push’s global launch quantization. If Phrase Sync is enabled, Push treats the chosen length as a musical phrase, and will begin recording from the position in the clip that corresponds to that position within a phrase of that length. For example, with a fixed length of 4 bars and Phrase Sync on, starting a recording when transport is at bar 7 will create an empty four bar clip and begin recording at the third bar of that clip.
Tip: Enabling Fixed Length while recording will switch recording off and loop the last few bars of the clip, depending on the Fixed Length setting.
8.3 Recording with Repeat
Pressing the Repeat button enables the Repeat Intervals buttons, which are used to set the repeat rate for notes. The Repeat button will pulse when active, and the button with the currently selected repeat interval will be lit up in green.

When a repeat interval is selected, you can hold down a pad to play or record a stream of continuous, rhythmically-even notes. This is useful for recording steady hi-hat patterns, for example. Varying your finger pressure on the pad will change the volume of the repeated notes.
Note that Push will store the Repeat button’s state and setting for each track. If you press and release Repeat quickly, the button will stay on. If you press and hold, the button will turn off when released, allowing for momentary control of repeated notes.
You can use the Swing and Tempo encoder to control the amount of swing applied to the repeated notes. Tap the encoder to check if Swing is selected or to check the current amount of swing applied. If necessary, press the encoder to switch from Tempo to Swing, then turn the encoder to adjust the swing amount.

8.4 Capturing MIDI Clips
In addition to recording MIDI, you can also play pads in real time and then press the Capture button to save the notes you’ve just played on an armed track, without needing to press the Record button first.

Once you press the button, the captured material will be saved in a new MIDI clip and immediately played back. Push will detect and adjust the song tempo, set appropriate loop boundaries, and place the played notes on the grid. You can then make further edits to the captured material in Clip View.
8.5 Quantizing
Pressing Push’s Quantize button will snap notes to the grid in the selected clip.

Press and hold Quantize button to access and change the quantization options:

Swing Amount determines the amount of swing that will be applied to the quantized notes. Note that the Swing amount can be adjusted with the first encoder or using the dedicated Swing and Tempo encoder.
Quantize To sets the nearest note value to which notes will be quantized, while Quantize Amount determines the amount of quantization that is applied to notes.
To automatically quantize notes during recording, set the Rec. Quantize option to On by pressing the corresponding upper display button. Adjust the Quantize To value with the corresponding encoder. Note that if Rec. Quantize is enabled, adjusting the Swing amount during recording will not affect the automatically quantized notes.
When working with drums, press and hold Quantize, then press a Drum Rack pad to quantize the notes for that selected pad only.
8.6 Arrangement Recording
When using Push in Control Mode, if Arrangement View is in focus in Live, pressing Record on Push will toggle Arrangement Recording on and off. While Arrangement Recording is on, all of your actions on Push are recorded into the Arrangement View.
You can also trigger Arrangement Recording while Live’s Session View is in focus by holding Shift and pressing Record. Note that this behavior is reversed when the Arrangement is in focus; holding Shift and pressing Record will then toggle Session recording.
9. Clip View
Press the Clip button to open Clip View, where you can view and edit MIDI or audio clips, as well as adjust various clip parameters. Some of the adjustable parameters change depending on whether an audio or MIDI clip is selected.
When working with an audio track, if no clip is selected, Push will prompt you to load a sample.
The clip’s name is shown in the upper-left corner of the display. If the clip is unnamed, the display will show the name “MIDI Clip” or “Audio Clip” depending on the type of the clip. If no clip is selected, the display will show “No Clip”.
The elements in the display such as parameter names, notes or waveform colors, as well as the upper display buttons, reflect the color of a selected clip. By default, newly created clips match the color of the track. Note that if you change track color the existing clips colors will not be updated automatically. You can change clip colors in Session Pad Mode.

In MIDI tracks containing Drum Racks, the color of the notes in Clip View matches the color of the respective Drum Rack pads. For example, you can set a different color for each pad and then see at a glance which notes belong to specific Drum Rack pads in the clip. Note that the pad colors are only visible on Push and not in Live (even if using Push in Control Mode).
In all MIDI tracks, the velocity of each note is indicated by its opacity.

During playback, the display follows the clip’s song position and scrolls automatically. A bar showing the playback progress also appears under the track name for tracks which contain playing clips.

For both MIDI and audio clips, the second upper display button toggles Loop on or off and exposes loop parameters for editing. With Loop on, you can set the following parameters:
Loop Position — determines from where within the clip the loop will begin.
Loop Length — sets how many bars and/or beats long the loop is, as measured from the loop position.
Start Offset — allows you to begin playback at a different point within the loop, rather than at the loop’s start position. If the Loop Position and Start Offset are at the same position, both values will be moved when adjusting the Loop Position.
With Loop off, you can control the clip’s Start and End position. This sets the region that will play (once) when the clip is launched. Hold Shift while adjusting these or any of the above-mentioned controls to adjust by 16th-note subdivisions.
When working with an audio clip, you can also toggle warping on or off and adjust the clip’s Warp Mode, as well as adjust the Gain and Transpose parameters. Hold Shift while adjusting Transpose to adjust in cents rather than in whole semitones. (Note: When using Push in Control Mode, the Transpose button on Push will adjust the Pitch parameter in Live’s Clip View.)
You can Zoom in or out of the clip using the first encoder. The line under Zoom represents the whole clip, and the part of the clip shown in the display is highlighted. The position you’ll zoom in or out of depends on which position encoder you last adjusted (Start, Length, Loop, etc.). Interacting with other position encoders will move the focus of the Zoom control to the position specified by those encoders.

9.1 Real-Time Playing Layouts
When recording your real-time playing using the 64 Notes, 64 Pads or 64 Slices layouts, Clip View lets you see the incoming MIDI notes, and the view expands so that all existing notes fit on the display at the same time.
9.2 Sequencing Layouts
When using the Drum or Melodic Sequencer, the display in Clip View will show a semi-transparent white box to indicate the sequenceable area. This represents the area on the pads where you can add, delete or adjust notes.

Each sequenceable area corresponds to one page of steps. A box on the far left side of the display indicates which pitch range is shown in the display.
As notes are added, lines will appear on the far left side of the display to indicate which pitch ranges contain notes. You can use these indicator lines to find and edit notes quickly, without looking at your computer screen.
Pitch ranges with a higher density of notes are represented by thicker lines.

9.3 Editing MIDI Clips
You can edit MIDI clips as well as individual notes directly on Push using the encoders, upper display buttons and jog wheel. You can also access Note Edit mode to make adjustments to individual MIDI notes.
To edit a MIDI clip, select a MIDI track using lower display buttons, then press the Clip button to enter Clip View.

If you want to edit another clip from a different scene on the same track, you can use the Session D-pad’s up and down arrows to momentarily toggle Session Screen Mode and easily navigate to that clip. You can also use Session D-pad’s left and right arrows to switch between tracks.

By default, Clip View will display Loop and Crop editing parameters that affect the entire MIDI clip.
Pressing the second upper display button activates or deactivates the Loop parameter, which determines whether or not the clip will loop when the track is played. When Loop is on, you can use encoders to adjust the following loop parameters:
Loop Position allows you to set a loop’s starting point within a clip.
Loop Length sets the length of the loop in bars/beats, as measured from the loop position.
Start Offset allows you to begin playback at a different point within the loop, rather than at the loop’s start position. If the Loop Position and Start Offset are at the same position, moving the Loop Position will result in the Start Offset moving along with it.
Note that you can adjust the above-mentioned parameters in finer increments by holding the Shift button when turning the encoders.
When Loop is off, you can set the Start and End position markers, which determine the region that will play (once) when the clip is launched. You can also use these markers to adjust the size of the clip. Use the corresponding encoders to set the desired clip size, then press the third upper display button to crop the portions of the clip that are outside of the Start and End points.
9.3.1 Note Edit Mode
You can select one or more notes in a MIDI clip, and change their properties or delete them using Note Edit mode.
To enter Note Edit mode, press the Edit upper display button on the right.

The display will now show controls that allow you to modify selected notes in place of the clip editing options. You can also quickly enter Note Edit Mode by pressing or turning the jog wheel instead of using the Edit button.
9.3.1.1 Highlighting vs Selecting Notes
In Note Edit mode, one note is always highlighted and ready for editing, as indicated by a white border and pulse animation.

You can then edit the highlighted note’s parameters by adjusting the corresponding encoders:
Position — moves a note backwards or forwards by sixteenths of a bar.
Nudge — represents the percentage that a note is offset from its current position (defined as the nearest sixteenths of a bar). When moving the note to the right, the percentage increases, while it decreases when moving the note to the left.
Length — adjusts the coarse length of a note.
Pitch — can be used to change the pitch of a note. Pitch is not available on tracks that contain a Drum Rack.
Drum Pad — can be used to move the selected note to another pad within a Drum Rack. Drum Pad is only available on tracks that contain a Drum Rack.
Velocity — allows to set the velocity of a note to a value between 0 and 127. The note’s color saturation changes depending on the velocity setting: notes with a higher velocity are more saturated, while notes with a lower velocity are less saturated.
Vel Range — sets a range from which a velocity value is randomly selected when a note is played.
Probability — determines whether a note will be played based on the selected probability percentage.
Turn the jog wheel to highlight different notes. You will move through the notes sequentially based on where they are in the clip.
If you want to edit multiple notes at once, for example to adjust a chord, you will need to select each note.

To select multiple notes, highlight a note, then press the jog wheel to mark it as selected. The note will turn solid white to indicate that it is selected. Now you can turn the jog wheel to highlight another note and add it to your selection, then edit their parameters at the same time using encoders. Note that when notes in the selection have different initial parameter values, a range will be shown in the display for those parameters. Values are adjusted in relation to the original range.

You can select as many notes as you like, then use encoders to edit them all at once. Note that if you highlight another note but don’t add it to the selection, adjustments made with encoders will apply to the highlighted note as well.
To quickly select all notes, press the Select All upper display button. To deselect all notes, press the Deselect All button.
To delete highlighted or selected notes, press the Delete button.
9.3.2 Editing Notes in a Step Sequencer
You can also edit notes while using a step sequencer layout in Clip View. When you press and hold one or more steps, the display will zoom in to the part of the clip that contains the selected steps, and show the individual step parameters that can be edited. Notes contained within the selection will be highlighted.

You may notice that the parameters are slightly different when editing steps than when editing notes individually.
To adjust these parameters for multiple steps at the same time, press and hold all of the steps you’d like to adjust, and then tweak the encoders. Note that if the parameter values are different for the selected steps a range of values for the selected steps will be shown in the display.
When working in the drum sequencer, you can adjust parameters for all steps belonging to a single drum pad. To do this, press and hold the Select button, press and hold the pad, release the Select button and adjust the relevant encoders.

10. Recording Audio
Push has a built-in high quality audio interface with two 6.3 mm balanced inputs so you can record audio from microphones, guitars, and synthesizers directly into clips for sampling, editing, and warping.
10.1 Setting Up an Audio Track
When setting up an audio track for recording instruments, check the following:
The track is armed for recording.
The track has the right input channel selected, with the input monitoring set to “Auto.”
The track has the necessary amount of input gain.
By default, audio tracks are configured to receive audio from the Input 1 port on Push. In Standalone Mode, the input monitoring is automatically set to Auto, and the track will be armed for recording as long as it is selected.
Use an instrument, line, or microphone cable to connect your instrument or microphone to an Input port on Push. If an instrument can be recorded in stereo, use In 1 for the left channel and In 2 for the right channel.
Recorded audio files have a bit depth of 24-bit and are in the WAV format. The default sampling rate is 44,100 Hz, which can be changed in the Audio Tab of the Setup menu if needed.
10.1.1 Arming (Record-enabling) Tracks
To record audio, make sure the audio track you want to record into is armed.
In Note Mode, you can arm an audio track by pressing its corresponding display button. When using Push in Standalone Mode, both audio and MIDI tracks can be armed this way.
When using Push in Control Mode or Session Pad Mode, audio tracks must be armed manually. To do this, either press the track’s display button twice quickly, or hold the Record button and then press the track’s display button. A circle icon next to the track’s name indicates that the track is armed.

To arm multiple tracks at once, make sure the Exclusive Arm option in the Status tab of the Setup menu is set to Off, then hold the record button and press the lower display buttons of the tracks you want to arm.
10.1.2 Choosing the Input for a Track
To select the input channel for your track, press the Mix button.

Two modes can be accessed via the Mix button. The first is the Global Mix Mode. This shows the volume, pan, and return send settings for each track.

Press the Mix button again to view Track Mix Mode, which displays the monitoring and input/output settings for the selected track. You can press the display button above Input & Output to select an input type and channel.

As previously mentioned, the input is set to channel 1 by default, but you can change this to channel 2 or 1 / 2 if you are using both inputs for a stereo instrument. When an ADAT extender is connected, you can also use channels 9-16. If you are using Push in Control Mode with an external audio interface, the inputs shown will be based on what is available for that interface.
The encoder above Input Type lets you select the input for your track. By default this is set to Ext. In when using Standalone Mode or an external audio interface in Control Mode. You can use the encoder above the Input Channel to select the channel you’d like to use.
You can use the encoder above Input & Output to switch to the Output settings, as well as select an Output Type using the corresponding encoder if needed; the default output is the Main track.

10.1.3 Track Monitoring
Audio tracks have input monitoring set to Auto by default, so that you can hear the incoming audio when the track is armed and also hear clips as they are played back.
If you want to permanently monitor the track’s input, regardless of whether the track is armed or clips are playing, change the monitoring to In using the encoder above Mix.
You can set the monitoring to Off when using an external application to monitor the input, or if you don’t want to hear the input when recording.
If you are recording a microphone using Auto or In monitoring, it is best to use headphones to prevent the chance of feedback.
10.1.4 Input Gain
For optimal recordings, you’ll want to record the loudest possible signal without any clipping or distortion. To do this, pay close attention to how the incoming audio sounds and check the input meter levels on Push. If you’re unsure whether or not the signal is clipping or distorted, you can give yourself more headroom by lowering the reference level, which is set using the Preamp Type options in the Audio tab of the Setup menu.

You can use the encoders above both Preamp Type entries to select the one you would like to use for each input.
Line – this is ideal for line level equipment such as synthesizers and drum machines.
Instrument – this is best for instruments like a guitar or bass. The Instrument preamp includes high input impedance (Hi-Z).
High – this is well suited for equipment that needs a lot of input gain in order to be properly recorded, such as dynamic microphones. Note that phantom power for condenser microphones is not supported.
If you are using a stereo instrument, use both inputs on Push and select the Link 1 & 2 option in the Audio tab using the corresponding upper display button. This ensures that the reference levels are the same for both input channels.
When choosing a Preamp Type, first turn up your instrument as loud as it can go without distorting. On instruments like a guitar or line level synth, this means turning the volume all the way up. Then play your instrument and look at the input meters on Push’s display to make sure that the level doesn’t peak when your instrument is at its loudest volume. If you hear any clipping or distortion, or if the level in the input meter reaches the top of the meter, try using a Preamp Type with a lower reference level.
If you’ve found the right Preamp Type for your instrument but still have a bit of headroom available, you can boost the signal a little more using digital gain. You can use the encoder above each Preamp Type to add up to +20dB of digital gain. But be careful as it is possible to clip the signal using too much extra gain, so keep an eye on the meter to check that the level does not reach the very top.
10.2 Recording Audio Clips
If your audio track is armed and configured properly, you should be able to hear the incoming signal as you play your instrument or use your microphone.
To record a clip in any of the Note Mode layouts, press the Record button. If the transport is running, the recording will start in time with the next beat. To stop recording, press the Record button again.
In Session Pad Mode, press any of the empty clip slot pads to record into the clip. The pads for empty clip slots will be red, while any clip slots that already contain clips will be the same color as the track. Press the pad again to stop recording.
You can add the Tuner audio effect to your device chain on the audio track to view the incoming notes and tune your instrument accordingly. Tuner now has an updated device visualization specifically optimized for Push.

10.3 Warping Audio Clips
In Clip View you can edit clips as well as warp them. Press the Clip button to enter Clip View.
When an audio clip is selected, you will see the Loop and Warp parameters by default.

You can press the Loop display button to loop or unloop a clip. When a clip is looped, you can set the Loop Position, Loop Length, and Start Offset using the corresponding encoders. When a clip is unlooped, you can adjust the Start and End positions.
To warp or unwarp a clip, press the display button above Warp.
When Warp is off, the sample is played back at its original recorded tempo, irrespective of the current Set’s tempo. This is useful for samples that have no inherent rhythmic structure such as percussion hits, atmospheres, sound effects, spoken word, etc.
When Warp is on, the sample can be “time-stretched” so that it is played back in time with the Set’s tempo. This works best for rhythmically structured samples such as loops, music recordings, complete songs, and so on.
You can set the Warp Mode to Beats, Tone, Texture, Repitch, Complex, and Pro (aka Complex Pro) using the encoder above Warp.
The Warp Modes use different varieties of granular resynthesis techniques. Granular resynthesis achieves time compression and expansion by repeating and skipping over parts of the sample (the “grains“). The modes differ in the selection of grains, as well as in the details of overlapping and crossfading between grains, which gives each mode slightly different characteristics.
Beats Mode – this works best for material where rhythm is dominant (e.g., drum loops as well as most pieces of electronic dance music). The granulation process is optimized to preserve transients in the audio material.
Tones Mode – this serves well for stretching material with a more or less clear pitch structure, such as vocals, monophonic instruments and basslines.
Texture Mode – this works well for sound textures with an ambiguous pitch contour (e.g., polyphonic orchestral music, noise, atmospheric pads, etc.). It also offers rich potential for manipulating all kinds of sounds in a creative way.
Re-Pitch Mode – this adjusts the playback rate to create the desired amount of stretching.
Complex Mode – this mode is specifically designed to accommodate composite signals that combine the characteristics covered by other Warp Modes; it works well for warping entire songs, which usually contain beats, tones and textures.
Complex Pro Mode – this mode uses a variation of the algorithm found in Complex Mode, and may offer even better results (although with an increase in CPU usage.) Complex Pro works especially well with polyphonic textures or whole songs.
You can use the encoder above Transpose to transpose the audio anywhere between -48 to +48 semitones. Hold Shift and turn the Transpose control to adjust the transposition in cents. Use the encoder above Gain to set the audio volume from -inf to +24dB.
Press the display button above Edit to access additional clip and warp parameters, or turn the jog wheel to quickly enter Edit Mode.

Use the jog wheel to select a position in the audio where you want the clip to start and then press the display button above Set 1.1.1 to move the start position to that location.
Press the display button above Warp to Grid to warp the clip so the recorded audio tempo automatically matches the Set’s tempo. This is useful when sampling from an external source, as the recorded tempo may not match the Set’s tempo. After warping, the loop settings for the clip will be preserved.
When you’re finished editing, press the display button above Done to get back to the clip’s loop parameters.
10.4 Converting Audio to MIDI
You can convert an audio clip to a MIDI track in various ways by pressing the Convert button.


Converting the audio to Simpler adds the audio clip into a new Simpler device.
Converting the audio to a Drum Pad adds the audio clip into a new Drum Rack on the first pad.
You can also convert audio into MIDI notes using the Audio to MIDI methods: Harmony-MIDI, Melody-MIDI, or Drums-MIDI.
Harmony-MIDI – The pitches in a polyphonic audio clip are identified and converted into MIDI notes, and the audio is replaced with an Instrument Rack containing a piano preset (which can be swapped out for any other instrument as needed). This option works best for harmonic instruments like guitar and piano.
Melody-MIDI – The pitches in a monophonic audio clip are identified and converted into MIDI notes, and the audio is replaced with an Instrument Rack containing a synth preset (which can be swapped out for any other instrument as needed). This option works best for vocal clips or soloed instrument samples.
Drums-MIDI – The rhythms from unpitched percussive audio are identified and converted into MIDI notes, and the audio is replaced with a Drum Rack containing a 606 Core Kit preset (which can be swapped out for any other drum kit as needed). This option works best for recorded breakbeats or beatboxing clips.
Note that the Audio to MIDI options are not available in the Live Intro edition.
11. Working with Samples
You can play samples on Push’s pads in a variety of ways using the Simpler instrument, which contains detailed but easy-to-use sample parameters accessible in three different modes.
Navigate to Browse Mode to add an empty Simpler instrument to a MIDI track.
You can enter Hot-Swap Mode to browse the available Simpler presets and samples from the Core Library. To view all of your samples, including ones from Packs, navigate to the Samples folder in the Device category.

Once you have selected and loaded a sample from Hot-Swap Mode, you will be taken back to the Device View. Here you will see the sample’s waveform in the display, along with a number of parameters that allow you to quickly adjust how the sample plays back. This is the main bank of Simpler’s controls.

If you have selected a preset and do not see the waveform in the display, the Simpler device may be inside of an Instrument Rack.

You can expand the device list to view Simpler and edit the sample’s waveform.
Simpler can be set in one of three modes: Classic, One-Shot, or Slicing. The sample parameters you have access to in the display change based on which mode is selected. You can use the encoder above Mode to choose your preferred option.

Classic Playback Mode is the default mode when using Simpler, and is optimized for creating melodic and harmonic instruments using pitched samples. It features an ADSR envelope and supports looping, allowing you to play the looped sample for as long as a note is held down. Classic Mode is polyphonic by default, and the pad grid uses the same layout in this mode as is used when playing other pitched instruments.
One-Shot Playback Mode is exclusively for monophonic playback, and is optimized for use with one-shot drum hits or short sampled phrases. This mode has simplified envelope controls and does not support looping. By default, the entire sample will play back when a note is triggered, regardless of how long the note is held. Like Classic Mode, the pad grid in One-Shot Mode uses the 64 Notes layout.
Slicing Playback Mode non-destructively slices the sample so that the individual slices can be played back from the pads. You can create and move slices manually, or choose from a number of different options for how Simpler will automatically create slices. This mode is ideal for working with rhythmic drum breaks. The pad grid in Slicing Mode only shows playable pads for the number of slices in the sample.
11.1 Classic Playback Mode

In Classic Mode, you can use the encoder above Zoom to zoom in or out of the waveform in Simpler’s display. This is useful if you want to set the start or end position of a loop to an exact location within the waveform’s transients.
The Start control sets the absolute position in the sample from which playback could start, while the End control sets where playback could end; these parameters define the region of the sample that can be worked with.
S Start and Length are represented in percentages of the total sample length enabled by Start and End. For example, hitting a pad after setting an S Start value of 50% and Length value of 25% will play back the third quarter (50-75%) of the region between the Start and End values.
Loop Length determines how much of the available sample (also determined by the Start and End values) will loop. Loop Fade sets the crossfade amount for the loop. Note that these two parameters are only active if Loop is enabled.
You can press Simpler’s upper display button to access the device’s Edit Mode. When in Edit Mode, you can use the lower display buttons to select additional pages of parameters and the upper display buttons to toggle certain settings on or off. Press Simpler’s upper display button again to exit Edit Mode.

Pressing the Loop On/Off button determines whether or not the sample will loop when a pad is held down. The Warp as… button adjusts the warping of the sample between the Start and End values so that it will play back precisely within the specified number of bars. The values should be based on the length of the sample, but if something sounds off, you can use the ÷2 or ×2 buttons to double or halve the playback speed, respectively.
Crop removes the portions of the sample that are outside of the Start and End points, while Reverse plays the entire sample backwards. Note that both Crop and Reverse are non-destructive; they create a copy of the sample and apply the process to the copy, so your original sample file is not changed.
11.2 One-Shot Playback Mode

In One-Shot Mode, the Zoom, Start, and End controls function the same as in Classic Mode, as do the Warp as…, ÷2, ×2, Crop, and Reverse buttons.
The Trigger and Gate options determine how a sample fades out after the pad is released.
If Trigger is enabled, the sample will continue playing even after the pad is released, i.e., the amount of time you hold the pad will have no effect.
If Gate is enabled, the sample will begin fading out as soon as you release the pad.
Fade In determines how long it takes the sample to reach its maximum volume after a pad is hit, while Fade Out specifies the amount of time it takes for the sample to fade to silence. You can use these parameters to shape the volume of the sample.
The Transpose encoder allows you to transpose the sample up or down by up to 48 semitones (four octaves). Note that when transposing, the timbre of the sample may change dramatically depending on which warp mode is selected in the Warp parameter bank. The Gain encoder sets the overall volume of the Simpler instrument.
11.3 Legato Playback
The Classic and One-Shot Modes provide a unique way of repitching a sample on the fly, without changing its playback position. This is essentially a playable version of Live’s Legato Mode in clips. To enable Legato playback:
Open Simpler’s full bank of parameters by pressing its corresponding upper display button in Device View.
Press the second lower display button to view the Global parameter bank.
Set the Glide Mode parameter to Glide.
Set the Voices parameter to 1. Note that this parameter is only available in Classic Mode. In One-Shot Mode, playback is always monophonic.

Now, as you play the pads legato, the sample will transpose without changing playback position.
For best results, make sure Warp is on (in the Warp parameter bank). Using Complex Pro tends to produce the best results when transposing, but you can try out the other Warp Modes to hear how they affect the sonic result.
11.4 Slicing Playback Mode

In Slicing Mode, the Zoom, Start, and End controls function the same as in Classic and One-Shot Modes, as do the Warp as…, ÷2, ×2, and Reverse buttons.
The Slice By chooser determines the specific way in which slices will be created:
Transient – Slices are placed on the sample’s transients automatically. The Sensitivity encoder determines how sensitive Simpler is to transient levels within the sample, and thus how many slices will be created. Higher numbers result in more slices, up to a maximum of 64 slices.
Beat – Slices are placed at musical beat divisions. The Division encoder selects the beat division at which Simpler will slice the sample region.
Region – Slices are placed at equal time divisions. The Regions encoder selects the number of evenly spaced slices that will be created.
Manual – When Manual is selected, no slices are placed automatically. Instead, slices are created manually by enabling the Pad Slicing control and tapping empty pads as the sample plays back. To create manual slices:
Tap a pad that contains a slice to begin playback from that slice.
When the sample reaches the point at which you would like to create an additional slice (a drum hit, for example), tap any empty pad.
A slice will be placed at this point and it will be assigned to a pad. Any pads that were already assigned after this point will be shifted upward on the pad grid.
Once the loop is sliced how you want it, turn Pad Slicing off.
In all slicing modes, slices are laid out from left to right in groups of four starting from the bottom left pad. Each additional four slices is placed on the next four pads up. After the left half of the pad grid is used, slices are placed along the bottom row on the right side of the pad grid, again moving upwards in groups of four.

By default, the pad grid uses the 64 Slices layout when in Slicing Mode. You can press the Layout button to cycle between the 64 Slices, Loop Selector, and 16 Velocities layouts.
The Playback control determines how many slices can be triggered simultaneously. Mono is monophonic; only one pad can be played or sequenced at a time. When set to Poly, multiple pads can be triggered together. When set to Through, playback is monophonic, but triggering one slice will continue playback through the rest of the sample region.
The Trigger/Gate options function similarly as when in One-Shot Playback Mode, but what you actually hear depends on which Playback mode is selected.
Nudge allows you to adjust the position of each slice marker. This is especially useful for fine-tuning slices that you’ve created in Manual mode. You can tap the pad you’d like to nudge and then use the Zoom encoder to zoom in on that specific slice region for greater accuracy. Hold Shift while turning the Nudge encoder to adjust in smaller increments.
Split Slice creates a new slice in the middle of the currently selected slice. This is also useful in Manual mode, in conjunction with Nudge, for fine-tuning slices created via Pad Slicing.
To delete a slice (that was created either manually or automatically), hold Delete and tap the corresponding pad.
11.5 Adding Samples to an Audio Track
To add a sample to an empty audio track, press the track’s lower display button to select it, then press the Clip button to enter Clip View.
You can then press the Swap button to enter Hot-Swap Mode, which will take you to the Samples folder. From there you can select and load a sample in the track’s empty clip slot.

To swap out a sample in a clip on an audio track, press the Session button to the right of the display to enter Session Screen Mode.

Use the jog wheel or up and down arrow buttons of the Session D-pad to navigate to the clip you want to update. Then go to Clip View by pressing the Clip button to access the sample in the display. You can then press the Swap button to enter Hot-Swap Mode and change the sample as needed.
12. Recording and Controlling External Instruments
Push can be used to control, monitor, and record external synthesizers and drum machines using a combination of MIDI outputs and audio inputs. The simplest method of doing this is by using the External Instrument device so that you can route MIDI and audio to and from your instruments as needed.
12.1 Using the External Instrument Device
In order to play and hear your instruments, you will need to have an armed MIDI track with an External Instrument device, as well as properly configured MIDI and audio inputs and outputs.
First, connect your instrument to Push using either the MIDI In and Out ports or the USB-A port.
Push’s MIDI In and Out ports are already configured to receive and send MIDI notes. If your instrument is connected to the USB-A port, make sure that the corresponding Input and Output ports are configured correctly in the MIDI tab of Push’s Setup Menu.
To do this, press the Setup button and then press the MIDI tab. You can use the encoder above I/O to switch between the Input and Output ports. You will also see the following MIDI port options that can be switched on or off using the corresponding upper display buttons: Track, Remote, Sync and MPE (Input only).
Track – allows Push to send or receive MIDI notes. Enable Track for the port’s Output so that Push can send MIDI signals to your instrument. If you also want to send MIDI signals from your instrument to Push, you can enable Input for the device’s port in the MIDI tab of the Setup menu. Note that enabling both Input and Output for Track at the same time could result in a MIDI feedback loop, so you may want to try this out first using a test project with your specific setup.
Sync – allows Push to send MIDI Clock. Enable Sync for the port’s Output to synchronize an external sequencer, drum machine or groove box to Push using MIDI Clock.
Remote – allows remote control access for a MIDI controller.
MPE – allows Push to receive MPE data from MPE-capable devices.
Note that natively supported Control Surfaces for Live will be recognized by Push in Standalone Mode.
Once configured, when you play notes on your instrument, you will see the corresponding pads light up in green on Push.
Then connect a line cable from your instrument to one of the In ports on Push so you can set up the audio configuration. If your instrument can be recorded in stereo, use In 1 for the left channel and In 2 for the right channel.
Finally, add an External Instrument device to a MIDI track by pressing the Add button to enter Browse Mode.


You can use the leftmost encoder to select which device to route MIDI data to. If your instrument is connected to Push’s USB-A port, you should see it show up in the list of available devices. If your instrument is connected to Push’s MIDI Out port, you can select the Push 3 MIDI Out entry.
You can use the encoder above Channel to set your preferred MIDI input channel as needed.
You can select the audio input channel that your instrument is plugged into on Push using the Audio From control.
Make sure that you have enough input gain for your instrument; you can check this in the Audio tab of Push’s Setup menu. You can also add extra gain using the Gain control in External Instrument as required.
Now when you play notes on your instrument or play Push’s pads, you should hear the audio coming through on your External Instrument track. If needed, you can compensate for any audio latency using the encoder above Latency.
External Instrument works like any other software instrument, so you can add MIDI and audio effects to the track and the incoming sound from your hardware instrument will be affected.
When you record clips using External Instrument, MIDI notes will be added to the clip and you will hear the audio from your instrument as long as it is connected to Push.
If you want to record your instrument on another track, or disconnect it but still hear the audio in clips you have already recorded, you can freeze the track that you have finished recording by holding Shift and pressing the track’s lower display button, then pressing Freeze.
This creates a sample file for each clip in the track, and these files are used during playback instead of recalculating the track’s device and clip settings in real time. That way you can record the same instrument on different tracks while still playing back the audio of previously recorded clips.
You can also Flatten a frozen track to replace the original clips and devices with the referenced sample files by holding the Shift button and pressing the track’s lower display button, then selecting Flatten.
12.2 Using CV to Control Modular Synthesizers
Push can be used to control and record audio from CV-enabled instruments, such as modular synthesizers. To do this, you can use presets from the pre-installed CV Tools Intro Pack.
First you will need to enable CV Out, which by default is switched off to limit the risk of damaging gear that is not meant to be connected to the Pedal 1 and 2 ports, such as headphones or speakers.
Press the Setup button and then the Pedals & CV tab. Here you can use the corresponding encoders to switch on CV Output for one or both ports.

Each Pedal jack is stereo and can be used with a male TRS to dual female TS splitter cable to access a total of four CV outputs.
When using CV, Pedal 1 represents outputs 5 and 6 on Push, while Pedal 2 represents outputs 7 and 8.
Once CV Out is enabled and you have connected your splitter cable to your CV inputs and Push’s Pedal jacks, you can set up a MIDI track with a CV Instrument preset from the CV Tools Intro Pack.
Navigate to the CV Tools Intro Pack in Browse Mode and select one of the Push 3 Presets that best suits your modular set up.


The customized Push 3 presets are designed to work without needing much tweaking; however, we do suggest reading through the Pack’s Help View lesson in Live to get familiar with the concepts behind the various settings and options.
13. Parameter Automation
Changes that you make to device and mixer parameters can be recorded to your clips as automation directly on Push. This means that the recorded changes will be applied to a clip and played back whenever the clip is launched, with no need to manually adjust the parameters as playback progresses.
13.1 Recording Automation
The Automate button can be used to toggle automation recording on or off. When on, the button is red; when off, it is white.

Switch on the Automate button to record automation. When using Push in Control Mode, the Automate button also toggles Live’s Session Automation Arm button. In Device View, select the track that contains the clip you want to automate, then press the Record button. As you make adjustments to different device parameters, the automation will be recorded in the clip.
When you’re done recording parameter changes, press the Record button again to stop recording but keep the transport running, or press the Play button to stop both recording and playback.
To delete the automation you’ve recorded for a particular parameter, press and hold the Delete button and tap the corresponding encoder. If automation hasn’t been recorded for a parameter, holding Delete and tapping an encoder will reset the corresponding parameter to its default value.
Automated parameters are shown with a white dot next to their parameter values in the display. If you adjust a parameter after automation has been recorded, the automation for that parameter will be overridden and the white dot next to the parameter name will turn gray.

To restore all automation that you have manually overridden, press and hold Shift and press the Automate button.
13.2 Automating in a Step Sequencer
You can also record automation when using the drum and melodic step sequencers. Depending on the selected display mode, different parameters will be available for the selected step(s):
In Device View, you can record automation for different device parameters.
In Mix View, you can create mixer automation.

You can hold one or more steps and record automation for them at the same time. While holding a step and tweaking an encoder, the corresponding parameter’s automation value will be adjusted specifically for the time represented by that step. Note that per-step automation can be created for any step, even if that step doesn’t contain notes.
14. Track Control And Mixing
When working on a Set, you may want to focus on individual tracks to take a closer look at how specific elements work with the rest of the Set, then make adjustments accordingly.
You can stop, mute or solo selected tracks using the Stop Clip, Mute and Solo buttons respectively.

Select a track and press one of the buttons to apply the corresponding action to that track. You can also apply the action to another track without navigating from the currently selected track. To do this, hold the button corresponding to the action you want to apply, then press the lower display button of a track.
The Stop Clip, Mute and Solo buttons have different ways of indicating that their respective actions have been applied to tracks. When the Stop Clip button is held down, the lower display buttons are unlit for any tracks that contain stopped clips. If a track is muted, the Mute button will be lit up when that track is selected, while its lower display button will be unlit and its controls will be grayed out in the display. If a track is soloed, the Solo button will be lit up when that track is selected and all the other tracks will have unlit lower display buttons and grayed out controls.
14.1 Lock Track Controls
Typically, pressing a lower display button will select the corresponding track, but you can use the Lock button to link pressing lower display buttons to a specific action such as stopping, muting or soloing a track.

Hold the Lock button, then press Stop Clip, Mute, or Solo button to lock one of those actions to the lower display buttons. The Lock button and the selected action button will start flashing and pressing a track’s lower display button will result in the selected action being applied to the track. For example, if you lock the Solo button, you will simply need to press a track’s lower display button to solo that track.

To unlock, press the Lock button or the selected action button one more time.
14.2 Track Mixing
To control track volumes, pans, or sends with the encoders, press the Mix button.
Each press of the Mix button toggles between Global Mix Mode and Track Mix Mode.
14.2.1 Global Mix Mode
In Global Mix Mode, the encoders adjust track volumes, pans, or send levels for the eight visible tracks. You can select which parameter will be controlled via the upper display buttons.

If your Set contains six or more return tracks, the rightmost upper display button will change to an arrow, which allows you to select which sends are visible in the display. Volumes and Pans will always remain visible.
You can use the lower display buttons or Session D-pad’s left and right arrow buttons to select a track for editing. If your Set contains more than eight tracks, Session D-pad’s left and right arrow buttons will allow you to navigate to a track which may be currently out of view.
Press the Main button to select the Main track.

In the Main Track Mix settings, you can adjust the Main track’s volume and panning using the first and second encoders, respectively. When using Push in Control Mode and switching to Split Stereo Pan Mode in Live’s Mixer, the display will show options for both the left and right pan channels instead of the Main Panning control.
To set the output channel for the Main track and Cue, press the upper display button above Input & Output.

Press the Main button again to return to the previously selected track.
14.2.2 Track Mix Mode
Press the Mix button again to get to Track Mix Mode. In this mode, use the two leftmost upper display buttons to select between Mix, where you can mix the selected track’s parameters, and Input & Output, where you can set the input and output routing options for the track. You can use the lower display buttons or left and right arrows on Session D-pad to navigate between tracks. With the Mix option selected, the corresponding encoders adjust the volume, pan, and send levels for the currently selected track. Hold Shift while adjusting the encoders for fine-tune control.

If your Set contains more than six return tracks, arrows will appear in the upper right corner of the display and you will be able to use the two rightmost upper display buttons to move between the tracks.

With the Input & Output option selected, all of the track’s routing and monitoring options can be adjusted from the encoders.

The first encoder allows you to set the track’s monitor setting or switch off monitoring altogether.
Turn the second encoder to switch between Input and Output settings.
When Input is selected, you can choose the Input Type for the track using the third encoder and Input Channel with the fourth encoder. If the Input Type is set to another track, the signal received can be tapped from one of three different positions: Pre FX, Post FX, and Post Mixer, which you can select using the last encoder.

When adjusting the Output settings, you can set the Output Type and Channel with corresponding encoders.
14.3 Rack and Group Track Mixing
Group tracks and tracks that contain Instrument or Drum Racks can be distinguished by unique icons displayed next to the track name.

These types of tracks can be unfolded, allowing you to use the Mix Modes for individual tracks or chains.
To unfold a Rack or a Group Track, select it using the corresponding lower display button. Then press this button again. The Group Track or Rack will unfold, revealing the enclosed tracks or chains. An unfolded track appears in the display with an underline that extends to the end of the enclosed tracks or chains. Each press of a selected track’s lower display button will toggle it open or closed.

Use Session D-pad’s left and right arrow keys to navigate to additional chains or tracks that may not be visible in the display when the track is unfolded. When working with an unfolded Drum Rack, hold Select and tap a pad to jump to that pad in the mixer. This can make it easier to mix with a large Drum Rack.
15. Session View
Session View gives an overview of all the tracks and clips in your Set. You can easily launch clips and scenes, as well as combine clips from different scenes into new ones. This makes Session View ideal for live performance and sketching song sections.
On Push, you can access Session View using one of two modes: Session Screen Mode and Session Pad Mode. In Session Screen Mode, you will see all of your clips and scenes in the display, while in Session Pad Mode you can use the pads to launch clips.

Session View displays the same tracks and clips in both modes. For example, if you navigate to a specific scene in Session Screen Mode, you will see the same clips on the pads when you open Session Pad Mode.

When using Push in Control Mode, you will see a colored border around the scenes that are currently in focus; this border is referred to as the Session Ring.
You can use Session View to play back individual clips or entire scenes as you’re working on your Set, as well as arrange the clips into different song sections or variations, and also launch clips during a live performance.
You can use the Stop Clip, Mute and Solo buttons in both modes to stop, mute or solo specific clips and tracks, respectively. You can also perform these actions by holding the relevant button and pressing a track’s lower display button.
If you want to stop all clips, press and hold Shift, then press Stop Clip.
15.1 Session Screen Mode
In Session Screen Mode, all of your clips and scenes are accessible in Push’s display. This lets you easily trigger scenes and clips from the display while still being able to play pads in Note Mode. If you named your clips in Live (either in Control Mode or in a Live Set transferred to Push) or added named audio or MIDI clips (in both Modes), the clip names will be displayed in Session Screen Mode.
To enter Session Screen Mode, press the Session button above the jog wheel.

You can navigate through clips, scenes, and tracks using either the jog wheel or the Session D-pad. To switch between tracks, nudge the jog wheel or use the Session D-pad’s left and right arrow buttons. Turn the jog wheel or press the Session D-pad’s up and down arrow buttons to scroll through scenes. Press the jog wheel or the Session D-pad’s center button to trigger the selected scene. If you named your scenes in Live (either in Control Mode or in a Live Set transferred to Push) you can tap the jog wheel to view the scene names.
Use the upper display buttons to trigger individual clips in a selected scene. If the scene is already playing, the selected clip will pulse in green to indicate that it is being queued up and will be launched in sync with the scene.

If you select an empty clip slot in an armed track in Session Screen Mode, the corresponding upper display button will light up in red.
You can use Session Screen Mode to access specific clips for editing in Clip View or to perform actions on the selected clips. For example, you can use the jog wheel or Session D-pad to choose a specific clip, then delete it by holding the Delete button and pressing the corresponding upper display button. To copy a clip, select it and hold the Duplicate button, then press the corresponding upper display button. Continue holding Duplicate, select a new clip slot, then press the upper display button of the track corresponding to the newly selected slot to paste the clip there.
15.2 Session Pad Mode
Session Pad Mode allows you to easily launch clips and scenes using the pads. Each column of pads represents a track, while each pad in a column represents a clip. Only one clip per track can play at any given time and you can launch clips from any track in any order.
Press the Session button under the Session D-pad to enter Session Pad Mode.

Tip: When in Note Mode, you can press and hold the Session button to temporarily toggle Session Pad Mode. Releasing the button will then return Push to Note Mode. Likewise, pressing and holding Note while in Session Pad Mode will temporarily toggle Note Mode.
In the Session Pad Mode you can navigate through scenes and tracks using the Session D-pad: the left and right arrow buttons move between tracks, while the up and down arrow buttons move between scenes. It is also possible to move by eight tracks or scenes using the Page or Octave arrow buttons, respectively. Note that navigation only affects which clips are displayed and not which clip is selected.
You can trigger individual clips by pressing the pads or entire scenes by pressing the corresponding Scenes buttons, the Session D-pad’s center button, or the jog wheel. To stop a clip in a given track, press an empty pad in that track.
The different pad colors indicate the following:
The clip’s color — this slot contains a clip. To change the clip color, hold Shift and press a pad that contains a clip. Then tap one of the pads on the outer ring to choose that color for the selected clip.
Flashing green — this clip is queued up to be launched.
Unlit — an empty clip slot.
You can copy a clip by holding the Duplicate button, pressing the pad you want to copy, and then pressing the pad where you want the clip to be copied.
15.3 Session Overview
Session Overview lets you quickly navigate through large Sets.
In Session Pad Mode, holding the Layout button gives you momentary access to Session Overview, which gives you an overview of all the clips and tracks in your Set. You can lock the Session Overview in place by holding Shift and pressing the Layout button. To unlock the Session Overview, press the Layout button again.
In the Session Overview, each pad represents an eight-scene-by-eight-track block of clips, giving you a matrix of 64 scenes by 64 tracks. Press a pad to focus on that section of the Session View. For example, pressing the pad in row three, column one will put the focus on scenes 17-24 and tracks 1-8. Furthermore, each of the Scenes buttons represents a block of 64 scenes (if they are available in your Set.)

In the Session Overview, the color coding of the pads is as follows:
White — indicates the currently selected block of clips. When using Push in Control Mode, the selection will be indicated by a colored border in Live (the Session Ring).
Green — there are clips playing in that block (though that may not be the block of clips selected).
No color — there are no tracks or scenes in that range.
16. User Mode
All of Push’s built-in functionality can be deactivated via User Mode. This allows Push to be reprogrammed to control alternate functions in Live or other software using custom mappings. With Push in Control Mode, you can press the User button to enter User Mode.

You will then see in Push’s display that User Mode is active. Note that when in User Mode, the display will not show any of Push’s built-in views.
If you want to use custom mappings in Standalone Mode, you can first create a Live Set with your preferred mappings in Control Mode, then save and transfer that Set to Push. When you load the Set on Push you can then enter User Mode to access the stored mappings.
To set up custom mappings in Live, make sure that Push’s User Ports are properly configured in the Link, Tempo & MIDI Settings.
The Track and Remote switches should be enabled for the input user port, which allows Live to receive MIDI note information and Control Change messages from Push.
Additionally, the Remote switch needs to be enabled for the output user port to allow visual feedback via Push’s LEDs.

Once the ports are configured, you can create manual mappings for most of Live’s controls via MIDI Map Mode.
Note that in User Mode, Push’s pads use the same Expression Mode that was set for Control Mode. If you want to use the pads to control buttons or clips, we recommend that you first set the Expression Mode to either Poly Aftertouch or Mono Aftertouch before entering User Mode. This will allow you to trigger changes with the pads more reliably compared to using MPE Mode, which is configured for expressive playing and changes MIDI channels every time the pads are pressed.
When mapping encoders, it is best to use the Relative (lin. 2’s comp.) Mapping Mode setting, which can be selected in Live’s Status Bar once a parameter is assigned to an encoder.

Touching the top of an encoder (including the jog wheel, Swing & Tempo encoder, and Volume encoder) will send a MIDI note, while turning the encoder will transmit a Control Change message; these can both be mapped separately.
All buttons send Control Change messages. This means they send values of 0 to 127 and can’t be used to toggle parameters. The User button itself cannot be mapped as this would make it impossible to leave User Mode. The touch strip can be mapped but will also continue to send pitch bend information.
17. Push Control Reference
The function of each button and control is explained below.
Sets – Shows your Set Library and stored Sets that were created in Standalone Mode. You can also create a new Set from here.
Setup – The Setup menu contains various settings for Push’s pads, audio interface, software authorization, and more.
Learn – Here you can launch lessons to learn about Push’s new features. You can access links to further learning materials, such as video tutorials and the manual, using the QR code. New lessons and tutorials will be added here over time.
User – Press the User button to enter User Mode, which allows you to deactivate Push’s built-in functionality so you can create custom MIDI mappings in Live or other software.
Volume Encoder – Adjusts the volume of the main output, headphone output, Main track volume, and Cue volume. Tap the encoder to see which volume option is selected. Press the encoder to switch between volume options. Turn the encoder to adjust the volume in increments of 1 dB. Hold Shift and turn the encoder to adjust the volume in increments of 0.1 dB.
Undo – Reverts the last action that occurred. You can press and hold Shift then press Undo to redo the previously reverted action. In Control Mode, Undo also applies to actions in Live, even if they were not performed on Push.
Save – Saves the current state of the Set.
Lock – Hold the Lock button and then press either the Stop Clip, Mute, or Solo button to lock that action to the lower display buttons. For example, if you lock the Solo button, you can simply press on a track’s lower display button to solo it. To unlock an action, press the Lock button or the button that is locked again.
Stop Clip – Press this button to stop a selected clip from playing. Hold Stop Clip and press any track’s lower display button to stop the playing clip in that track. When Stop Clip is held down, the lower display buttons will be unlit for any tracks that contain a stopped clip.
Mute – Mutes the currently selected track. Hold Mute while pressing another track’s lower display button to mute that track. Hold Mute while pressing a Drum Rack pad to mute the pad. Hold Mute while pressing a step sequencer step to deactivate the step. Hold Mute while pressing a device’s upper display button to deactivate the device.
Solo – Solos the currently selected track. Hold Solo while pressing another track’s lower display button to solo that track. Hold Solo while pressing a Drum Rack pad to solo the pad.
Swing and Tempo Encoder – Sets the tempo for the Set, as well as the swing amount for quantized and repeated notes. Tap the encoder to see whether Tempo or Swing is selected. Press the encoder to switch between Tempo and Swing. When set to Tempo, turning the encoder adjusts the tempo in increments of one BPM. Hold Shift and turn the encoder to shift the tempo in increments of .1 BPM. When set to Swing, turning the encoder adjusts the swing amount in 1% increments anywhere between 0% - 100%.
Tap Tempo – Press this button repeatedly to set your desired tempo. If you are working in a 4:4 signature, it takes four taps to start song playback at the tapped tempo.
Metronome – Press to toggle the metronome on or off. Hold this button to access additional metronome options.
Quantize – Press to quantize selected notes (or all notes in the clip if there is no selection). Hold Quantize and press a drum pad to quantize that pad’s notes. For audio clips, Quantize will affect transients. Press and hold Quantize to access the quantization settings.
Fixed Length – Toggle to switch Fixed Length on or off. When on, all newly created clips will be a fixed number of bars. When off, new clips will continuously be recorded until you press the New, Record, or Play button. Press and hold Fixed Length to set the recording length for clips or enable Phrase Sync.
Automate – Toggle to turn automation recording on or off. The Automate button will appear in red when on and white when off. When on, any parameter changes you make using the encoders will be recorded into the clip. Automated parameters will have a white dot next to the parameter name in Device View, while parameters that have overridden automation will have a gray dot next to the parameter name. Hold Shift and press Automate to re-enable any automation that you have overridden. Hold Delete and press the Automation button to delete all automation in a clip.
New – Press New to stop the selected clip and prepare an empty clip slot in the track so that you can record new material.
Capture – Press the Capture button to capture any MIDI notes you have played on the pads while not actively recording into a new clip. A track must be armed in order for Capture to work.
Record – Press to start recording and press again to stop recording while continuing playback. Pressing Record a third time will enable overdub mode, allowing you to record more notes into the clip while it plays back. Hold Record and press the lower display button for a track to manually arm it. In Control Mode, when the Arrangement View is focused in Live, pressing Record will toggle Arrangement Recording on and off. You can also trigger Arrangement Recording while Live’s Session View is in focus by holding Shift and pressing Record. Note that this behavior is reversed when the Arrangement is in focus; holding Shift and pressing Record will then toggle Session recording.
Play – Toggles playback on or off.
Touch Strip – When a MIDI track is selected, the touch strip adjusts pitch bend or modulation wheel amount when playing the pads in real-time, or the available range of notes when step sequencing. Pitch bend is selected by default for instrument tracks. You can hold Select and then tap the touch strip to toggle between pitch bend and mod wheel functionality. Note that pitch bend and modulation wheel functionality are not available when using the Melodic Sequencer. When a Drum Rack track is selected, the touch strip selects the Drum Rack bank.
Encoders – The eight encoders are used for a variety of things depending on what mode or view is in focus, such as parameter adjustment, selecting and navigating, clip and note editing, and more. Usually, if you see a parameter or option in the display, the encoder above it will affect it.
Upper and Lower Display Buttons – Like the encoders, the display buttons are used for various options depending on what mode or view you are in, such as track selection, accessing parameter banks and edit options, selecting, track arming, and more.
Display – The display shows what is in focus on Push at any given time.
Pad Grid – Push’s 8x8 pad grid is fully MPE-capable. You can play notes directly on the pads in the 64 Notes layout, or step sequence notes using the Melodic or Drum Sequencer.
Scenes & Repeat Intervals – These buttons have different functions depending on what mode you are in. In Note Mode, you can use the Repeat Intervals buttons to set the beat divisions of the step sequencer and grid, as well as use them in conjunction with the Repeat button to add repeated notes in the various beat divisions. In Session Mode, you can use the Scenes buttons to launch scenes.
Main Track – Press to show the Main track in the display. Press the button again to return to the previously selected view.
Swap – Press to enter Hot-Swap Mode, where you can browse and load new devices onto tracks. Press Swap again to return to the previously selected view.
Add – Press to enter Browse Mode, where you can browse and add new tracks, instruments, and effects to your Set, as well as access your Packs, User Library, and Collections labels.
Device – Press to enter Device View, where you can view and adjust the device parameters of the selected track.
Mix – Press once to enter Global Mix Mode, which shows the volume, pan, and return send settings for each track. Press twice to view Track Mix Mode, which displays the monitoring and input/output settings for the selected track.
Clip – Press to enter Clip View, where you can set various loop settings for clips and edit individual MIDI notes.
Session Screen Mode – Press to enter Session Screen Mode, which shows your Session View clips and scenes in the display. Use the jog wheel or Session D-pad to navigate between scenes and clips. Depending on which Workflow option you have selected in the Setup menu, you can press the jog wheel or the center button of the Session D-pad to trigger scenes (Scene Workflow) or clips (Clip Workflow). Hold Shift and press the jog wheel or center button of the Session D-pad to launch individual clips (Scene Workflow) or scenes (Clip Workflow).
Jog Wheel – Use the jog wheel for navigation and selection. You can turn the jog wheel to navigate, press the jog wheel to make selections, and nudge the jog wheel left to return to previous menus when navigating through submenus. Nudge the jog wheel to the right to rename selected devices or Sets. Nudge the jog wheel left or right to move the cursor when entering text.
Session D-pad – Like the jog wheel, you can use the Session D-pad to navigate and make selections. Use the up, down, left, and right arrows to navigate, and press the center button to make selections.
Note – Press to enter Note Mode, where you can play the pads as well as select various layouts for the pad grid.
Session Pad Mode – Press to enter Session Pad Mode, which displays your Session View clips on the pad grid for launching and recording.
Scale – In Note Mode, press Scale to select a key and scale for your Set. Scale options are saved with the Set and are defaulted to whenever the Set is loaded.
Layout – In Note Mode, press Layout to switch between the various pad grid layouts. When a MIDI track containing a melodic instrument is selected, you can toggle between the 64 Notes, Melodic Sequencer, and Melodic Sequencer + 32 Notes layout. When a MIDI track containing a Drum Rack is selected, you can toggle between the 64 Pads, Loop Selector, and 16 Velocities layouts.
Repeat – Press Repeat when in Note Mode to enable the Repeat Intervals buttons, which let you retrigger notes in various beat divisions when holding a pad. If you press and hold Repeat, you can temporarily enable the Repeat Intervals buttons.
Accent – If you press Accent, all incoming MIDI notes are played at full note velocity. Like the Repeat button, you can press and hold Accent to temporarily enable its action.
Double Loop – Doubles the material with the loop, as well as the length of the loop.
Duplicate – In Scene Workflow, Duplicate creates a new scene containing all of the currently playing clips. In Clip Workflow, Duplicate creates a copy of the currently selected clip in the next clip slot, while continuing playback of any currently playing clips in other tracks. Hold Duplicate and then press a Drum Rack pad to copy the pad and paste it to a new location in the Drum Rack. Hold Duplicate while pressing a track’s lower display button to duplicate that track. In Session Mode, you can hold Duplicate and press a clip to copy it, then tap another clip slot to paste the clip there.
Convert – Depending on what device is selected, Convert works in the following ways:
When using Simpler in Classic or One-Shot Mode, pressing Convert creates a new Drum Rack with the Simpler device on the first pad. Any other devices on the track, such as audio effects, are also part of the new device chain.
When using Simpler in Slicing Mode, pressing Convert creates a new Drum Rack that contains all of the slices mapped to individual pads.
When using a Drum Rack, pressing Convert creates a new Simpler (or Sampler depending on the Rack’s contents) containing all of the devices that were on the selected pad.
When using an audio track, pressing Convert gives you the option to add the audio into a new Simpler or Drum Pad, or use the Audio to MIDI options: Harmony-MIDI, Melody-MIDI, and Drums-MIDI.
Delete – In Note Mode, this button deletes the selected clip. When working with a Drum Rack, you can hold Delete and press a pad to delete that pad’s notes in the clip (or the pad itself if there are no recorded notes). In Session Mode, hold Delete and then press a clip to delete that clip. Hold Delete and select a device or track with the upper and lower display buttons to delete the device or track. Hold Delete and touch an encoder to delete automation controlled by that encoder. If automation has not been recorded for a particular parameter, holding Delete and touching the corresponding encoder will reset that parameter to its default value. In Simpler’s Slicing Mode, hold Delete and tap a pad to delete that slice. In Control Mode, if the Arrangement View is in focus in Live, pressing Delete will delete the currently selected clip in the Arrangement.
Octave Up / Down – If an instrument track is selected, these buttons shift the pads up or down by an octave. If a Drum Rack is selected, these buttons shift the Drum Rack’s pad overview up or down by 16 pads. In Session Mode, these buttons shift control of the Session View up or down by eight scenes. These buttons will be unlit if no additional octaves are available.
Page Left / Right – When working with the Drum or Melodic step sequencers, these buttons navigate to the previous or next page of steps. In Session Mode, these buttons shift control of the Session View left or right by eight tracks.
Shift – Press and hold Shift while pressing other buttons to access additional functionality. Hold Shift while turning encoders for finer resolution.
Select – In Session Pad Mode, hold Select and press a clip to select the clip without launching it. This will also display the clip name in the display. In Note Mode, hold Select and press a Drum Rack pad to select it without triggering the pad.
18. Credits
Ableton Push Manual
Reference Manual by Sara Riegel, Ania Kuźbik, Michelle Hughes, Chandler Tipton, Jordan Evans, and Jesse Terry.
Schönhauser Allee 6-7 | 10119 Berlin, Germany
Contact Support: https://www.ableton.com/help/contact-support/
Copyright 2024 Ableton AG. All rights reserved. Made in Germany.
This manual, as well as the product described in it, is furnished under license and may be used or copied only in accordance with the terms of such license. The content of this manual is furnished for informational use only, is subject to change without notice, and should not be construed as a commitment by Ableton. Every effort has been made to ensure that the information in this manual is accurate. Ableton assumes no responsibility or liability for any errors or inaccuracies that may appear in this book.
Except as permitted by such license, no part of this publication may be reproduced, edited, stored in a retrieval system or transmitted, in any form or by any means, electronic, mechanical, recording or otherwise, without the prior written permission of Ableton.
Ableton, the Ableton Logo, the Live logo are trademarks of Ableton AG. Apple, iOS, Mac, macOS, are trademarks of Apple Inc, registered in the U.S. and other countries. Windows is a registered trademark of Microsoft Corporation in the United States and other countries.