Lesson 3: Performing a Mashup
Lesson overview
In Lesson 3, students develop their own mashup performance for a grid-based MIDI controller, such as an Ableton Push, Novation Launchpad or Akai APC40. Their performance is captured via a close-up webcam or phone camera.
Learning intentions
- Creative/musical – musicality of sound combinations and form
- Critical thinking – understanding and practical application of clip techniques
- Technology literacy – understanding and effective use of audio and video equipment
Preparation (10-15 mins)
- Download and familiarize yourself with the Mashup Performance - Live Set and Mashup Performance video
- Identify how you will capture video and audio of student mashup performances
- Have the Mashup Performance worksheet and Advanced Clip Workflows guide available to students
In the classroom (90-120 mins)
- Step 1: Introduction – explain the task by showing some of the videos of mashup performances (5-10 mins)
- Step 2: Teacher instruction – explain some of the advanced clip workflows using the supplied Mashup Demo Live Set (10-15 mins)
- Step 3: Practical task – students follow the Advanced Clip Workflows Guide and use the Mashup Performance Checklist to set up and configure a grid-based performance Live Set (30-40 mins) *
- Step 4: Practical task – students develop and rehearse their mashup performance (30-40 mins)
- Step 5: Wrap up – students capture their mashup performance on video (10-20 mins) ^
Activity Option:
* Students can use audio material they have been developing throughout other lessons, but there is an option to use the supplied Mashup Performance Demo Set as a template to perform from.
^ You can capture the audio and video in a number of ways depending on the resources you have available. Alternatively, you may get students to perform their mashup in front of peers.
Introduction: Mashup performances
Grid-based controller mashup performances have been seen on Youtube since 2011. This style of performance is engaging, accessible and achievable to students with a diverse range of technique and ability levels.
Madeon’s Pop Culture
A classic clip-triggering live mashup performance. It shows various parts of 39 songs being triggered in Ableton Live by a Novation Launchpad.

Q: What parts can you identify being played whenever a pad is being pushed?
Don’t hold back, just push things forward
This APC40 live mashup shows a simple clip and scene triggering performance along with scenes from the movie soundtracks where audio was sourced.

Q: Can you recognize that both individual clip launching and scene launching is taking place?
Pad Culture
This article from Novation talks about the rise and evolution of YouTube mashup performances – from triggering audio clips to light shows.
Read: Novation Article: The Story of the Launchpad Lightshow
Practical Task: Developing a Mashup Performance
In this task, students use the techniques and strategies included to create their own mashup performance Live Set.
Task steps:
- Use techniques learned from the Advanced Clip Workflows guide
- Watch the mashup performance demo video and examine the Live Set to gather ideas for setting up a performance Live Set
- Use the ideas listed in the Mashup Performance Checklist to develop a performance Live Set
- Rehearse the mashup and capture a performance on video
Advanced Clip Workflows
To fully explore the possibilities of a clip-triggering performance, it helps to learn some of the more advanced features of audio clips.
This guide provides students with information on warp modes, launch modes and looping to help them plan a clip-based performance.
Guide: Advanced Clip Workflows
Mashup Performance Checklist
When students are developing a mashup performance set, they may need some guidance. This set of strategies is a best practice guide to setting up clips for a mashup performance.
Worksheet: Mashup Performance Checklist
Tip: The mashup demo video linked below shows a live performance that has been built on these strategies.
Mashup Performance - Live Set
Having ready-to-go musical material enables students to dive right into the creative process of performing a mashup.
The downloadable Live Set can be used as a template for creating a mashup performance. It includes clips made from the included songs which are laid out in a performable way.
Download: Mashup Performance - Live Set*
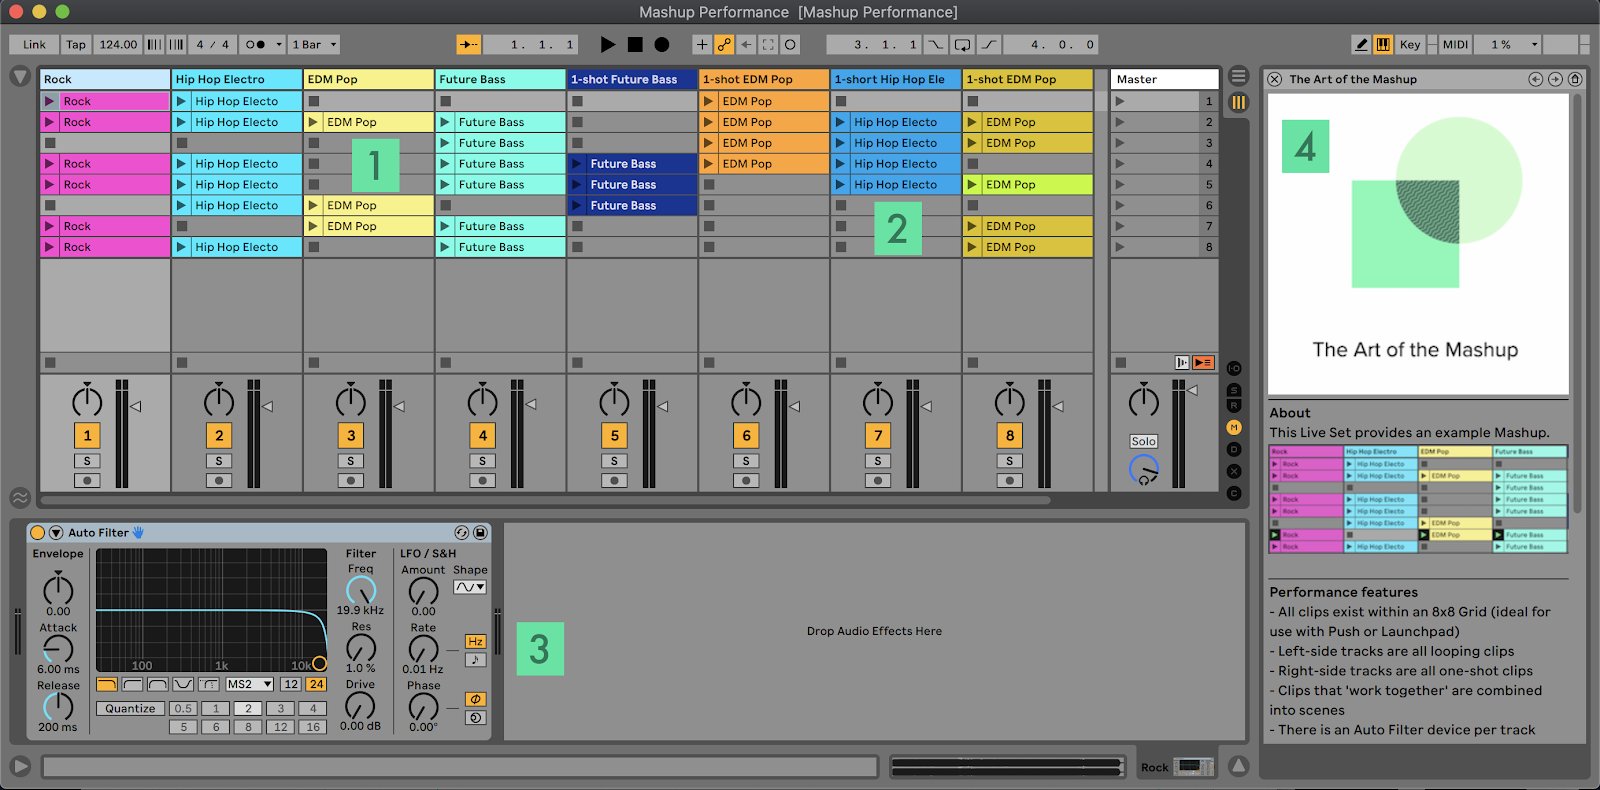
- Clips with songs pre-warped and looped
- Clips of one-shot elements
- Performance effects per channel
- Overview of what is included within the Live Set
* The audio recordings downloadable in this project have been licensed by Ableton to be used by teachers and students in this project.
Mashup Performance - Example Video
This demo video demonstrates performing a mashup on Push using the provided Live Set. It provides a birds-eye view of the Push over a screen capture of Live’s Session View.
Key elements to observe:
- Clips on the left side are generally sections of songs
- Clips on the right are generally one-shots or FX-style clips
- Use of both clip and scene triggering
- Use of Auto-Filter audio effect on each track
- Use of ‘Fade to Grey’ preset on master track (found in the Performance & DJ Audio Effect Rack folder)
Classroom Tip: Capturing mashup performances on video
Madeon's Pop Culture video is dark, grainy and DIY, but the close-up nature of his hands triggering clips is engaging and fun to watch.
Capturing a close-up or bird’s-eye view via video of the mashup performance is a great way to finish this project.
Below are two options for video and audio capture.
Option 1: Use a mobile phone to capture the performance
This is a much more guerilla-style approach where students can capture their own performance using a mobile phone angled towards their controller.
Camera App
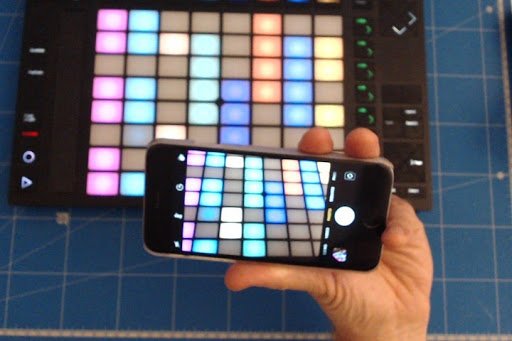
Use the camera app on a phone to capture a video of the performance.
The phone’s microphone quality is not ideal for capturing audio, but can provide adequate results.
Combining audio and video
For better quality audio, record the mashup performance into Arrangement View.
If you have Live 10 Standard or Suite, you are able import the video directly into Live and sync it.
Otherwise, export audio and sync using any basic video editing software.
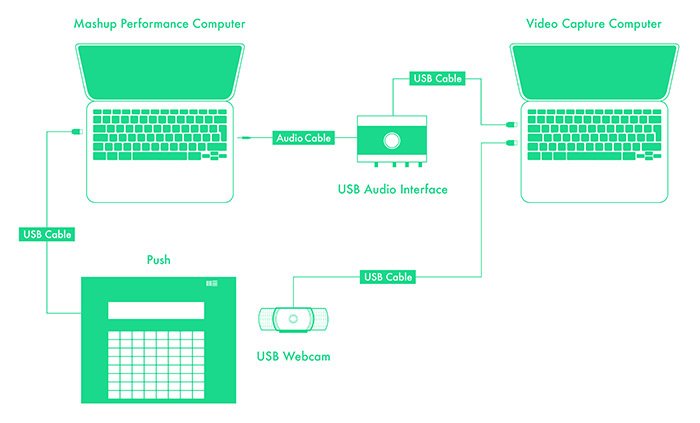
Option 2: Record performances with a dedicated video capture computer
The video capture computer is set up at the teacher’s workstation with a webcam to capture the video, and audio interface to capture audio.
This is a great option to capture good quality video and audio simultaneously, with no need to do any post production.
Signal path diagram
Use a dedicated computer as the video capture device for all students.
Connect an audio interface to the video capture computer.
Connect the mashup performance computer’s audio output to the audio interface input.
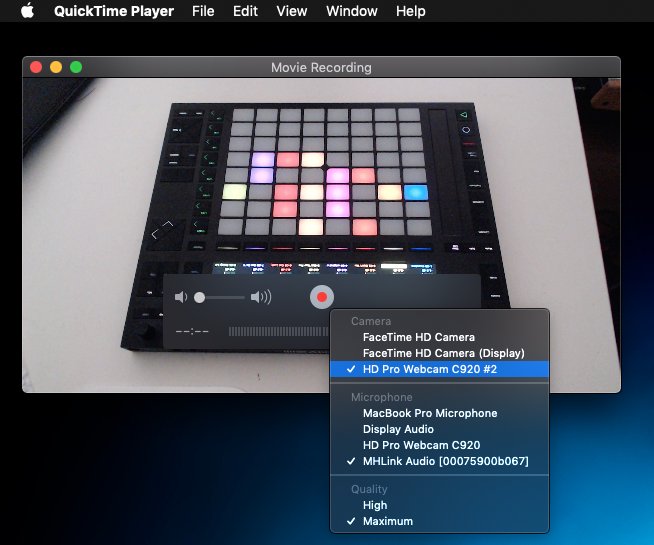
Using QuickTime
Open QuickTime on the video capture computer
Select New Movie Recording from the File menu
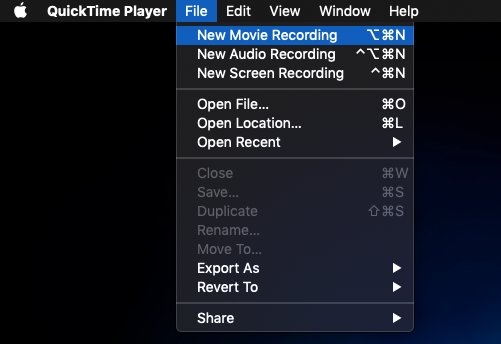
Open the record button’s dropdown menu
Select the camera source (if multiple options)
Select the audio interface as the microphone source
Note: the students will want to hear themselves during the recording, so you should either use a headphone splitter or monitor through the audio interface.
Press QuickTime’s record button and capture the performance.
Learn more about how to use QuickTime.
Note: Windows users can download QuickTime or may wish to use the native camera application to achieve the same results.