Chapter 7 - Exploring the Arranger View's Automation
By Darwin Grosse
One of the primary differences between an amateur and professional mix is the prevalent use of automation. Automating volumn changes, pan position changes effects sends and even effects settings can turn an otherwise tired mix into a spectacular one.
Why is automation so important? It gives use the ability to add dynamic movement to the mix, and allows us to maximize the impact of particular audio sections. Imagine a singer plowing through a song with no changes in pitch, level or emotions. Boring, no (Tom Waits notwithstanding...)?
Using the automation in Live's Arranger View is pretty easy, but can also benefit from a few tricks. First, you need to know how to get at the automation curves (called Envelopes in Ableton's terminology).
Move to the arrange page, and "expand" a track to automate.
In this example, I've taken a relatively simple track and looped a section that I'm going to automate. Track 3 contains a drum loop, and I'm going to take a one measure break section and automate the effects to provide a nice turnaround.
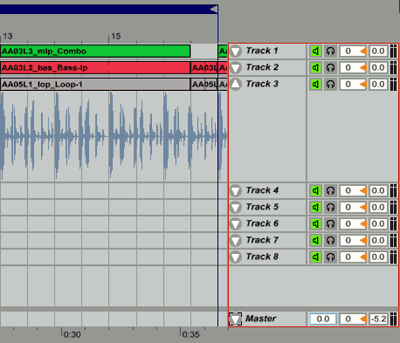
Use the View Menu to show the processes you want to automate.
Since we are going to be automating the effects sends, we will need to view the sends in the Arranger View. This is an important note - you can't automate anything that you can't see!
Select the View Menu, and "check" the Sends option. This will expand the track area of the display to include the values of the mixer send settings. If you click on one of the send settings, a red "automation envelope" will be shown. This is where we do our work...
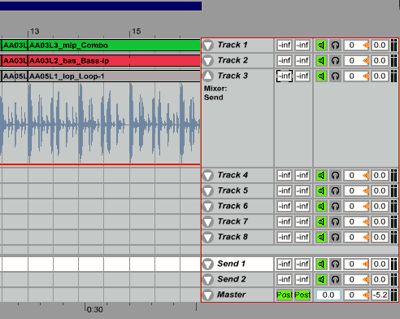
Add automation points to alter the settings.
To create an automation point, you need to double-click on the automation line. This will drop in an editable point that can be moved to alter the effects send value. In this case, I'm going to place a point both before and after the area I'm going to automate - these are my "fence points", which will prevent changes I make from affecting the rest of the mix.
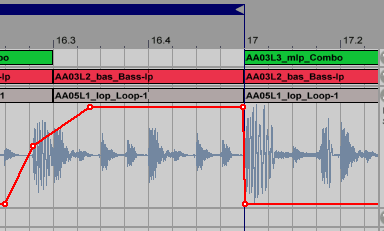
Add additional points necessary to create the automation moves you want.
In this case, I'm increasing the effects send value (which is routed to a Filter Delay) from "-inf" (which is a technically correct way of saying "nothing") to "full-on" over the first portion of the selected area. I'm actually starting the increase before the actual break occurs, so that I'm able to "load up" the deleay effect prior to the beginning of the break.
At the end of the break, I "slam" the value back to "-inf" over a very short timeframe. This is the equivalent of "slamming the fader". One of the niceties of Live's automation envelope is the ability to create an automation point, then adjust it both vertically and horizontally. In this case, I created a point, pushed it to the max, then slid it very near my ending "fence point".
Automate other moves.
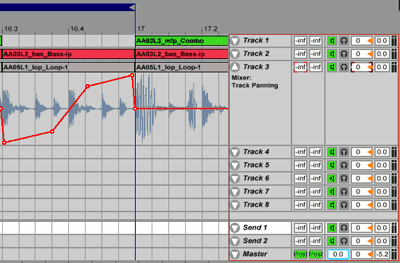
In addition to automating the effects send, I'm going to automate the panning - to give a nice L->R sweep during the break. The process is similar to that described above - I just chose the "pan" setting, and adjusted its automation envelope. Rather than doing a "straight-line" automation, I've exaggerated the curve to make the sound live outside the center for the majority of the break.
Automate the effects settings.
While changing the volume, pan and send settings can provide an interesting set of sounds, even more mix animation can come from automating the actually effects settings. One of the real hallmarks of a pro mix is the use of appropriate effects manipulation. In this case, we are going to use automation to control the settings of the Auto-Filter on a track.
In this case, I already had an Auto Filter assigned to the first track. One the Arranger Page, I've selected and "expanded" Track 1. The effects settings are not displayed on the Track Info itself - rather, you have to click on the setting of the effects device itself (since you can "only automate what you can see").
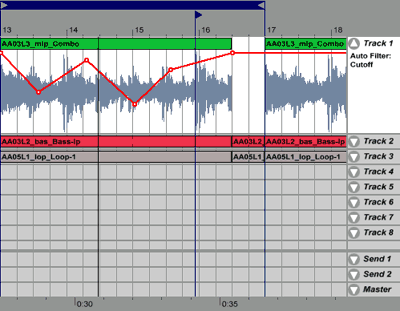
I want to automate the cutoff frequency and the resonance, so I'll have to do two separate automations. First, I click on the "Freq" setting in the effect - the track now displays "Auto Filter: Cutoff", and a red automation line is displayed. I add some automation points and alter them to create a nice filter transition over the a "verse".
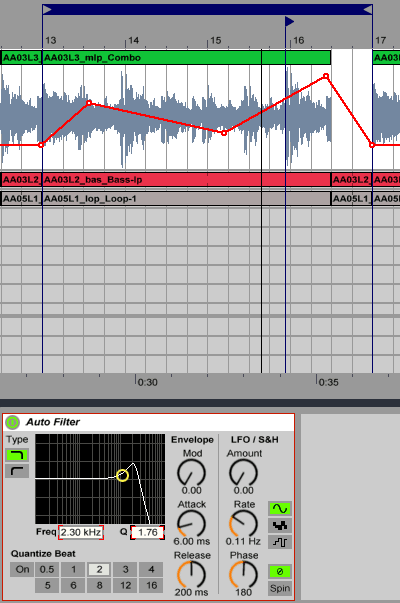
Next, I select the "Q" control on the Auto Filter. The track display changes to "Auto Filter: Resonance", and a new automation line is displayed. I manipulate this to taste as well...
The result is a set of changes to the Auto Filter that are focused on the actual track, and sound much more "focused" than a normal "LFO" setting for the Auto Filter.
That's really all there is to doing automation. Just as Live allows you to swap clips to create an organic mix, the use of automation envelopes can add an organic feel to the mix and your use of effects. Don't skimp on automation - it's literally the life-blood of a great track.