Chapter 6 - Tweaking the Render Options...
By Darwin Grosse
One of the best new features of the 1.5 Live update is the availability of a "Render to Disk" function. The basic information on using this function can be found in the "Live Manual Addendum.pdf" file that is included with the 1.5 update. However, in order to create the best possible output, a bit more detail might be useful - hence, this article...
First, the criteria for rendering. The software acts differently depending on whether you are viewing the Session View or Arranger View. If you are currently in the Arranger View, the Render command will build a file based on the time range that you select.
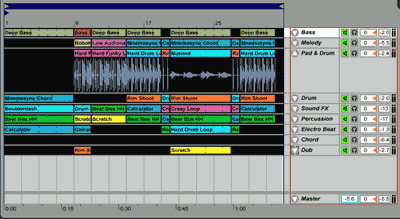
If in Session View, a the "render dialog" has a "length" option that will determine the length of the file created - and the contents will be based on any automation recorded in an arrangement. Any effects that are currently applied will be applied to the output recording. Once you select an audio range (in the Arrange View), or record an Arrangement in the Session View, you select the "Render To Disk..." option from the File menu.
The "normal" dialog (the one display when you are in the Arrange View) looks like this:

The options are covered in the Live Manual Addendum, but some of the details may still be a bit cloudy for new Live users.
The Normalize option is used to maximize the output level. Prior to actually writing the output audio file, the audio range is searched for the maximum volume of the selected range. If the maximum level is less than +0dB, a level adjustment will be added to the output of the subsequent file output - now making the maximum level +0 dB. In basic terms, this means that the file will be created as loud as possible. Now, this isn't necessarily the loudest that it could sound - this would be a matter of adding some compression (fodder for a future article).
The Render as Loop option is pretty well explained in the Addendum - it does a "pre-loop" to prepare the file for an appropriate render. Why would you use this? A common mistake of beginning loopers is to record the first 4 bars of a track for a loop. The problem is the effects - no effects will be heard at the beginning of the loop, and there will be an unnatural break at the end of the loop (where the listener might expect delay or reverb tails). By running a "pre-loop", Live prepares the file for appropriate looping by feeding effect returns into the second-pass recording. Slick, and it makes an audible difference when creating complex effects-laden loops.
File Type, Bit Depth and Sample Rate are pretty simple. The File Type is almost irrelivant for most computer system. Both PC's and Mac's are more than happy to work with either WAVE (WAV) or AIFF (AIF) files. If you are outputting data for a CD pressing, you will want to use a Bit Depth of 16 (bits) and Sample Rate of 44100 - otherwise, you should use whichever depth and rate you are using for your Live sessions (which are often 16/44100 anyway). 24 bit files are handiest for working with Pro Tools, since that software doesn't allow you to mix Bit Depth or Sample Rates without converting (which is not necessarily great sounding).
Finally, the "Create Analysis File" will determine if the system should create the ".asd" file used for Live analysis. This is only required if you are creating an audio file for re-insertion into Live. Otherwise, it's just wasted disk space... Convert to Mono is self-explanatory (but a useful option for a lot of dance music, where mono samples make for more solid dance system tracks).
Remember I said that, if you are looking at the Session View, you will have an addition field? Here it is:
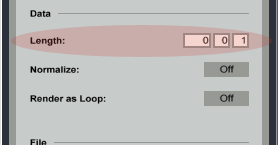
The length is the amount of time that will be recorded of session contents (as automated in a previous record session). Don't be misled - you won't be able to click on clips or scenes while the rendering is taking place - so you need to pre-produce your automation before running this option.
Practically speaking, it is easiest to just use the Arrange View method of selection and rendering.
Once you make your output selections, click the "OK" button to select the output file. You will get the following output dialog (Mac version shown, but Windows users will get the idea...):
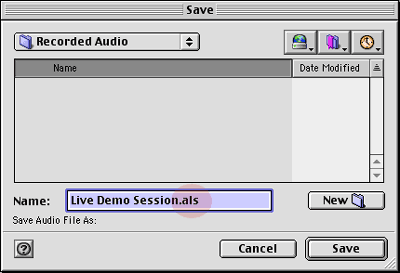
By default, the output file has an ".als" extension. This is really an important detail - because (for Windows users) it can submarine your playback stategies. Many windows programs demand that the output file name (actually, the extension - .xxx) match certain criteria in order to be read. Windows programs seldom "dive into" a file before it is opened, so you need to name the file in order to give your software a hint.
Bottom line? If you are saving a WAV file, name the file with a ".WAV" extention; ".AIF" is the right extension for AIFF files. If you don't do this, the output file will most likely be invisible to many of your sotware programs.
Mac users have a slightly different issue - the ol' File Creator issue. When you render a Mac arrangement to file, it will be created with an appropriate "Type", but with Ableton Live as the File Creator. That make sense, since Live did create the file.
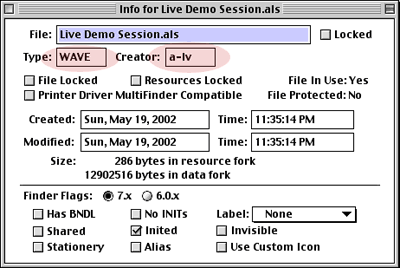
The downside is that, if you double click the file, you jump into Ableton Live to read the file. This is especially bad if you (like me) keep that old version of Live on your disk - on my machine, double-clicking on the rendered file kicks of Live 1.01, which chokes on the file. There are a few ways to fix this:
- You could edit the file in ResEdit and change the Creator to something more useful (change the creator to "TVOD" in order to invoke the QuickTime Player for the sound).
- You could open and edit the file in an editor (like Peak) and save the results (which will then re-open in Peak).
- Probably a best idea is to get a program like File Typer (http://www.ugcs.caltech.edu/~dazuma/filetyper/), and use it for drag'n'drop type handling.
Hopefully, this article has given you further insight into using the Render to Disk option. If you have any further insights, brain-storms or criticisms, drop me a line at ddg@creativesynth.com, and I'll try to "adjust to fit".