Chapter 5 - Zoomin' To The Hits
By Darwin Grosse
The first four tutorials were all about the Session View and clip manipulation. It's time to dig into the Arranger View.
You get to the Arranger View by clicking on the "vertical bar" button at the top right of the display. There are two different ways to get track into Arranger View tracks - you can hand enter them, or you can play in a "starting point" by recording changes in the Session View. Frankly, the second way is easier, and it's a little more the "Live Way". A collection of clips laid out across the Arranger View has a name in Live World - it's an arrangement. For this tutorial, I created a number of clips, made up some scenes and recorded a simple arrangement that I'll use for demonstration.
Jumping into the Arranger View looks much more like "standard" music software. You have a timeline across the horizontal axis, and tracks lined up vertically. While this view may look familiar (if you are a Cubase, Logic, Pro Tools or Cakewalk user), there are a few tweaks that are quite different than these other software packages. In this tutorial, we are going to learn how to zip around the user interface and zoom in-and-out of various detail levels.
Arranger View Editing
One of the really great tweaks is the Arranger Overview (outlined in red below) - a complete "30,000 foot" view of your arrangement. In addition to giving you a view of the arrangement, you can use the Overview to set the location of the track display area, the start and end points (the left and right points) or the zoom level. This is your starting point for "personalizing" the display area view.
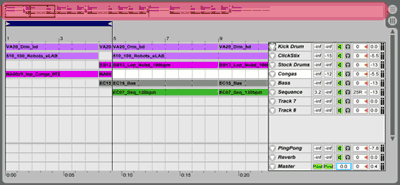
The Arranger Overview is a "miniaturized" version of the track display, and will always show you the entire arrangement. There is a rectangular box around a portion of this display - this is the area that is currently shown in the track display area below. While it's nice that Live gives you a hint about your current context, it would be nice if you could move that boxed section around. Guess what? That's exactly what you can do!
If we take a closer look at the boxed area, we can see three special "grab area". The first, the left border, is shaded a light grey. If you hover your cursor over that area, the cursor will change to a "left bracket":
Clicking and draggin the left border while the cursor is "bracketed" allows you to move the time location of the left side of the track display. As you move this around, you will notice that the zoom level of the track display area will change to "expand" or "contract" to match your current settings.>
The right border, also shaded grey, is similar. Hovering the cursor over this area will change it to a "right bracket", and will allow you to set the time location of the right side of the track display.
Again, clicking and dragging this border while bracketed will change track display area, and alter the zoom level to match.
Finally, there is a thin bar outline in the center of the boxed area. This represents the center of the current track display, and allows you to zoom from the center out. It's really harder to explain than to do - so just try it! When you hover the cursor over this center "grab area", the cursor will change to a "magnifying glass":
Click on that center bar, and drag the cursor up or down. When you do, you will notice a temporary line drawn on the track display, and that line will stay put while the zoom level changes. As you drag your cursor downward, the zoom level will increase - the zoom level decreases if you drag upward. Once you've identified an area of your arrangement that you'd like to tightly edit, this is probably the easiest way to get in close for some intimate editing...
Track Display Area Movements
The track display area has it's own set of markers, and it's own set of tools. The main areas of the track display area are:
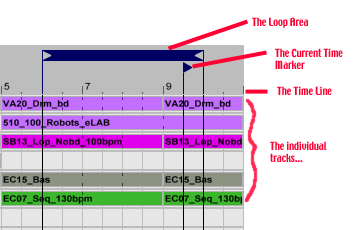
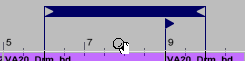
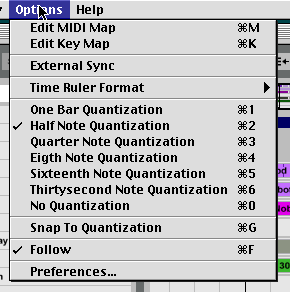
The Loop Area is the range of time that will be looped if the Loop Mode is turned on (that is, if the Loop button is clicked). The Start Marker is the current location of the playback cursor, and the point that will start playing when you hit the play button. Beneath that is the Beat Time Ruler, which displays the bars and beats of the currently displayed area. Next, the individual tracks are displayed top-to-bottom. Finally, there is another time line - the Time Ruler - underneath the tracks. This time line defaults to elapsed seconds, but can be changed to SMPTE time using the Time Ruler Format selections in the Options menu
Placing the cursor in the Loop Area bracket will change it to a "slider" cursor, and will allow you to slide the loop wherever you need it. The same cursor will appear if you place the cursor at the top of the track display area. Clicking outside of the Loop Area will cause the current loop to jump to this new location.
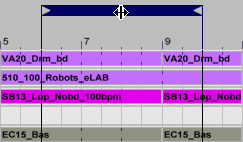
You can also grab the left or right sides of the Loop Area and drag them into place. The cursor will change to an appropriate shape, and will allow you to quickly zap a loop into place.
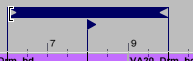
The Start Marker can be moved in two ways - but jumping it to a location, or by dragging it. You can grab the marker and slide it left or right. Or, you can place your cursor in the middle of the location area and click - the Start Marker will immediately jump to this new location.
Placing the cursor on the Beat Time Ruler is a trip - you can scroll left/right or zoom in and out using the "magnifying glass" cursor that is displayed:
You can zoom out or in by dragging the cursor up or down (just like in the Arranger Overview). You can also scroll left and right by dragging the cursor left and right. This four-way function is one of the few ways you can truly trip out using music software - dragging the cursor in a circle will simulataneously zoom and pan. This will either drop you into a trance or give you sea sickness...
If you just want a sane way to scroll left or right, the Time Ruler at the bottom works a bit better. Clicking on the Time Ruler changes the cursor to a "gripping hand", and allows you to drag the track display area left or right (with no disconcerting zoom action):

So, as you can see, there are a wide number of ways to fly around the user interface. In reality, you will probably not use them all - you will choose some favorites and focus on those. For example, I find myself using the Arranger Overview for almost all of my panning and zooming - I just like the way it works. The only time I use the Beat Time Ruler zoom is when I need to zoom in really tight. I also really like using the panning available from on the Time Ruler (at the bottom) - I didn't notice this function right away, but I use it all the time now...
One final tip - if you are used to working with Cubase or Logic, you are probably used to having the display scroll as a track displays. Conversely, Pro Tools users often get used to the tracks not scrolling with playback. You can change the display scrolling fuction using the "Follow" setting in the Options menu:
Turning it on (checked) will make the display scroll (actually jump - this style is often called "jump scrolling") along with the arrangement playback. Turn this option off if you are doing detailed editing and don't want to lose you position everytime you do a playback.
That's it for this week. Our next tutorial (in two weeks) will cover automation in the Arranger View.