Chapter 4 - Increase the Love - Increase the Groove...
By Darwin Grosse
In reviewing all of the Ableton Live reviews, I saw a lot of discussion on the settings of the Warp Markers. These markers are the vertical lines that you see when you eyeball the Clip View. Normally, these markers are automatically set when you load in a sample as a clip. In all of the reviews I saw, there were discussions about moving the Warp Markers to the loop transient, and how this will rob the clip of its "groove".
Well, I asked myself, could you use this to add some groove as well? You know what I mean - sometimes when you import a few loops, the difference between swing factors in between the drum loop and (for example) the bass loop might prevent you from having any kind of rhythm section lock-in. By adjusting the Warp Markers, you can adjust the swing factor of one loop to match another, or simply add some groove to an otherwise stale drum loop.
For this tutorial, I created a butt-simple drum loop using the Redrum instrument in Reason. I added no shuffle, and the result was straight - too straight to be interesting. I created an audio file, and loaded into Live. The result looked like this:

The loop was eight bars long, but I wanted to work on a one-bar loop. So, I pulled in the right loop marker to limit the loop to a single bar. Creating some groove (or swing, or shuffle) means altering the loop segments; alternative segments must be either shorter or longer. I want to make an eighth-note swing feel, so I zoomed in until I was able to see the eighth note markers (the markers with a .3 suffix).
Since I wanted to alter the location of the markers, and wanted them to "stay in place" while other parts of the sampler were stretched, I needed to "lock down" all of the eighth note Warp Markers. I did this by double-clicking on the marker's ID, which changed them from grey to green:

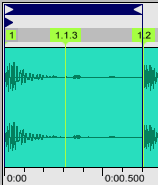
Note that I also locked-down the final marker of the loop (the "2" marker), so that the overall length would not change when I change other markers. Now, to make it easy to set up a groove, I moved the right loop marker to include only a single beat. By looping on a single beat, it is easy to "feel" the groove lock into place. Once I had a single beat looping (by starting the clip), I began sliding the off-beat marker toward the loop start point. This has the effect of shortening the first half of the beat, and stretching out the second half - the technical definition of a swing beat:

Notice how the 1.1.3 marker is now considerably forward of its initial position.
By moving the loop range to subsequent beats, I locked down a nice groove on each of the four beat of the measure. The result looks like this:

Now, as an experiment, I created a copy of the clip, and pushed the alternating markers even further forward:

As the second half of each beat gets longer, you will notice the some other markers being displayed (the ".4" markers in this case). Now, for a final clip, I really crank on the ".3" markers to maximize the groove:

The result of the manipulations can be heard in this AIFF file - which contains two measure of each of the above four clips - the starting clip, then three "grooved" versions from lightest to heaviest.
Hopefully, this will help you imagine all sorts of interesting warp marker tweaks that you can do on your music. This tutorial is a perfect example of why I enjoy working with Live - it really allows you to get fluid with your loops...
Have fun, 'cuz next time we are on to the Arrange Page - with some starting tutorials and advanced track handling.