Chapter 2 - Mixdown of a Live Session
By Darwin Grosse
One of the few "gripes" I've heard about Ableton's Live software is the lack of an "Export Audio" function. This is something we all need — as was taught to us by Propellerheads Software (which makes it easy to build standalone loop files from Rebirth and Reason). I thought I'd dig into this a bit further, and have realized that the function is there — it just isn't quite as obvious at it could be.
We'll use the demo session to do this tutorial. Here is the play-by-play on recording a performance:
Create an arrangement of your track.
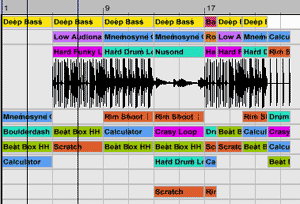
In order to create a single audio file from your Live session, you need to create an arrangement of the track. This is because of a unique feature of Live — if you try to record a scene-based performance, you will actually create a number of smaller clips for each scene that you select.

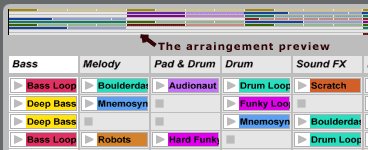
For this tutorial, I've created a simple arrangement by selecting a variety of scenes. An arrangement is created by hitting the Record button, then selecting clips on-the-fly. While recording, you get a helpful display at the top of the Session View that shows you "what's going on" in the arrangement. When you've finished, go ahead and hit the "stop" button.
Edit to suit your needs.
Now's the time to clean up the recording. Create track fades, eliminate loops that aren't needed and create the performance you really meant to record. Clean 'er up, because we are going to seal this recording "in stone", or at least into an AIFF file.

Verify the "Audio Record Directory" location for later.
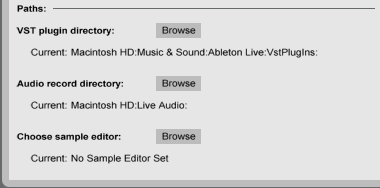
One of the keys to pulling this off is a correct "Preference" setting. Open the Preferences dialog (from the Edit menu), and select Preferences. Near the bottom is a setting labeled "Audio Record Directory". This is where your audio files are going to go, and it's critical that you be aware of it — there is nothing worse than having all your files in some "limbo" directory of your hard disk.

In my case, I have a special directory I've called "Live Audio". Make a note of the location, and move on.
Set up a new track to record into.
Select "Insert Track" from the Edit menu to create a new track. For this exercise, I've relabeled the track "Mixdown", since it will be for that specific purpose. (You relabel a track by double-clicking on the track name and typing in a new label.)
Once the track is created, set it up for recording by changing the input option to "Master Out". This will automatically set the track up to be "Record Armed" (ready for recording), and will prepare all of the clips as recording locations. We will only be using one of the clip locations, so there is really no additional setup required.

Select record, then hit a clip.
Click on the Record button at the top of the interface, preparing Live to record. Then, simply hit one of the clips in the Mixdown channel. The track will start playing, and will follow all the changes in the arrangement. Live will create a new clip on the Mixdown channel containing the track recording.

When complete, stop the playback.
When you are done recording, hit the stop button and take the Mixdown channel out of "Record Arm" mode. You may want to "solo" the Mixdown channel and trigger the new clip to make sure you got everything. Once you've verified it, it's time to find the created file.

Look into your Audio Record directory, there is a file to edit...
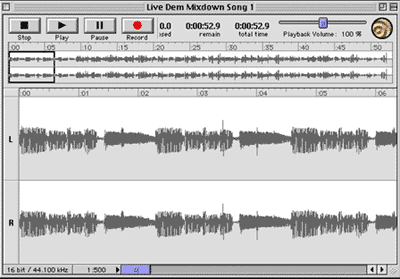
Jump back to the operating system, and open the folder that you selected as the "Audio Record Directory". You should find a two new files there — in my case, the files is called "Live Dem Mixdown Song 1" (using Live's automatic file naming scheme), and one with an "asd" extention (which contains Live-specific stuff).

Use an audio editor like Sound Forge or Peak to open the file without an extension, which is your audio in standard AIFF format. You now have the final mix outside of Live, easily available for further editing, processing or inclusion on your hot new mix CD!

So, it really isn't that hard — as long as you are willing to create an arrangement of your track ahead of time. And, frankly, you probably should do that, since it gives you the ability to draw in automation, tweak effects and edit out those "clams" that you didn't really want in the first place.
Next time, we are going to get into some automation techniques, both basic and advanced...