1. Welcome to Note
Note is a playable mobile app for sketching ideas anywhere, capturing improvisations, and sampling your environment. Using Ableton Cloud, you can easily send your Sets to Live, Move, Push, or other devices that have Note installed to develop them further. You can also export Sets as audio files directly from the app.
1.1 Setup
Note is available to purchase from the App Store and is supported on iOS 15.0 and iPadOS 15.0 or later.
An ableton.com account is required to authorize Ableton Cloud.
You can prevent Ableton Cloud from using mobile/cellular data by going to your device’s Settings > Apps > Note and switching off the Mobile/Cellular Data toggle. Cloud will then only transfer Sets if Wi-Fi is enabled.
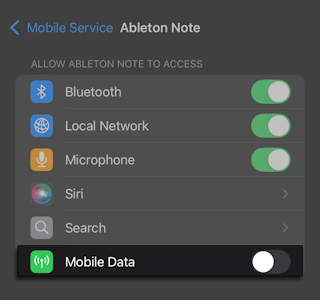
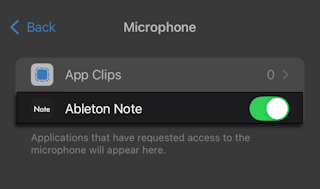
To record samples, Note will request microphone access the first time you launch the app. You can also grant access by going to your device’s Settings > Privacy & Security > Microphone.
2. App Settings
In Note’s App Settings, you can enable Ableton Cloud and Link, set up MIDI input sources, configure preferences, as well as access learning materials and usage data settings. You can also claim a free Live Lite license or join the Ableton Discord to connect with other music makers.

Tap the three dots in the bottom-left corner of the Set Library to open App Settings.

2.1 Ableton Cloud
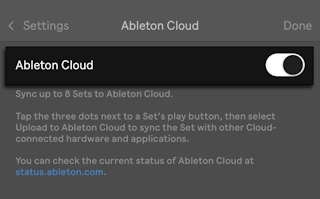
Ableton Cloud is a service that lets you store up to eight Sets from Note and Move, which you can access across all Ableton products.
To activate Cloud functionality in Note, enable the Ableton Cloud toggle.
You can also access this toggle from the Enable Ableton Cloud area in the Set Library, or via the Upload to Ableton Cloud entry in the Set Options menu.
Enabling the toggle opens ableton.com in a web browser, where you can follow the prompts to connect the service to your Ableton User Account.
Once Cloud is activated, any Sets that are already stored in Cloud — for example, from Move — will appear in the Ableton Cloud area of the Set Library.
Note requires an internet connection to upload Sets. If mobile/cellular data or Wi-Fi is turned off on your device, uploads will begin automatically once a connection is available.
Read more about uploading Sets to Ableton Cloud in the Transferring and Exporting Sets chapter.
2.2 Link & MIDI
In the Link & MIDI section, you can enable Link for use with Note, configure MIDI input devices, and assign custom MIDI mappings.
2.2.1 Link
Ableton Link is a technology that keeps devices in time over a wired or wireless network. It’s built into all Ableton products, as well as a growing number of third-party apps and hardware devices.
To use Link in Note, turn on the Ableton Link toggle. Your device may prompt you to allow Note to find devices on local networks.
Once Link is activated, two additional options can be enabled as needed:
In-app notifications — Sends notifications when other Link-enabled participants join or leave the session.
Sync Start/Stop — Synchronizes the playback position as well as the tempo. Start and stop commands triggered from other Link-enabled devices will cause the playback on Note to start or stop at the corresponding point in time.
The Connected Peers section shows how many Link-enabled participants are currently active in the session.
Link generally works without issues as soon as it’s enabled and provides reliable synchronization in most scenarios. For more information, check out the Using Link in Note or Link Troubleshooting articles in the Knowledge Base.
2.3 MIDI Input
Note can receive MIDI input from class-compliant USB or Bluetooth MIDI controllers, Mac computers (via a virtual MIDI network or Bluetooth), and other mobile apps. Once a MIDI input source is connected, you can use it to play instruments in a Set.
Connected sources are remembered and automatically recognized the next time they’re used. If you don’t want a source to remain enabled for future sessions, switch off its toggle before disconnecting the device or closing the app.
2.3.1 Connecting a USB MIDI Controller
To use a USB MIDI controller with Note, connect it to your device. Once connected, Note detects the controller and adds it to the list of available devices. Then, enable the toggle next to the controller’s name to send MIDI to Note.

Depending on your setup, you may need to use an adapter (e.g., Lightning to USB) or a powered USB hub if your controller draws more power than your device can supply.
2.3.2 Connecting a Wireless MIDI Controller
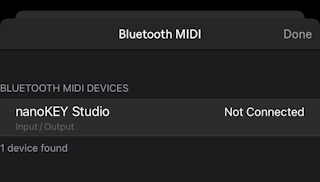
To use a wireless MIDI controller with Note, tap Connect to Bluetooth. If Bluetooth is turned off on your device, you’ll be prompted to allow new connections. Once enabled, a list of available Bluetooth MIDI devices will appear in Note. If you don’t see your device listed, make sure Bluetooth is turned on and that the device is in pairing mode, if needed.
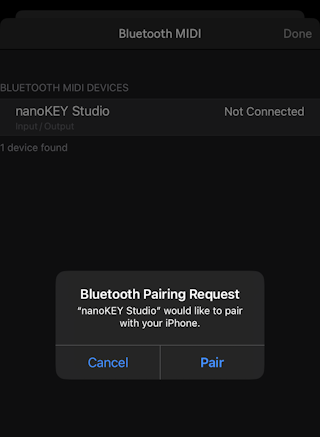
Tap the controller’s name to connect it to Note.
Then, pair the controller to your device.
Once paired, tap Done to return to the main MIDI Input page.
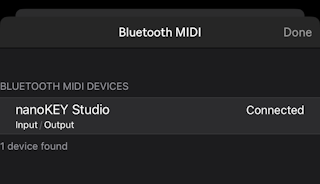
Lastly, enable the toggle next to the controller’s name to send MIDI to Note.

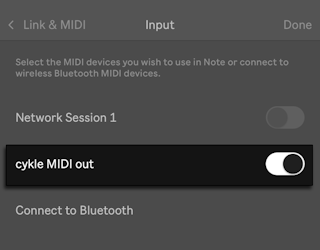
2.3.3 Receiving MIDI from a Virtual MIDI Network or Bluetooth
Note can receive MIDI input from Mac computers on the same Wi-Fi network via a virtual MIDI network or Bluetooth.
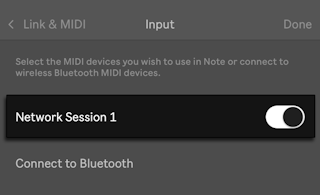
For example, you can set up a virtual MIDI network to send MIDI from Live to Note. To do so, create a network session on your Mac and connect to your device. In Note, enable the Network Session 1 toggle to receive MIDI.
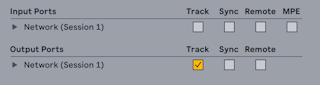
Open Live’s Settings and enable Track for the network session’s output port.
Then route a MIDI track’s output to the network session.
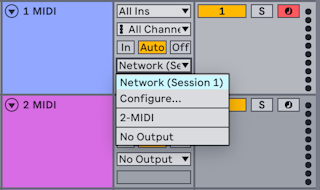
You can now play notes in Live and the signal will be sent to Note.
2.3.4 Receiving MIDI from an App
Note can receive MIDI input from other apps on the same device. Compatible apps appear in the list of available MIDI devices. To receive MIDI from an app, enable the toggle next to its name.
Depending on the app, you may need to enable MIDI output in its settings.
2.3.5 MIDI Mapping
You can assign up to eight macros and map key parameters to a connected MIDI controller. This makes it easy to automate device parameters and trigger common commands.

Tap a macro knob in Note and then tweak the control you’d like to map it to on your MIDI device.
You can also map several common controls: Capture, Clear Capture, Start/Stop, Quantize, Undo, and Redo. To do so, tap any of the dedicated Map buttons in Note and then tweak the control you want to map it to on your MIDI device.
2.4 Preferences
Use the options on the Preferences page to configure various app settings.
2.4.1 Themes
You can choose between a Dark theme and a High Contrast theme for Note’s UI.
2.4.2 Capture
Capture Timeout determines how the MIDI Capture buffer behaves. By default, this option is enabled, which means any notes that haven’t been captured into a new clip are automatically cleared after you stop playing the pads for a short period.
When this option is switched off, played notes can still be captured even if you stop playing for an extended time. In this case, the buffer is only cleared once you start playing the pads again and a clip still hasn’t been captured.
Note that the behavior of Capture Timeout does not affect capturing new notes into existing clips when overdubbing.
2.4.3 Pads
To display corresponding note or sample names on Note’s pads, enable the Show Note Names or Show Sample Names toggle, respectively.
2.4.4 Melodic Pads Layout
You can choose between two layouts when using melodic instruments: Fourths and Sequential. In the Fourths layout, the pitch of each pad is a perfect fourth (5 semitones) higher than the pad directly below it. In the Sequential layout, pitches are arranged from left to right, starting from the root note pad in the bottom-left corner, and continue in order onto the rows above.
2.4.5 Other
2.4.5.1 Show Touches
Enabling Show Touches adds a small white circle to the UI that follows your gestures as you navigate around Note. This can be a helpful visual indicator when recording performance videos and tutorial content.
2.4.5.2 Monitor Audio Input
You can enable this option to automatically monitor audio input when headphones are connected to your device. This lets you hear the input signal while recording into the Drum or Melodic Sampler.
2.5 Help
The Help page contains links to learning resources such as videos, the manual, and knowledge base articles, as well as the release notes.
You can also submit bug reports, send feedback about your experience with the app, sign up for user research testing, or join the Note beta to try out new features before they’re released.
This page also displays the version number of your current Note installation, which can be helpful to include with bug reports.
2.6 Privacy & Legal
The Privacy & Legal page includes options for managing your user data and enabling crash reporting. You can also view the End User License Agreement, Third Party Licenses, and Privacy Policy.
When Ableton Cloud is enabled, usage data consent is synced across all instances of Note.
2.7 Leave a Review
Use this option to share your feedback about Note in the App Store.
2.8 Get Ableton Live Lite
Every purchase of Note comes with a copy of Live Lite — you can claim your free license via this option.
2.9 Join Ableton Discord
Tapping this option takes you to the Ableton Discord, where you can connect with other music makers.
3. Creating and Managing Sets
3.1 Creating New Sets
Tap on the + New button to create and open a new Set. Each track is preloaded with a drum, bass, melodic instrument, or Sampler preset.

3.2 Sets Library Overview
When you open Note you will see the option to create a new Set, as well as any previous Sets you’ve created, and some Demo Sets. Sets that have been uploaded to Ableton Cloud appear in the respective section, and Sets that are only stored on your device appear in the Local section.

Tap on the play button next to a Set name to start playback of that Set.
3.3 Set Options
Tap on the three dots next to the play button to display various Set options.

You can duplicate and rename a Set, as well as choose artwork for the Set from your Photo Library, or take a photo to use as artwork.
You can also upload the Set to Ableton Cloud, which will transfer the Set to Live and then generate a Set folder which you can access from Live’s browser.
If you are logged into Ableton Cloud with your ableton.com account on multiple devices, your transferred Sets will show up in the Cloud section on every device that has Note installed.
Share To… allows you to share your Set to AirDrop or other apps, copy the Set, or save it to the Files app. Sharing the Set creates an .ablbundle file (e.g., “MySong.ablbundle”), which is similar to a Live Set, and includes all samples and metadata. Shared .ablbundle files can be opened in other instances of Note or in Live (version 11.2.5 and later).
4. Session View
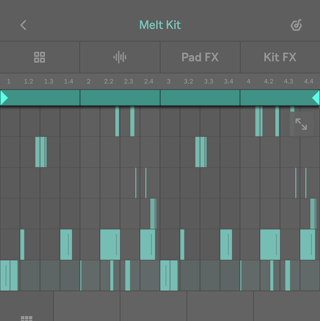
When you open a Set you will see the Session View, which contains tracks, clips, scenes, Set settings, a mixer, and a play/stop button.
You can always get back to the Sets Library by tapping the back arrow to the left of the Set name.
To the right of the Set name you can access the Set’s settings, where you can choose the tempo, switch the metronome on or off, pick a key and scale for the Set, or export the Set as an audio file.

4.1 Tracks
In a new Set you will see three default tracks. You can add more tracks (up to eight total) by swiping to the left and tapping the Add Track  icon on the right.
Tracks are arranged vertically, similar to Live’s Session View.

You can long-press on tracks to drag them around and rearrange them. You can also long-press on tracks to access Duplicate and Delete commands.

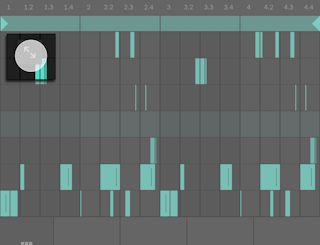
4.2 Clips
Clips contain your captured loops and are the building blocks of your tracks.
In a new Set, you will see an empty grid of squares beneath the track headers. These are empty clip slots where you can add new clips to the track. To add a clip, tap the Add Clip  icon in a track.
Adding a new clip takes you to the Instrument View, where you can record performances on the pads, edit recorded notes, and adjust the instrument and audio effect parameters.
To get back to the Session View from the Instrument View, you can tap the back arrow to the left of the Set name.
Tap on a captured clip to start its playback on the nearest downbeat. When a clip is playing, you will see a square Stop Clip icon, which you can use to stop the clip’s playback.
Additionally, you can long-press a clip and then drag to move it to another clip slot on any track. You can also long-press on clips to access Edit Clip, Duplicate, and Delete commands.

4.3 Scenes
Scenes are made up from various clips that are on the same horizontal row. You can play individual clips from different scenes by tapping on them during playback. Or you can launch a scene itself by tapping on the scene number, which will play all clips in the selected scene.

Each Set can have up to a maximum of eight scenes.
To display the scene numbers, tap on the Show/Hide Scene Numbers icon at the bottom of the Session View grid.
You can tap a scene number to launch all clips in that scene.

Long-press on a scene number to drag and rearrange it, as well as access duplicate and delete commands.

4.4 Mixer
You can access the mixer for your Set by tapping the Show/Hide Mixer icon at the bottom of the Session View grid.
Tap M to mute a track or S to solo it.


Use the sliders to adjust the track’s volume.

4.5 Session View Actions
At the bottom of the Session View grid you can access Undo/Redo commands, the Set’s mixer, a toggle to show/hide scene numbers, and a global Play/Stop button.

5. Set Settings
To access Set-specific settings, tap the Set Settings icon in the upper right corner of a Note Set.

5.1 Metronome
The easiest way to record in sync with a set tempo is to play along with the built-in metronome. The metronome will start ticking when you enable its switch in Set Settings, then press the Play button or launch a clip.

5.2 Tempo
Select Tempo to access the Set’s tempo settings.

Here you will find three different ways to adjust the Set’s tempo:
Drag the slider horizontally to make coarse tempo adjustments.
Tap the arrows at the left and right sides of the slider to make fine tempo adjustments of 1 BPM per tap.
Tap the Tap Tempo button. After four initial taps, the tempo will be set based on the speed of your taps. If you continue tapping beyond those four beats, the tempo will update continuously to match the speed of your taps.
5.3 Key & Scale
Select Key & Scale to unfold a submenu that provides access to the Set’s key and scale settings.
The In Key switch is turned off by default, allowing you to play all twelve notes in a Western chromatic scale in Note’s Pad View. However, you can enable this switch and use the key and scale buttons to select any root note and scale type of your choosing. This will snap the pad layout for melodic instruments to notes within the scale.

A set of melodic pads are also included, so you can hear the key and scale settings before using them in the Set. The pad sound preview uses whichever melodic instrument was last selected to generate its preview sound. The In Key options will be greyed out if no melodic instruments are present in the Set.
5.4 Export Audio
You can use this option to access audio export settings for your Set. Read more about exporting audio from Note in the Transferring and Exporting Sets chapter. If no clips are present in the Set, the Export Audio option will be greyed out.
6. Instrument View
The Instrument View is where you can play instruments with pads, capture and edit your performances, and shape sounds by adjusting preset parameters.

To open the Instrument View while in the Session View, double-tap on any existing clip, tap the Track header, or tap on the Add Clip icon in any of the empty clip slots in a track (which will also create a new clip).
The Instrument View consists of the Track Preset section, the Clip Preview window, which displays the notes in a clip and can be used to open the MIDI Editor, as well as the pads.
The Instrument View is also where you access Note’s browser, which you can use to swap out instruments, samples, effects, or entire Track Presets, organize them by favorites, and import your own recordings. To open the browser from the Instrument View, tap on any instrument, sample, or effect name in a track.
6.1 Instrument View Actions
There are several options available at the bottom of the Instrument View that allow you to perform different actions.

- The Undo/Redo arrows respectively undo or redo any changes you make in your Set.
- The Pad Performance Options button opens a sidebar with different options available depending on the Track Preset.
- The Duplicate Clip button creates a duplicate of the currently open clip in the next available clip slot in the Session View, and seamlessly switches to playing that clip.
- The Note Quantize button quantizes notes to align them with a musical grid. This can help you correct notes that were not captured perfectly on beat.
- The Play/Stop button starts or stops global transport.
7. Using Devices and Effects
Once you open the Instrument View, you will see the name of the currently loaded Track Preset at the top. Immediately below the name is the Track Preset section, which you can use to refine the preset’s sound using different device and audio effect parameters, contained within the Track Preset tabs.
7.1 Track Presets
Each track in a Set comes loaded with a random Track Preset, which contains an instrument with adjustable parameters and two audio effects.

Track Presets include one of the following instruments, each marked with a distinct icon that is displayed in the first tab.

- Drift — a synthesizer based on subtractive synthesis.
- Drum Rack — offers 16 pads in total. Each pad contains a Drum Sampler instrument, one audio effect send, and one audio effect for the entire Rack.
- Melodic Sampler — repitches a sample across the pads.
- Wavetable — a synthesizer that uses wavetable-based oscillators.
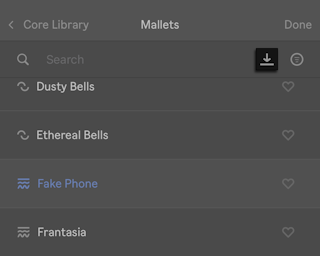
7.1.1 Browsing Presets
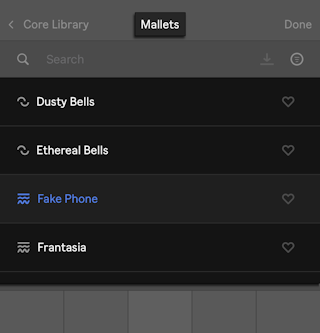
Note’s Core Library includes a wide selection of instrument and audio effect presets, as well as samples. You can tap on the preset name in a track to browse through the list of available presets in the same category.
Tap on a preset name in the list to trigger an audio preview of the device’s sound. You can play the pads in the Pad View below the preset list to test out the sound. Tap Done to close the browser and load the selected preset on your track.
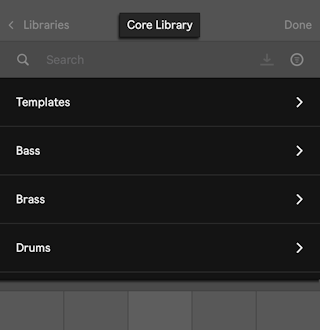
Track Presets are organized into categories in the Core Library. To view the full list of available categories, navigate to the Core Library folder.

You can look for specific presets by keyword using the search bar at the top of the browser. You can also filter for specific preset type by tapping the Filters icon to the right of the search bar.

If you find a preset you like, you can save it to the Favorites list, which will make it easier to locate in the future. To save a Track Preset as a favorite, tap the heart icon next to the preset name. Tap the heart icon again to remove the preset from Favorites.
To browse the presets you added to the Favorites list, tap the Filters icon and select Favorite.


7.1.2 User Presets
When you tweak a preset’s parameters, Note recognizes that the preset has been modified and displays an asterisk next to its name to indicate this. You can save the modified version as a user preset by tapping on the preset name and then tapping the Save icon in the browser.
User presets are saved to the User Library. To browse the presets you saved, use the back arrow to navigate to the Libraries section of the browser, then select User Library, where user presets are organized by instrument category.

7.2 Device Parameters in Track Presets
Different parameters are available depending on whether your track contains a Drift, Drum Rack, Melodic Sampler, or Wavetable preset. The parameters are contained within the first tab in the Track Preset section.

Drag your finger up or down on a parameter knob to adjust the parameter’s value. You can also drag left or right. To reset a parameter to its default value, double-tap on the parameter. You can also single-tap the parameter to bring up the parameter options menu where you can reset the parameter, as well as insert or delete automation.
7.2.1 Drift Device Parameters
In tracks containing Drift presets, device parameters are contained in the first tab. By default, Drift presets contain a selection of the instrument’s parameters, with the exact available parameters differing between the individual presets.

You can also purchase full access to Drift, which lets you use all of the synthesizer’s parameters. To do so, tap the arrow next to the first tab and a screen will be displayed with the option to buy Drift or restore an earlier purchase. Follow the instructions on screen to complete or restore your purchase.
Once purchased, tapping the arrow next to the first tab will expand the following parameter tabs: Macros, Osc, Filter, Env, LFO, Mod, and Global.

The Macros tab lists the default parameters for the selected Drift preset (which would have been the only parameters available prior to purchasing full Drift). However, these parameters are also available in their dedicated tabs; for example, oscillator parameters are included in the Osc tab. You can recognize which parameters are assigned to macros by the padlock icon in the center of the parameter knob. You can choose to remove the macros and only access those parameters through their tabs. To do so, tap on a macro-mapped parameter and a screen will be displayed where you can select the Remove Macros option. Note that this action removes all of the macro-mapped parameters, which results in the Macros tab being removed as well.

Once the macros are removed, the currently selected tab will appear as the first tab in the Track Preset section.
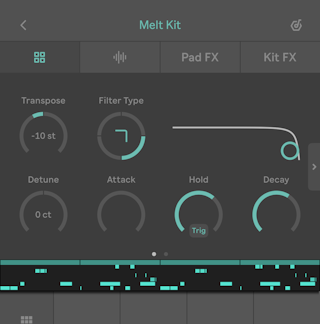
7.2.2 Drum Rack Device Parameters
In tracks containing Drum Rack presets, you will find two pages of parameters in the first tab. As each of the Drum Rack’s pads contains a separate Drum Sampler instrument, the parameters affect only the sample loaded into the Drum Sampler on the currently selected pad.

The first parameter page contains the following parameters:
- Transpose — transposes the sample’s pitch up or down by semitones.
- Filter Type — switches between four filter types: low-pass 12, low-pass 24, high-pass 24, and peak. The selected filter type determines how frequencies are processed based on the set cutoff point: the low-pass filters remove frequencies above the cutoff, the high-pass filter removes frequencies below the cutoff, and the peak filter emphasizes frequencies near the cutoff. Filter types are visualized in the display on the right, which can also be used to adjust the filter cutoff frequency and resonance or gain (depending on the filter type selected) by dragging the handle.
- Detune — detunes the sample in cents.
- Attack — sets the time needed for the sample to reach the peak level.
- Hold — sets how long the sample plays at the peak level once the Attack time is reached. At the base of this control, you can tap on Trig to choose between two envelope types: Trig and Gate. When set to Trig, the sample plays for the duration set by the Hold parameter, regardless of when the pad is released. When set to Gate, the sample plays only while the pad is held down and the Hold parameter is deactivated.
- Decay — sets how long it takes for the sample to fade to silence from the peak level after the Hold time.
The second page contains the following parameters:
- Pan — determines the position of the pad’s sound in the stereo field.
- FX Type — sets the playback effect used to manipulate the sample: Stretch, Loop, Pitch Env, Punch, 8-Bit, FM, Ring Mod, Sub Osc, or Noise. Each playback effect has two unique parameters that can be adjusted by dragging the handle in the X/Y pad on the right.
- Velocity > … — sets how much a target parameter is modulated by note velocity. Tap on the name in the lower part of the control to select the target parameter from the following: Filter, Attack, Hold, Decay, FX 1, and FX 2. The FX1 and FX2 targets correspond to the parameters unique to the selected playback effect.
- Vel > Vol — sets how much note velocity modulates the sample’s volume.
7.2.3 Melodic Sampler Device Parameters
In tracks containing Melodic Sampler presets, the device parameters are contained in the first tab.

The following parameters are available:
- Filter Freq — sets the cutoff point for the selected filter type. You can change the filter type by tapping on the type name in the lower part of the control. There are three types to choose from: LP (low-pass), BP (band-pass), HP (high-pass). The selected filter type determines how frequencies are processed based on the set cutoff point: the low-pass filter removes frequencies above the cutoff, the band-pass filter allows frequencies near the cutoff to pass while removing frequencies on either side of that range, and the high-pass filter removes frequencies below the cutoff.
- Transpose — transposes the sample’s pitch up or down by semitones.
- Detune — detunes the sample in cents.
- Attack — sets the time needed for the sample to reach the peak level.
- Decay — sets how long it takes for the sample to fade to silence from the peak level. You can tap on the name in the lower part of this control to choose between two envelope types: Trig and Gate. When set to Trigger, the sample plays for the duration set by the Decay parameter, regardless of when the pad is released. When set to Gate, the sample plays only while the pad is held down.
- Release — sets how quickly the sample becomes silent after the pad is released.
- Filter LFO — sets how much the LFO modulates the filter cutoff.
7.2.4 Wavetable Device Parameters
In tracks containing Wavetable presets, device parameters are contained in the first tab. The exact available parameters differ between the individual presets.

7.3 Sample Tab
In tracks containing Drum Rack or Melodic Sampler presets, the second tab contains the sample that is loaded into the instrument on the track.

The Core Library presets already have a sample loaded, but you can manipulate it in different ways or load your own samples. You can find out more about working with samples in a dedicated chapter of this manual.
7.4 Audio Effects in Track Presets
Each Track Preset includes two audio effects with adjustable parameters. The effects are accessible via the two rightmost tabs of any preset. You can swap out the default effects in a Track Preset for different ones by tapping on the effect’s name to open the browser.

The browser contains the following audio effect categories, with different effect presets available in each category:

- Auto Filter — a classic analog-style filter with LFO and envelope modulation.
- Channel EQ — a basic equalizer.
- Chorus-Ensemble — a chorus effect with Chorus, Ensemble, and Vibrato modes.
- Delay — a delay effect with time and filter modulation.
- Dynamics — a combined compressor and EQ effect.
- Phaser-Flanger — a phaser effect with Doubler, Flanger, and Phaser modes.
- Redux — a bit crusher with jitter and filter modulation.
- Reverb — an algorithmic reverb that simulates how sounds echo in an acoustic space.
- Saturator — a waveshaping effect with several shaper curves and color modulation.
Once you select an effect preset, tap Done to load it onto the track.
Much like when working with Track Presets, you can add audio effect presets to Favorites. Since each effect category uses a unique icon, it is easy to later find specific effect presets in the Favorites list.

In Drum Rack presets, the third tab contains an audio effect whose parameters affect individual Drum Rack pads, whereas the fourth tab contains an effect that applies to the entire Drum Rack; the tabs are called Pad FX and Kit FX respectively.


Various parameters will be displayed depending on the category of the selected effect. That said, the Pad FX tab always contains the Send Amount parameter, which adjusts how much of the effect is applied to the device in the currently selected pad.
In Drift, Melodic Sampler, or Wavetable presets, the audio effects tabs are called FX1 and FX2. The audio effect loaded in the FX1 tab is applied to the instrument’s sound first, and the result is fed into the effect loaded in the FX2 tab, which then outputs the final sound.

7.5 Automating Parameters
You can make changes to device and audio effect parameters while a clip is playing and then capture those changes so that they play back automatically. These automatic parameter changes are referred to as automation, and can be useful for adding variation to your sounds.
To automate a parameter, make sure Note’s transport is running, and then adjust a device or audio effect parameter. You will see a dotted line has appeared in the Clip Preview window, indicating that automation was recognized for that parameter.

Tap the Add button at the bottom of the app to capture the automation into the clip. You can also adjust several parameters at the same time; when you press the Add button, automation will be captured for all of the parameters simultaneously.

Captured automation appears as a solid line in the Clip Preview. To make it easier to recognize which parameters have been automated, a dot is added below the name of an automated parameter. When transport is running, you will also see the values of the automated parameters adjust automatically.
You can continue to change parameters even after automation has been captured. When Note’s transport is running, you can adjust parameters again and new dotted lines will appear in the Clip Preview window. Tap the Add button to update the captured automation with the new values.

7.5.1 Parameter Options Menu
You can tap a parameter name to open the parameter options menu and access the following automation commands:
Insert — adds a straight line of automation at the parameter’s current setting.
Delete — removes any automation for the selected parameter.

Note that when a parameter is automated, the Return to Default option, which restores the parameter’s default value in the selected Track Preset, is grayed out.
8. Clips and Notes
Performances are stored in Note as individual notes within containers called clips.
You can use the pads in the Instrument View to play notes. These performances can be captured and stored within clips, which you can later edit in the MIDI Editor, which is also a part of Note’s Instrument View.
8.1 Capturing Clips
As soon as you start playing the pads, Note recognizes the input and allows you to capture the notes you have just played. You can set a fixed length for the clip or capture performances freely.
8.1.1 Fixed Length Capture
Add a clip by tapping on an empty clip slot in a track, which will take you to the Instrument View. Tap the plus icon at the bottom of the clip area to add a clip with 1, 2, 4, 8, or 16 bars.
Once a clip has been added, you can play the pads and notes will be added in the MIDI Editor. The clip will keep looping until you tap the Add button at the bottom of the Pad View, which will add the notes to the clip. This way of capturing performances is called Fixed Length.
If Note’s transport is stopped, and you are capturing a clip for the first time, the Set’s tempo will be automatically set based on your performance.


8.1.2 Free Length Capture
You can also start playing pads without adding a clip and then capture your performance. This way of capturing performances is called Free Length.
If Note’s transport is stopped, you can play for up to eight bars, and then tap on the Capture button to create a clip of your performance.
If Note’s transport is stopped, and you are capturing a clip for the first time, the Set’s tempo will be automatically set based on your performance.

You can tap the X icon next to the Capture button to clear any notes you’ve already played if you want to start your performance again.
If Note’s transport is running and there are other clips in the Set, you can start playing and then tap on Create Clip to capture your performance. Any newly captured clips will have at least as many bars as the shortest clip already in the Set.

If you have a captured clip and Note’s transport is running, you can add more notes to the clip by playing pads and tapping the Add button.

If you have a captured clip and Note’s transport is stopped, you can start playing the pads again to capture new clips.
8.1.3 Pad Performance Options
You can access various performance options by tapping the Pad Performance Options icon below the pads.
In a Drum Rack you will see the following options:
Pads — Drum Racks use a 4x4 grid of playable pads by default. However, you can also switch to a Single pad layout while capturing clips or go back and forth between the 4x4 grid and the Single layout as needed.

Single — this layout provides detailed control over a single drum pad. First select a pad using the Pads layout, then switch to the Single layout. The 4x4 pads will be replaced with one large, velocity-sensitive performance area; taps on the upper half of this area create higher-velocity notes while taps on the lower half create lower-velocity notes. Note: this option only appears for Drum Racks.

Repeat — this option opens a submenu of buttons that represent common beat divisions. Hold a pad and tap one of the submenu buttons to repeat held notes at that rate, or switch between different beat divisions to create rhythmic variations. You can also select OFF to switch off the feature altogether. Repeat can be used in both the Pads and Single layouts.

In a melodic instrument you will see the following options:
Pads — melodic instruments use a 5x5 grid of playable pads by default. However, you can also switch to the Keys layout (explained below) to use a more traditional keyboard setup. Otherwise, you can always go back and forth between using the 5x5 grid and the Keys layout as needed.

Keys — this layout replaces the Pads layout with a two-octave keyboard.
If the In Key switch is enabled in the Key & Scale settings, the Keys layout will appear as a row of identical rectangles. When the switch is turned off, a more familiar piano-style chromatic keyboard will appear instead, complete with sharp and flat notes.

Octave — this option opens a submenu of buttons that allow you to change the octave of the Pad View.

Repeat — you can use the Repeat function in the same way as described for Drum Racks above. Note: the Repeat feature works with both the Pad and Keys layouts.

Lastly, please note that the state of a track’s Pad Performance options are specific to that track and saved with the Set. For instance, if one track is using the Keys layout, and another is using the Pad layout with a Repeat function of 1/8th notes, these settings will remain after you close and reopen the Set.
8.2 MIDI Editor
Note’s Instrument View typically displays device parameters front and center, with recorded notes shown in the Clip Preview window below.
You can also long press on the preview to access the options to duplicate, crop, or delete the loop, as well as create a clip if one has not been added on the track yet.
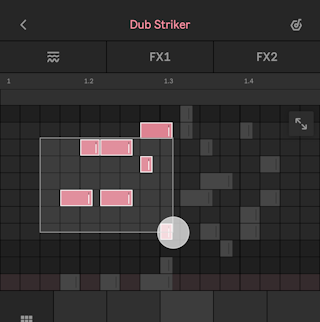
Tap the Clip Preview window to open Note’s MIDI Editor, which provides a more detailed overview of the captured performance and allows you to manually add, adjust, copy, or delete notes.

The MIDI Editor contains a time ruler, loop brace, and an editing grid composed of rows of drum hits or notes, as well as columns which correspond to timeline positions.
When viewed alongside the Pad View, the MIDI Editor displays only the rows that already contain notes or, if no notes have been added, only the rows associated with the selected pad or piano key. The editor can be expanded to full screen which displays all the rows within the selected key range or corresponding to the drum pads in a Drum Rack. To open the MIDI Editor in full screen mode, tap the Expand button.


The Expand button can be moved to any of the MIDI Editor corners in case it gets in the way. To do so, tap and drag the button to the desired location.
When the MIDI Editor is expanded to full screen, there are additional options available in the menu below the editor: Undo/Redo buttons, the note editing menu icon, the Duplicate Loop icon, and the Triplets icon (which adjusts the grid spacing in the editor to triplets).
When the MIDI Editor is in full screen, you can use it in landscape mode on your device.

You can zoom in on the MIDI Editor’s grid to make more granular changes as necessary. To do so, tap in the editor with two fingers and pinch out. You can then swipe left and right on the screen to navigate the timeline. Tap and pinch in to zoom the MIDI Editor back out.
To close the MIDI Editor, collapse full screen mode if it is open, then tap on any of the Track Preset tabs above the editor.

If you return to the Session View when the MIDI Editor is open, the next time you go to the Instrument View, the MIDI Editor will automatically open in the same state it was in prior to exiting the Instrument View. For example, if the MIDI Editor is expanded to full screen and you press the back arrow in the upper left corner to go to the Session View, the next time you open a track, you will see the expanded MIDI Editor.
8.2.1 Adding and Removing Notes
Tap on the MIDI Editor’s grid in the desired row and timeline position to add a new note. By default, a new note added in the MIDI Editor will correspond to one grid cell.
You can also draw notes by tapping and holding in the MIDI Editor until a note appears, then dragging left or right. In drum clips, this will create multiple consecutive notes. In melodic clips, drawing will create a note and shorten or extend its length. Given that notes created by tapping in the grid have the same length as the preceding note, drawing notes in melodic clips allows you to quickly change note duration for the next note you create.
It is possible to adjust the duration for existing notes by tapping on a note’s right edge and dragging left or right to adjust the length.

To delete a note, simply tap on it.
8.2.2 Selecting Notes
You can long press on a note to select it for editing. Once a note is selected, you can drag in the MIDI Editor to add more notes to the selection.
It is possible to create a multiple-note selection without pre-selecting an individual note first. To do so, tap and briefly hold in an area next to the notes, then immediately dragging across the grid to form a selection box.
When you make a selection, the note editing menu will open automatically, giving you the option to edit different note properties.
Once you have selected some notes, you can keep adding to the selection by tapping additional individual notes. Tap and drag in the editor again to make a new selection.
To clear the selection, tap anywhere outside of the selection in the MIDI Editor or close the note editing menu. Note selection will also be cleared whenever you close the MIDI Editor or exit the Instrument View.
8.2.3 Editing Notes
When you make a note selection, the note editing menu automatically opens below the MIDI Editor, with options that allow you to edit different note properties. The menu consists of four tabs: Operations, Transpose, Quantization, and Velocity. In drum tracks, an additional Pitches tab is available as well.
8.2.3.1 Operations Tab
The Operations tab is where you can edit the placement and length of your selected notes, as well as delete multiple notes at once.

Use the beat division buttons in the top row to set the value by which to shorten, extend, or nudge notes. When set to OFF, the selected notes will be adjusted in fine, unquantized increments. The Triplets button can be switched on to use the nearest triplet of a selected beat division. For example, when you enable Triplets and select ¼ as the beat division value, and then use the Nudge buttons, notes will be nudged by ⅓ of a beat.
Use the buttons in the second row to adjust the note length or position, or to delete the selected notes. The leftmost and rightmost buttons are the Shorten and Extend buttons, and can be used to decrease or increase note duration, respectively. Note length is adjusted according to the value selected in the beat division buttons above.

The arrow buttons next to the Shorten and Extend buttons are the Nudge Left and Nudge Right buttons, which can be used to adjust note position according to the value set with the beat division buttons.
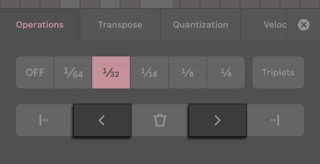
In the center, you will find the Delete Notes button, which can be used to quickly delete multiple notes.

Note that when notes are deleted, the note editing menu automatically closes.
8.2.3.2 Transpose Tab
The Transpose tab contains two sets of buttons, which let you transpose selected notes in fine or coarse increments. The arrow buttons on the left transpose the selected notes one semitone at a time, while the OCT up/down arrows on the right transpose notes by entire octaves.
For melodic instruments, the Transpose buttons will quantize notes to scale degrees if a key and scale has been set in Set Settings. Transposing notes in a Drum Rack has no effect on pitch. Instead, transposing notes moves them to different sample pads within the rack.
Note that the octave transposition buttons are disabled for Drum Racks.
8.2.3.3 Quantization Tab
The Quantization tab contains the option to snap selected notes to the chosen beat value on the grid and the option to specify by how much they are snapped to that value.

To quantize your note selection, tap the button corresponding to your desired meter value. Tap OFF to return the selection to its original position on the grid. You can tap on the Triplets button to use the nearest triplet of the selected meter value instead.
Another way to quickly adjust note placement is to use the Quantization icon, which is found in the menu at the bottom of the Instrument View. Tap the icon once to quantize all notes according to the current quantization settings, or long-press the icon to open the Quantization tab and adjust the quantization settings. Note that this action will select all the notes in the clip.
8.2.3.4 Velocity Tab
You can use the Velocity tab to adjust velocity for the selected notes.
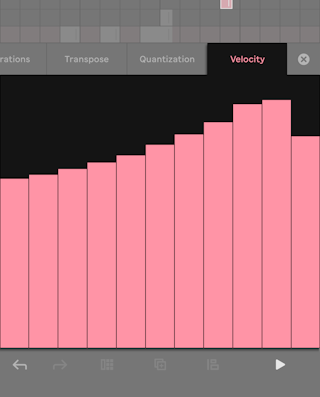
The vertical sliders in the tab represent individual notes’ velocities and can be moved up or down to increase or decrease the velocity. Velocity sliders are also visible directly on the selected notes, close to the right edge, and can be used to adjust the velocity outside of the Velocity tab. Note velocity is also reflected through color saturation; higher saturation corresponds to higher velocities, while lower saturation corresponds to lower velocities.
When editing velocity for multiple notes, you can swipe your finger across the screen to create a smooth transition between individual note velocities or use two fingers to create a velocity ramp between the left- and rightmost note in the selection.
8.2.3.5 Pitches Tab
The Pitches tab, available in drum clips, allows you to adjust the pitches for individual drum hits.
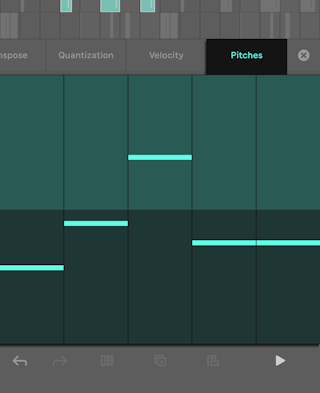
The pitches can be adjusted with vertical sliders in the tab; move the sliders up or down to increase or decrease the pitch.
Much like when editing velocity for multiple notes, you can also create a smooth pitch transitions by swiping your fingers across the screen.
8.2.3.6 Editing Notes with Gestures
Aside from using the note editing menu to change note properties, you can also make adjustments directly in the MIDI Editor through gestures:
- You can move notes on the timeline by tapping the left edge or the center of one of the notes in the selection, then dragging left or right.
- To adjust note length manually, tap on the right edge of one of the notes in the selection, then drag left or right.
- In order to transpose notes, tap on the left edge or the center of one of the notes in the selection, then drag up or down.
- To change note velocity, tap on the velocity slider near the right edge of one of the notes in the selection, then drag up or down. The slider will move as you do so and the notes’ color saturation will change, much like when editing through the Velocity tab.
8.2.4 Editing Clip and Loop Length
The MIDI Editor’s loop brace can be used to modify the clip length, as well as the loop length.
To adjust the loop size, tap and hold on one of the edges of the loop brace, then drag left or right. If the clip length is longer than one bar, the loop brace will include grid lines that indicate each bar. You can then tap on each bar to add or remove the bar from the loop.
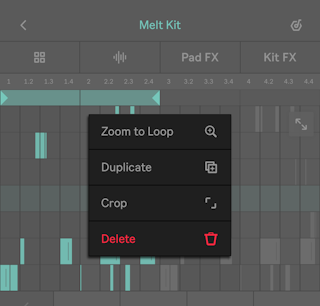
When you tap and hold on the loop brace, you can access additional options. If the loop length is equal to the clip length, the Duplicate and Delete options are available, which duplicate the loop and delete the clip, respectively.
If the loop length is shorter than the clip length, two additional options become available: Zoom to Loop, which zooms the MIDI Editor to fit the content of the loop brace on the screen, and Crop, which crops the clip length to match the loop length, discarding the content outside of the loop brace. In addition, the behavior associated with the Delete option is different: instead of deleting the clip, this option deletes only the content within the loop brace, while preserving the rest of the clip’s content.
If the MIDI Editor is zoomed in, you can quickly view the entire clip by tapping and holding on the loop brace, then selecting the Zoom to Clip option.
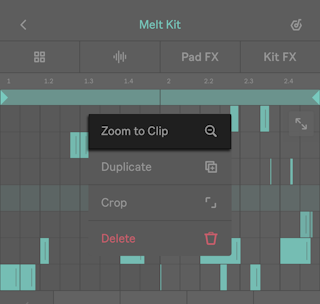
You can also use gestures to quickly change the zoom level: swipe up on the loop brace to zoom to the loop, or swipe down to zoom out to the clip.
9. Using Samples
You can import sample files into Note using AirDrop or the Share option from different apps. Note supports WAV, AIFF, and M4A files. M4A files will be converted to WAV files as soon as they are imported.
Samples can be added to tracks containing a Drum Rack or a Sampler instrument.
You can add samples to empty Drum Rack pads by adding a Drum Rack to a track and then selecting the pad that you want to add the sample to.

Tap Load Sample to select a sample from your imported files, recordings you have saved from within Note, the Core Library, or other recorded files from the Current Set.

Tap Record Sample to record a new audio file directly into a Drum Rack pad. Tap on the pad that has turned red or the Stop icon in the upper right of the Sample View window when you’re done recording.

If you’re recording onto a pad, you can tap on a different pad to immediately start recording onto the newly selected one.
The recorded sample will automatically be cropped to start playing at the first detected transient. You can drag the sample waveform left or right to set a different starting point. Or you can use a two-finger pinch gesture to zoom in and out of the waveform while adjusting the starting point. You can drag up or down on the sample waveform to adjust the sample’s volume gain amount anywhere between +24 and -70 dB.
Adding samples to the Sampler instrument works in a similar way: you can either load or record samples into the device.
Sampler plays audio files at their original pitch on the C3 pad, otherwise the sample will be transposed across the scale accordingly depending on which note you tap.
9.1 Resampling Note’s Output
In addition to recording your own samples, you can also resample audio output from Note.
If other clips are playing in a Set, you can long-press on the microphone icon in the Sample View of a Drum Rack pad or Sampler device to access the Resample Output recording option.

You can then record Note’s output. Tap the Stop button when you’re finished recording to add the audio file to the Drum Rack pad or Sampler device.


Long-press the Resample Output icon again to switch back to the Microphone Input recording option.

9.2 Sample Options
You can tap on the sample’s waveform to access additional Sample Options. The available options vary slightly depending on whether your track contains a Drum Rack or Sampler instrument.
In a Drum Rack you will see the following options:
Choke Sample — enabling this option means that the sample will be stopped when other samples in the same Choke group are played. There is only one Choke group per Drum Rack.
Mode — you can set the Trigger/Gate mode for the sample. Selecting Trigger means the sample will play all the way through no matter when the note ends, while Gate means the sample will stop playing as soon as the note is released.
Save Sample — this option lets you save the sample to the Recordings section of the All Samples directory. The sample will be saved to the Drum Sampler folder. This option only appears if a sample has been recorded into a Drum Rack.
Swap Sample — you can use this option to swap out the pad’s sample with another one.

In a Sampler instrument you will see the following options:
Mode — you can set the Trigger/Gate mode for the sample. Selecting Trigger means the sample will play all the way through no matter when the note ends, while Gate means the sample will stop playing as soon as the note is released.
Save Sample — this option lets you save the sample to the Recordings section of the All Samples directory. The sample will be saved to the Melodic Sampler folder. This option is only available if a sample has been recorded into a Sampler instrument.
Swap Sample — you can use this option to replace the cell’s sample with another one.

10. Transferring and Exporting Sets
You can transfer a Set out of Note by uploading it to Ableton Cloud to send it to Live, or by exporting an audio file of the Set directly from Note to save it to your device or share it with other apps.
10.1 Transferring Sets using Ableton Cloud
Use Ableton Cloud to share your Note Sets with Live, Move, Push or other devices that also have Note installed.
Tap the three dots next to a Set’s play button and select Upload to Ableton Cloud to upload the Set to Cloud.

Once uploaded to Ableton Cloud, the Set will be available in Live’s browser in the Cloud folder in Places, as well as any instances of Note on other devices that are logged into Cloud with the same registered email address.
You will also see the Set has been moved to the Ableton Cloud section of the Set Library in Note.

In Live you will see a folder for the uploaded Set has been added to the Cloud section of Places; this folder is similar to a Live Project folder. You can access individual samples and recordings, or expand the Set.abl file to access individual tracks. You can also double-click the .ablbundle file to open it as a Live Set.


Important: when using Note content in Live — by opening Note Set .abl files as Live Sets, or by using individual samples or recordings from Note Sets — you should always make sure to use the Collect All and Save option from Live’s File menu in the corresponding Live Set. This collects and saves all external files referenced by the current Set, ensuring that the content isn’t lost if the Note Set is removed from Cloud.
It is also important to remember that sharing Sets between Note and Live only works in one direction: Sets from Note can be opened in Live, but not the other way around.
10.2 Exporting Audio
You can export an audio WAV or M4A file of your Set directly from Note and save it to your files or share it with AirDrop or other apps.
From the Set Settings menu, select Export Audio to access the audio export settings. The audio file will contain an ordered sequence of all scenes within the Set, starting from top to bottom. The longest clip in each scene sets the length of that scene in the recorded file.

You can choose between an uncompressed WAV file (48 kHz, 16-bit) or a compressed M4A file (48 kHz, 32-bit) for your exported audio. Choose your preferred file type and then press Export to continue.

The audio file will start rendering and Note will display a progress bar that indicates the status of the process. Once complete, an audio preview of the finished recording will appear.

When you’re ready, tap Share to bring up your device’s share menu, where you can save the exported file to your device or share it with other apps.
Alternatively, you can tap Cancel to exit the audio preview and go back to the Session View.
11. Credits
Ableton Note Manual
Reference Manual by Sara Riegel, Ania Kuźbik, Michelle Hughes, and Chandler Tipton.
Schönhauser Allee 6-7 | 10119 Berlin, Germany
Contact Support: https://www.ableton.com/help/contact-support/
Copyright 2024 Ableton AG. All rights reserved. Made in Germany.
This manual, as well as the product described in it, is furnished under license and may be used or copied only in accordance with the terms of such license. The content of this manual is furnished for informational use only, is subject to change without notice, and should not be construed as a commitment by Ableton. Every effort has been made to ensure that the information in this manual is accurate. Ableton assumes no responsibility or liability for any errors or inaccuracies that may appear in this book.
Except as permitted by such license, no part of this publication may be reproduced, edited, stored in a retrieval system or transmitted, in any form or by any means, electronic, mechanical, recording or otherwise, without the prior written permission of Ableton.
Ableton, the Ableton Logo, the Live logo are trademarks of Ableton AG. Apple, iOS, iPadOS, AirDrop, macOS, are trademarks of Apple Inc, registered in the U.S. and other countries.