The anatomy of the APC20
Session View Matrix
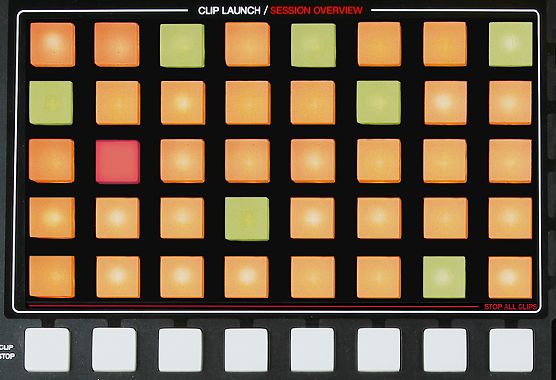
The APC20's button matrix gives you direct access to the clips in your Session View. The matrix has 40 three-color buttons arranged in a five-scene-deep-by-eight-track-wide grid. The smart color-coding system lets you know exactly what's happening in each clip, and simple directional controls let you move around inside your Session View.
Play, stop, record
Pressing a Clip Launch button triggers the clip in the corresponding clip slot in Live. If the track is armed to record, pressing the button records a new clip.
The buttons in the matrix light up in different colors so you know what's going on:
- Amber: this slot contains a clip
- Green: this clip is playing
- Red: this clip is recording
Empty clip slots don't light up at all. The buttons feature bright LED backlighting, so you can see them clearly on even the darkest stages. Many aspects of the Live interface are replicated in the APC20. You can stop all music in a track with its Stop Clip button and fire horizontal lines of clips with the Scene Launch buttons. Pressing Shift and any of the Clip Stop buttons stops all clips.
Cursors and Shift Button
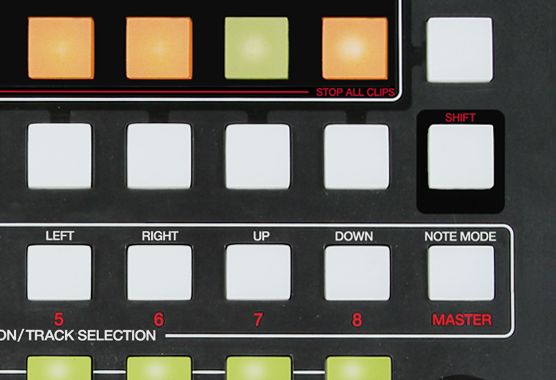
The cursor controls and shift button give you access to a whole lot more than the initial eight by five grid. Pressing Up or Down moves you up or down one scene at a time and the left and right arrow keys move you either left or right one track at a time.
Session Overview
The shift button gives you a faster way to move around your Live set--this is referred to as Session Overview. Hold down the Shift button and the matrix zooms out to reveal an overview of your Session View. Each button represents a five-scene-by-eight-track block of clips, giving you a quick way to navigate in a matrix of 125 scenes by 64 tracks. For example, pressing the shift button and then pressing the 3rd button down in the first column will put the focus on tracks 1-8 and scenes 11-15.
While the shift button is held down, the color coding is a little different:
- Amber: indicates the currently selected block of clips, which will be surrounded by a border in the software.
- Green: there are clips playing in that block of clips (though that may not be the block of clips selected).
- Red: there are no clips playing in that range.
- No color: there are no tracks or scenes in that range.
Transport
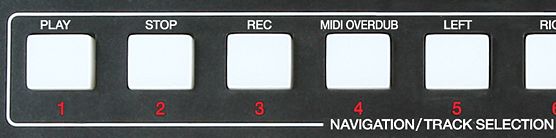
Live's Play, Stop and Global Record buttons are at your finger tips. MIDI Overdub lets you overdub on a MIDI clip--very useful when you're in Note Mode.
Mixer
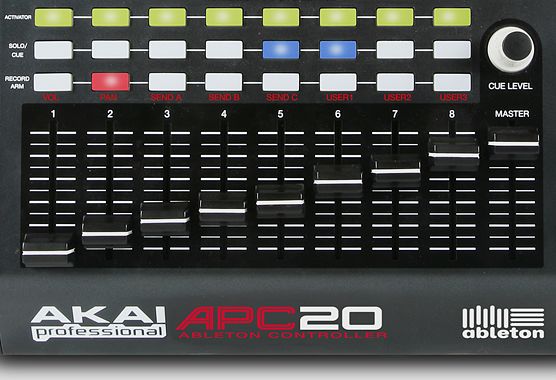
The Mixer section gives you control of your mix, as well as all soloing, pre-cueing, muting, pans, sends and more. The APC20 features eight tracks and a master fader, all of which can be expanded with the Session Overview. A Cue Level knob controls cue volume, so you can pre-listen to a clip or the metronome without your audience hearing.
You can shift these eight tracks around the Session View. Press the right or left buttons to move incrementally, one track at a time. In the Session Overview, you can jump in blocks of eight tracks at a time.
Flexible faders
The Vol, Pan, Send A, Send B, Send C, User 1, User 2 and User 3 buttons provide additional control possibilities, by re-assigning the 8 faders to the selected function. Selecting Pan, for example, lets you use the eight faders to control track pan setting.
To change the functionality of the faders, simply hold down the Shift button and select the parameter you want to control. The selected parameter bank will light up red, showing you that it's selected. When you release the shift button, the faders will remain locked to the corresponding function.
The user banks let you use Live's MIDI Map Mode to customize what the banks of faders control. Try mapping tempo or global swing to your faders.
The Master fader works as a master fader in all modes.
Note Mode
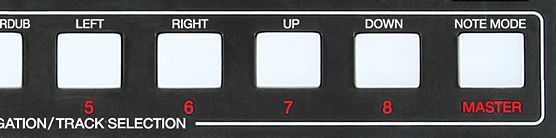
Pressing the Note Mode button changes the functionality of the Session Overview. When Note Mode is on (i.e., when the button is lit), the buttons on the grid send MIDI notes instead of controlling Live's Session View.
Track Selection

Holding the shift button for Track Selection lets you change which track will be in focus, allowing you to see what clip is currently highlighted on the selected track when 'Select on Launch' is active in Live's preferences. Holding down a Track Select button will also open or close a group track.
Combination Mode
The real power of the APC20 comes through when you put it next to an Akai Professional APC40.
As many tracks as you need
When you connect more than one APC unit to Ableton Live, the controllers will automatically work in Combination Mode. You can use up to six total APC20s or APC40s side by side. The topmost controller selected in your preferences will control tracks 1-8, the second controller selected will control tracks 9-16, and so on. When an APC40 and an APC20 are connected at the same time, the APC20's buttons will default to Track Selection, and its faders will default to volume, allowing swift access to an expanding array of clips and tracks.
