10. Editing MIDI Notes and Velocities
A MIDI clip in Live contains notes and controller data for playing a MIDI instrument. This instrument can be a virtual instrument in a MIDI track’s device chain (see ‘Working with Instruments and Effects’) or an external synth fed via the track’s output routing (see ‘Routing and I/O’). The MIDI clip (see ‘MIDI Clips and MIDI Files’) provides the device with a musical score to play, specifying note pitch, length, position and dynamics (referred to as velocity in the MIDI lexicon). MIDI is composed and edited in Live’s MIDI Note Editor.
10.1 Creating an Empty MIDI Clip
MIDI clips are created:
- by recording on a MIDI track (see ‘Recording New Clips’);
- or by capturing MIDI (see ‘Capturing MIDI’);
- or by double-clicking an empty Session slot in a MIDI track;
- or by selecting an empty Session slot in a MIDI track and choosing the Create menu’s Insert MIDI Clip(s) command;
- or by double-clicking on the track display of a MIDI track in the Arrangement View;
- or, in the Arrangement View, by selecting a timespan in a MIDI track and choosing the Create menu’s Insert MIDI Clip(s) command.
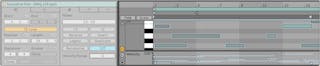
10.2 The MIDI Note Editor
To bring up the MIDI Note Editor, double-click a MIDI clip to open the Clip View. You can then choose from any of the three Clip View tabs by clicking their tab headers, or using the following key combinations:
- ALT-1 switches to the Notes tab/panel
- ALT-2 switches to the Envelopes tab/panel
- ALT-3 switches to the Note Expression tab/panel
Depending on which Clip View tab/panel is chosen, the Clip View will show different information. You can read more about these tabs/panels in the Clip View chapter (see ‘Clip View’).
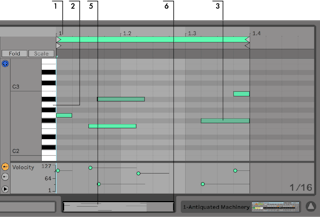
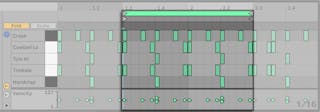
When the Notes tab/panel is visible, the MIDI Note Editor is divided into two editing windows: the upper MIDI Note Editor and the lower Expression Editor lanes (consisting of the MIDI Velocity and MIDI Chance Editor lanes).
While the Velocity Editor lane is shown by default, both it and the Chance Editor lane (described in detail below) can be shown or hidden via the lane selector toggle buttons at the left. Underneath the lane selector toggle buttons, a triangular toggle button allows showing or hiding all enabled lanes at once. When both lane selectors are hidden pressing the triangular toggle button will show both lanes at once.
The Velocity and Chance Editor lanes can be resized individually via their split lines, or simultaneously resized by dragging the split line between the lanes and the MIDI Note Editor.
It is also possible to resize the velocity, probability, and per-note expression lanes using the mousewheel/pinch gesture while holding the ALT key.

Switch to Draw Mode by activating the Control Bar’s Draw Mode switch or by pressing the B key. You can now draw MIDI notes into the MIDI Note Editor with the mouse. Deactivating Draw Mode allows notes to be selected and moved around via clipboard operations or by clicking and dragging, either vertically to change their transposition, or horizontally to change their position in time. MIDI notes can also be added and deleted by double-clicking when Draw Mode is inactive.
The “Draw Mode with Pitch Lock” toggle in the Record/Warp/Launch preferences lets you choose between two different ways of using Draw Mode. When enabled, drawing MIDI notes is constrained to one single key track (or pitch) at a time, while holding the ALT key allows freehand melodic drawing. When disabled, Draw Mode defaults to freehand melodic drawing, and holding the ALT key enables pitch-locked drawing. The melodic Draw Mode can be used to erase notes, when drawing starts on an existing note. When the MIDI Note Editor is focused, the “Draw Mode” entry in the Options and context menus displays the currently selected state of the “Draw Mode with Pitch Lock” preference, as “Pitch Lock On/Off”.
Provided your MIDI track’s device chain contains an instrument (see ‘Working with Instruments and Effects’), activating the Preview switch in the MIDI Editor allows you to hear notes as you select and move them. If the MIDI track is armed, activating Preview also allows you to step record (see ‘MIDI Step Recording’) new notes into the clip. Note that the Preview switch’s on/off state applies to all MIDI tracks in the Live Set.
After drawing a few notes and moving them around, you will probably want to know how to get around in the MIDI Note Editor. So, before we get into detailed editing information, we will first explain MIDI Editor navigation.
10.3 MIDI Editor Navigation and Transport
The MIDI Editor has both vertical and horizontal navigation. Along the horizontal axis lies a time ruler, which shows note position along a musical timeline. The vertical axis contains the note ruler, displaying octaves C-2–C8, and a representation of a piano keyboard (the piano roll). Note that if the Preview switch at the top of the piano roll is activated, you can listen to the results of your piano roll playing.
- To smoothly change the time-zoom level, click and drag vertically in the time ruler. Drag horizontally in the time ruler to scroll from left to right. While scrolling up and down using the mousewheel, you can hold the CTRL(Win) / CMD(Mac) modifier to zoom horizontally, or you can hold the ALT modifier to zoom vertically.
- Click and drag vertically in the note ruler to change which octaves are shown, or drag horizontally to change the vertical zoom size of MIDI notes and the keyboard.
- Click and drag over one or more notes to select them, or over a portion of the editor’s background to select a range of time. Then, double-click on the note ruler or time ruler to automatically zoom in on your selection. If nothing is selected, double-clicking the note ruler will zoom in on the area from the lowest to the highest note in the clip, while double-clicking the time ruler will zoom out to show the time between the first and last note. You can change the note selection using the CTRL(Win) / ALT(Mac) modifier in combination with the up or down arrow key.
- To zoom in and out around the current selection, use the computer keyboard’s + and - keys.
- The Clip Overview just beneath the MIDI Editor can also be used for navigation. It always shows the complete contents of the selected MIDI clip. The black rectangular outline represents the part of the clip that is currently displayed in the Editor above. To scroll, click within the outline and drag left or right; to zoom in and out, drag up and down.
- Change the length of what is shown in the Editor by dragging the left or right edges of the outline in the Clip Overview.
- To quickly change what is shown in the Editor, click on a section that you want to examine in the Clip Overview, then drag downwards to zoom in, or scroll by dragging left and right.

The area displayed in the MIDI Note Editor can be set to scroll with playback using the Follow switch from the Control Bar. Follow will pause if you make an edit in the MIDI Note Editor, and will start again once you stop or restart playback, or click in the Arrangement or clip scrub area.
When Permanent Scrub Areas is enabled in Live’s Look/Feel Preferences, clicking in the scrub area below the beat-time ruler starts playback from that point, rounded by the global quantization setting. (Tip: activating the Options menu’s Chase MIDI Notes command allows MIDI notes to play back even if playback begins after the MIDI note’s start time.)
When the Permanent Scrub Areas preference is off, you can still scrub by Shift-clicking anywhere in the scrub area or in the beat-time ruler. Learning about the loop/region controls (see ‘Clip Defaults and Update Rate’) and associated shortcuts can also be helpful in getting around in the MIDI Editor and playing selections quickly and easily.
As you work with MIDI, you may find yourself needing extra screen space. You can click and drag vertically on the window split between the Session or Arrangement View and the Clip View to enlarge the MIDI Editor.
10.4 Editing MIDI
10.4.1 Non-Destructive Editing
You can always return your MIDI clip to its previous state by using the Edit menu’s Undo command. Furthermore, if the MIDI clip being edited originated in a MIDI file on your hard drive, none of your editing will alter the original MIDI file, as Live incorporates its contents into your Live Set when importing.
10.4.2 Scales, Folding and Looping
By highlighting certain notes in the piano roll of a MIDI clip, Scale Mode allows you to easily write melodies within a chosen scale. Scale Mode can be toggled with the Scale button in the corresponding clip tab/panel. To the right of the Scale button, Root Note and Scale Name choosers allow setting a root note and scale for the selected clip(s).

When a selected clip has Scale Mode enabled and a scale is selected, notes belonging to the scale are highlighted in the piano roll. By default, key tracks belonging to the selected scale are highlighted in the MIDI Note Editor, and the root note is indicated by a prominent highlight in the piano roll. Scale highlighting can be toggled on or off, by pressing the K shortcut key while the MIDI Note Editor is in focus, or via the Highlight Clip Scale context menu and View menu entry.
Newly-created MIDI clips inherit the previously edited or viewed clip scale, even if they have Scale Mode disabled. When editing multiple clips with different key and scale settings, any foreground clip with Scale Mode enabled will update the global setting that is used to create new clips.
When a selected clip has Scale Mode enabled and a scale is selected, pressing the Scale button to the right of the Fold button will only show key tracks belonging to the chosen scale. Any key tracks containing notes not in the current scale will also be displayed.
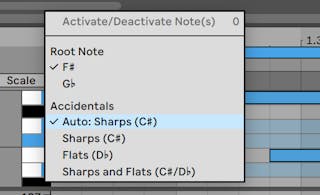
You can set a preference for spelling a clip’s notes with flats, sharps, or both, via the piano roll’s context menu. When Scale Mode is not enabled, this setting applies to all notes, but when Scale mode is enabled, this preference only applies to notes which are outside of the chosen scale; notes within the scale will maintain their proper accidentals. An additional “Auto” option automatically selects flats or sharps based on the position of the root note in the circle of fifths.
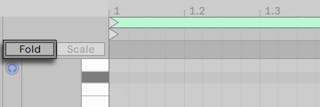
An important feature of the MIDI Note Editor is the Fold button, located in the upper left corner. Activating this button will immediately hide all rows, or key tracks, that do not contain MIDI notes in each MIDI clip. This means that the available key tracks in each clip in your Set will differ, depending on which notes exist in that clip.
This is very useful when working with percussion kits, for example, which are oftentimes mapped out along a keyboard in sections corresponding to percussion type (e.g., snares grouped together two octaves down from hi-hat cymbals, etc.). When working with a MIDI file created by such a mapping, sometimes only one or two of each type of percussion sound is used, and it becomes unnecessary to view the entire keyboard range. (Note: folding the MIDI Note Editor is not possible when editing multiple clips (see ‘Multi-Clip Editing’).)
When editing MIDI, you might find that you want to change which part of the clip you are listening to, or loop the clip in order to listen to it repeatedly. You can use the loop/region markers (see ‘Clip Gain and Pitch’) for this.
If Fold is deactivated on a track containing a Drum Rack (see ‘Drum Racks’), the MIDI Note Editor only shows rows with notes corresponding to a pad with devices on it. If Fold is activated, only rows containing notes are displayed.
Tip: Selecting the loop brace in a MIDI clip and pressing CTRL-D(Win) / CMD-D(Mac) doubles the length of the loop brace and zooms as necessary to show the entire loop. Any notes to the right of the loop will be moved, so that they maintain their position relative to the end of the loop.
10.4.3 Grid Snapping
Most functions in the MIDI Note Editor are subject to grid snapping (see ‘Using the Editing Grid’). But when adjusting events with the mouse, the grid is “magnetic”; event positions can be moved freely up to the previous or next grid line and then will snap if you continue to drag. You can hold down the ALT(Win) / CMD(Mac) modifier while performing an action to bypass grid snapping.
Note movements will also snap to an “offset,” which is based on the original placement of the note relative to the grid. This is useful for preserving a groove or loose playing style that you do not necessarily want to “set straight.”
10.4.4 Editing Notes
Editing in the MIDI Note Editor is similar to editing in the Arrangement (see ‘Selecting Clips and Time’). In both cases, your actions are selection-based: you select something using the mouse, then execute a menu command (e.g., Cut, Copy, Paste, Duplicate) on the selection.
Here is how selection works:
- Clicking a note selects the note. Multiple notes can be selected in unison: “rubber-band” select more than one note with one mouse motion by clicking in empty space, then dragging to enclose the notes in the dotted line that appears. Esc deselects all selected notes.
- Clicking into the background of the MIDI Note Editor selects a point in time, represented by a flashing insert marker.
- Clicking and dragging in the background selects a timespan. Press Enter to toggle the selection between the timespan and any notes that begin within it.
After placing the insert marker, you can manipulate it using your computer keyboard.
- Press the left or right arrow keys to move the insert marker to the left or right, according to the grid settings. CTRL(Win) / ALT(Mac) plus the left or right arrow keys moves the insert marker to the next note boundary.
- Hold down Shift while pressing the arrow keys to extend or retract the selected timespan by moving the insert marker. ALT(Win) / ALT(Mac) plus Shift while pressing the arrow keys extends or retracts from the opposite side of the selection.
- The insert marker can be moved to the beginning or end of a MIDI clip by pressing the Home or End key, respectively.
As we have seen, notes in the MIDI Note Editor can be moved both horizontally (changing their position in time) and vertically (changing their transposition). They can be moved either by clicking and dragging, or with the arrow keys on your computer keyboard. Notes moved with the arrow keys are always subject to grid and offset snapping, while notes dragged with the mouse can be freely moved until reaching the previous or next grid or offset point. If you are playing the clip while you edit notes, you can listen to them play in their new assignments as you change them.
Several key modifiers also apply to note editing:
- To transpose selected notes by octave, hold down Shift while pressing the up or down arrow keys.
- Shift plus the left or right arrow keys extends or retracts the duration of selected notes, according to the grid settings. To extend or retract notes without snapping to the grid, also hold ALT(Win) / CMD(Mac).
- To change the selection to the next note in the same key track, hold CTRL(Win) / ALT(Mac) while pressing the left or right arrow keys. CTRL(Win) / ALT(Mac) plus the up or down arrow keys moves the selection to the next note in time.
- To nudge notes without snapping to the grid, hold ALT(Win) / CMD(Mac) and press the left or right arrow keys.
- You can use the Shift modifier to click and add individual notes or additional “rubber-band” selections to your current selection. You can also remove a single note from your selection by holding down Shift and clicking on it. Holding Shift and clicking on the piano roll adds all notes in a single key track to the current selection, or removes them if they were already selected.
Selecting a note (or notes) makes it subject to commands from the Edit menu, such as Copy and Paste. Notes in the clipboard will be pasted starting at the location of the insert marker. You can also use the CTRL(Win) / ALT(Mac) modifier to click and drag copies of notes to a new location. If you click and drag to move notes but then decide that you would like to copy them instead, you can press the CTRL(Win) / ALT(Mac) modifier even after starting the drag.
When editing or drawing, you may sometimes place a new note on top of one that already exists. If the new note overlaps with the beginning of the original note, the original note will vanish. If the new note overlaps with the “tail” of the original, the original note’s length will change so that it lasts just until the new note’s beginning.
10.4.5 Changing Note Length
Clicking and dragging on a note’s left or right edges changes its length. As with note positions, note lengths can be adjusted freely up to the previous or next grid line but will be quantized when dragging further unless the ALT(Win) / CMD(Mac) modifier is held down.
Tip: To set a group of notes to the same length, select them all, grab the end of the longest one, drag them all down to zero length and then extend them.
10.4.6 The …Time Commands in the MIDI Editor
The standard clipboard commands like Cut, Copy and Paste only affect the currently selected notes (or the notes within a time selection). But, as in Arrangement editing (see ‘Using the …Time Commands’), there are “… Time” commands that act upon the entire MIDI clip by inserting and deleting time.
Note that these operations do not change the clip start/end position or the loop brace settings.
- Duplicate Time places a copy of the selected timespan into the clip, along with any contained notes.
- Delete Time deletes a selection of time from the MIDI clip, thereby moving any notes on either side of the deleted area closer together in the timeline.
- Insert Time inserts as much empty time as is currently selected into the clip, before the selection.
10.4.7 Quantizing Notes
There are three options for quantizing MIDI notes in Live. First, you can quantize MIDI notes as you record them (see ‘Recording Quantized MIDI Notes’). Secondly, as previously mentioned, you can move notes so that they snap to the visible grid lines. Finally, you can select a note or notes and choose the Quantize command from the Edit menu, or use the CTRL-U(Win) / CMD-U(Mac) hotkey. The first time you do this, you will see a dialog box with several quantization options. This will quantize using default settings, or the settings that you previously applied.
To adjust your quantization parameters, open the Quantization Settings dialog from the Edit menu.
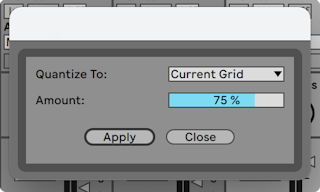
Using the options presented here, you can select either the current grid size or a specific meter value for quantization and set either the note start or end (or both) to be quantized. Quantizing the note end will stretch the note so that it ends at the chosen meter subdivision. You can also quantize notes without giving them that “quantized” feel using the Amount control, which will move notes only by a percentage of the set quantization value.
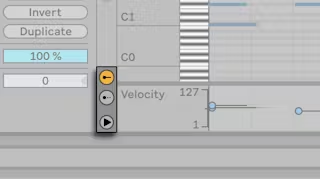
10.4.8 Editing Velocities
To change velocity for a MIDI note, click and drag on the associated marker in the Velocity Editor. Velocity values will be shown numerically in the Velocity Editor’s lane header. To help you locate the velocity marker belonging to a MIDI note that may be stacked vertically with others, Live highlights the velocity marker for whichever note your mouse is hovering over.
As in the MIDI Note Editor, you can select multiple velocity markers to change by clicking with the Shift modifier held down.
Tip: To set a group of notes so that they all have the same velocity, select their markers in the Velocity Editor, drag them up or down to either maximum or minimum velocity, and then adjust velocity to the desired value.
As we saw earlier, Draw Mode allows drawing identical velocities for all notes within a grid tile. While in Draw Mode, velocity drawing is limited to only those notes that are currently selected. To draw markers individually (as you would want to with a crescendo, for instance) deactivate grid snapping with the CTRL-4(Win) / CMD-4(Mac) shortcut, or simply hold down the ALT(Win) / CMD(Mac) modifier.
Tip: To draw a velocity ramp with notes that are all in the same key track, click a key in the piano roll to select all notes within the desired key track. Make sure Draw Mode is activated and draw the ramp into the Velocity Editor. This will affect only the selected notes.
Tip #2: To draw a linear velocity ramp across a selection of notes, first select the notes that should be affected (using the Shift modifier to select non-adjacent notes if necessary). Make sure Draw Mode is activated and draw the line into the Velocity Editor while holding the CTRL(Win) / ALT(Mac) modifier.
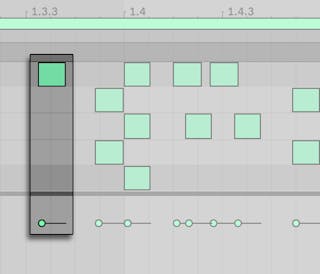
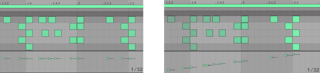
Each note in the MIDI Note Editor displays its velocity by the amount of shading in that note’s color — light notes play softly, and vice versa. To change the velocity of notes without the Velocity Editor open, click any selected note and drag vertically while pressing the ALT(Win) / CMD(Mac) modifier.
While pressing the CTRL(Win) / CMD(Mac) key, vertical movements in Draw Mode correspond to velocity changes. This means that, with one horizontal motion and one vertical motion, you can draw multiple notes and their velocities without releasing the mouse button. If you change velocity with this vertical movement, Live will remember the change and use your new velocity on any notes that you draw afterward.
Velocity values can also be entered manually by first selecting the velocity marker, then typing the numerical value on the computer keyboard and hitting the Enter key. Holding the Shift key allows fine-tuning the values of selected velocity markers. When using the up or down arrow keys with CTRL(Win) / CMD(Mac) held down, the values of selected velocity markers are incremented by +/-10.
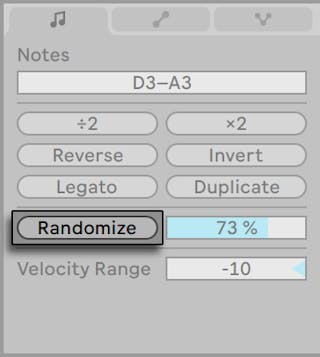
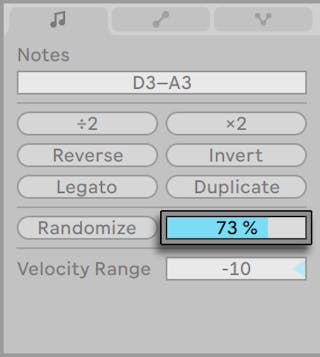
Velocity values can be randomized by first clicking in the Velocity Editor lane, which will change the Randomize Range slider to an integer value. Clicking on the Randomize button will then randomize velocity values for selected notes (or notes with selected markers). If no markers are selected, values for all notes will be randomized.

The Randomize Range slider, at the right of the Randomize button, allows specifying a randomization range that can be applied to velocity values. The slider’s randomization value can be typed as a number with the keyboard, and triggers randomization when validated using the Enter key. Velocities values will be randomly increased or decreased by a value between zero and the number shown in the Randomize Range slider.
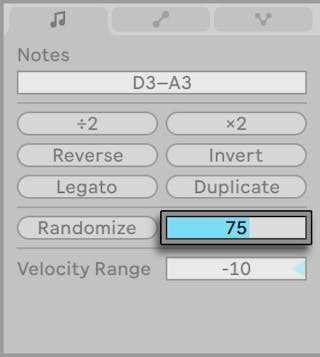
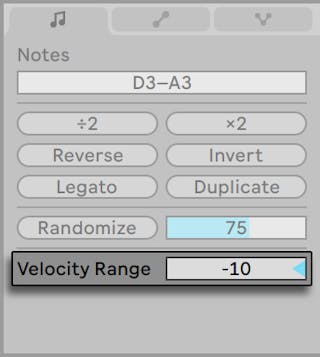
The Velocity Range slider can be used to set a range for each note’s velocity. Velocity values are then chosen randomly from within the specified range each time a note is played. Positive and negative values can be set, which increase or decrease velocity, respectively.
For example, if a velocity range of +20 is set for a selected note with a velocity value of 60, a random value between 60 and 80 will be chosen each time the note is played. A velocity range can also be applied to the entire clip if no specific notes are selected.
In addition to the Velocity Range slider, you can also set the range by holding CTRL(Win) / CMD(Mac) and dragging up or down from a velocity marker. The velocity range is indicated by the shaded area that appears as you drag up or down. Double-clicking the velocity marker will reset the range to 0.
The Velocity Range slider can be used in addition to the Randomize button or on its own.
10.4.8.1 Note-Off Velocity
By default, the Velocity Editor allows you to adjust note-on velocities. But you can toggle the editor to show note-off velocities via options in the editor’s right-click(Win) / CTRL-click(Mac) context menu.
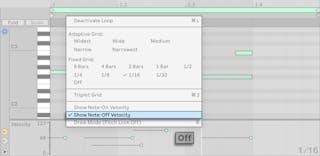
Note-off (or “release”) velocity is a somewhat esoteric parameter, and is only supported by certain devices. Ableton’s Sampler instrument (see ‘Sampler’), for example, provides note-off velocity as a controller for a variety of parameters.
10.4.9 Editing Probabilities
The Chance Editor allows setting the probability of a MIDI note occurring in a playing clip. The Chance Editor lane is hidden by default and can be shown by clicking on its toggle button on the left.
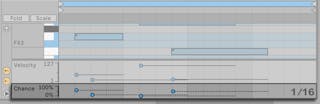
To change probability for a MIDI note, click and drag on the associated marker in the Chance Editor. You can drag a note’s probability marker up and down to change the probability value between 0-100%. (To help you locate the probability marker belonging to a MIDI note that may be stacked vertically with others, Live highlights the probability marker for whichever note your mouse is hovering over.) Probability changes will be shown numerically in the Chance Editor’s lane header.
Probability values can also be entered manually by first selecting the probability marker, then typing the numerical value on the computer keyboard and pressing the Enter key. Holding the Shift key allows fine-tuning the values of selected probability markers. When using the up or down arrow keys with CTRL(Win) / CMD(Mac) held down, the values of selected probability markers are incremented by +/-10.
To randomize probability values, first click in the Chance Editor lane. This will change the Randomize Range slider to a percent value. Clicking on the Randomize button will then randomize probability values for selected notes (or notes with selected markers), depending on the focused lane. If no markers are selected, values for all notes will be randomized.
The Randomize Range slider, at the right of the Randomize button, allows specifying a randomization range that can be applied to probability values. The slider’s randomization value can be typed as a number with the keyboard, and triggers randomization when validated using the Enter key. Probability values will be randomly increased or decreased by a value between zero and the number shown in the Randomize Range slider.
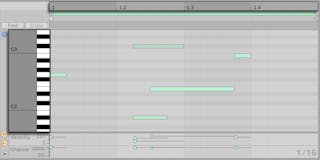
Notes with probability values less than 100% will display a small triangle on their upper-left corners, which will only be visible if the key track height is expanded enough; otherwise, it will be hidden.
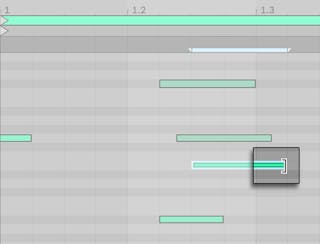
10.4.10 MIDI Note Stretch
When multiple notes or a range of time are selected in the MIDI Note Editor, Note Stretch markers will appear, allowing notes to be scaled proportionally in time. The markers are a pair of downward-pointing indicators that snap to the beginning and end of the selection.
By clicking and dragging one of the markers horizontally, the selected notes will move and stretch so that they continue to occupy the same proportion of time that they did when they were initially selected. As with notes, Note Stretch markers can be freely moved until reaching the previous or next grid or offset point, after which they will snap to the MIDI Note Editor’s grid lines unless the grid is not shown or the ALT(Win) / CMD(Mac) modifier is held while dragging.
When the mouse is between the Note Stretch markers, a “pseudo” stretch marker will appear. Dragging this stretches or compresses the material between the fixed markers without affecting the material outside of them. The pseudo stretch marker has the same grid snapping behavior as fixed markers.
When notes (but not time) are selected, one marker can be dragged beyond the boundary of the other, which will “reflect” the order of the stretched notes in relation to their initial sequence; this is sometimes referred to as “retrograde” behavior.
Adjusting the Note Stretch markers will also adjust the timing of any of the clip’s linked clip envelopes. Unlinked clip envelopes are not affected.
10.4.11 Cropping MIDI Clips
MIDI data that is outside of the loop brace can be deleted by means of the Crop Clip command. Simply right-click(Win) / CTRL-click(Mac) on a MIDI clip in the Session or Arrangement View and select this option. Unlike cropping audio clips (see ‘Cropping Audio Clips’), cropping a MIDI clip does not create a new file on disk.
10.4.12 Deactivating Notes
To deactivate, or mute, a note (or notes) in the MIDI Editor, select it and press 0. The Deactivate Note(s) command will mute the note, making it appear gray in the display. Press 0 again to reactivate notes. You can de- or reactivate all of the notes in a single key track at once by clicking a key on the piano roll and pressing 0.
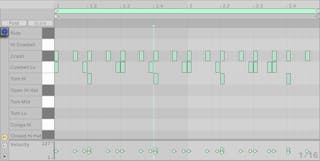
10.4.13 The Transform Tools
In addition to the editing possibilities within the MIDI Note Editor itself, the Notes tab/panel’s transform tools (see ‘The Notes Tab/Panel’) offer a number of ways to quickly manipulate the notes within a MIDI clip.
10.5 Multi-Clip Editing
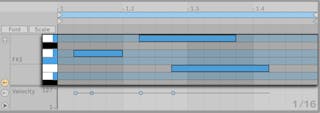
In the MIDI Note Editor, you can view notes in multiple MIDI clips at the same time. This helps you to see melodic and rhythmic relationships between different clips when creating and refining musical ideas, and allows you to edit material across separate tracks and scenes more quickly. In addition to editing notes across multiple clips, you can also modify various parameters for the selected clips.
When multiple MIDI clips are selected:
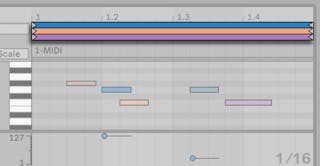
- The notes from these clips will be shown together in the MIDI Note Editor. You can select and edit notes from multiple selected clips at the same time, or use Focus Mode (see ‘Focus Mode’) to edit notes in a single clip while notes from other clips are still in view.
- Loop bars will appear above the MIDI Note Editor. Each loop bar represents a different clip in the current selection, and the colors of the loop bars match the color of the clip. Clicking on a clip’s note or loop bar switches to that clip for editing.
- You can adjust the loop length for any single clip by clicking and dragging its loop bar marker. You can also select and edit loop bars from any of the selected clips simultaneously, by clicking or dragging their loop markers while pressing the CTRL(Win) / CMD(Mac) key. Using the Shift key allows you to select contiguous loop bars. (Note: With Focus Mode enabled, it is not possible to select more than one loop bar at a time, and any existing multi-selection is ignored.)
- You can duplicate selected loop bars using the right-click(Win) / CTRL-click(Mac) context menu option.
- The title bar will show the name of the clip selected for editing. This can be particularly useful for identifying different clips with the same color. (Note: if a clip has no name, the title bar will display the name of the track containing the clip instead.)
- Certain controls in Clip View (see ‘The Clip Tabs/Panels’) appear when multiple MIDI clips are selected and are editable for all selected clips. These controls include Loop settings, Clip Time Signature, Clip Groove settings, and Scale Mode settings.
- Fold and Fold to Scale settings can all be edited for all selected clips.
- Randomization of velocity and probability values is only ever applied to a single clip at a time. It is not possible to randomize these values for all notes in all selected clips.
- You can resize the loop bar region by clicking and dragging directly above the multi-clip title bar’s scrub area.
Note that multi-clip editing works differently depending on whether you are working in the Session or Arrangement View. These differences are explained in dedicated sections for the Session View (see ‘Editing in the Session View’) and the Arrangement View (see ‘Editing in the Arrangement View’) further down in this chapter.
10.5.1 Focus Mode
Focus Mode allows you to select a single clip to edit while viewing multiple clips. Focus Mode can be toggled via the Focus button or the N keyboard shortcut. Holding N while editing with the mouse toggles Focus Mode momentarily. Multi-clip editing functions differently depending on whether Focus Mode is enabled or not.
When Focus Mode is enabled:
- The active clip’s notes will be shown in that clip’s color, while the inactive clips’ notes will be shown in gray.
- The active clip’s loop bar will be shown in black, while the inactive ones will be shown in gray.
- The name of the active clip is displayed below the loop bars.
- Hovering the mouse over an inactive clip’s notes or loop bar will reveal that clip’s color, helping you to choose a different clip in the current selection to edit. Clicking on a clip’s note or loop bar switches to that clip for editing.
- The loop length controls and Notes tools are available for editing the active clip.
- Enabling Scale Mode displays the root note and scale name for the currently selected clip.
- If Fold to Scale is enabled, key tracks for all scales through all selected clips will be folded. Enabling Fold will disable Fold to Scale and instead fold all key tracks across all selected clips.
- The Transpose, Reverse, Invert, Legato and Duplicate controls in the Notes tab/panel only applies to the active clip.
When Focus Mode is disabled:
- All notes are displayed with their clip’s color, as all notes are active.
- A clip’s loop bar will turn black when clicking on it, which then allows you to randomize Velocity or Chance for notes within that clip by first-clicking. The non-selected loop brace will display the color of its clip.
- Enabling Scale Mode displays the root note and scale name for the currently selected clips only if they are the same across all clips. Otherwise, an asterisk is shown where different root notes or scale names are chosen.
- The Transpose, Reverse, Invert, and Legato controls in the Notes tab/panel apply to all selected clips. Note that at least one note must be selected in order for the Reverse, Invert, and Legato controls to function.
- The Duplicate, Play at Half Tempo and Play at Double Tempo functions can be applied to multiple notes across selected clips.
- Notes can be cut or copied from multiple clips and inserted into the same set of clips, as long as the clip selection/foreground clip has not changed, or into a different clip once that new clip has been selected.
- Note editing functions (e.g. copy, cut, paste, delete) can be used when working with note selections across clips and loop boundaries.
- Time in the MIDI Note Editor can be selected across loop and clip boundaries.
10.5.2 Editing in the Session View
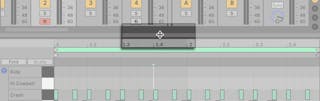
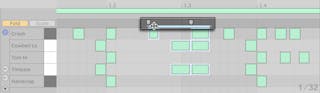
In the Session View, you can select and view up to eight looped MIDI clips at the same time. In the MIDI Note Editor, loop bars are ordered vertically (first by track, and then by scene).
If multiple clips of different lengths are selected, the MIDI Note Editor will show as many loop iterations as necessary for the clips to realign. Loop points are represented by black vertical lines in the MIDI Note Editor. Clips with a start marker set before the loop start are represented by a bar at the top of the MIDI Note Editor.
While multi-clip editing is useful for looking at clips across different tracks, it can also come in handy when you need to compare and edit multiple clips within the same track. For example, you can create evolving pattern progressions by adding notes to a clip, then making a variation to the clip in the following scene and so on, while maintaining an overview of the other clips in the track.
10.5.3 Editing in the Arrangement View
In the Arrangement View, it is possible to select and view MIDI clips from up to eight tracks, across a selection of time. In the MIDI Note Editor, loop bars are ordered vertically by track and horizontally by time.
Notes can be drawn continually across clip boundaries, except in Focus Mode.
The MIDI Note Editor will not show silence before or after the selection of clips – instead, it will fit its display range to show the beginning of the first clip up to the end of the last clip in the selection. If the selection contains looped and unlooped clips, the Loop button will appear half colored.