Chapter 3 - Quick Work of Loops
By Darwin Grosse
I'm using a loop from the "Drum 'n' Bass — The Classic Breaks", a Newtronics CD that we used to sell at CreativeSynth. In addition to audio loops, it includes .WAV files of each of the loops — a real convenience. Like many loop CD's, however, each loop contains "a little extra" audio at the end of the loop.
In this tutorial, we'll take a loop, quickly "fix" it, and then make a few creative tweaks to add some interesting. To start, I've taken an audio file (in this case, named 001B.WAV) and moved it into the clip pool. Once it is loaded, you can select the Clip View at the bottom of the interface.
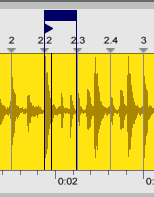
Once the loop is displayed, I can start it up by selecting the clip in the pool. The loop I've selected has a 1/4 bar "hitch" at the end — a common sample CD function that gives some flexibility with timing. By watching the cursor scroll through the waveform on playback, I can determine where I want the loop to end.
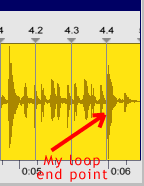
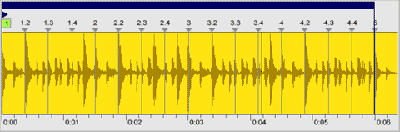
What I really want is for the end of the fourth bar to hit the loop end. To do this, I grab the "5.0" grid marker (which is sort of hidden on the right side), and drag it to my desired end point. Zing — the loop is doing the right thing! You will notice that all of the grid markers between the start and the end have adjust to be equally-spaced — an important function that must be done before we make further adjustments.
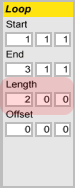
In many cases, this is all that you'd need to make a loop usable. In some cases, however, a four bar loop contains a fill or turnaround that you don't really want. In this case, I'm going to copy the loop to another clip position, and limit the playback to the first two bars. Since I've already established a "good" ending point, I'm pretty confident that my grid markers are in good spots. I can set the "length" setting to 2.0.0, and I will now have a two-bar loop.
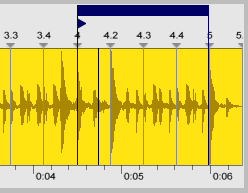
Finally, I want to have a little fun. The last bar of the loop has a bit of a turnaround, and I want to play around with it a little. I copy the loop to another clip position (using the Option-drag on the Mac, or Ctrl-drag on the PC), and set the length to one bar. In order to get the last bar, I can either set the Start setting to 4.1.1, or drag the colored bar (at the top of the waveform display) to the fourth bar. In either case, I am now repeatedly looping the fourth bar.
Now, to have a little fun, I'm going to transpose this clip by +24 semitones (2 octaves). Changes of this type are specific to the current clip selection, so I don't have to worry about screwing up early loops. I just twist the transpose setting up, and I've got a creaky robotic turnaround.
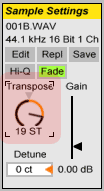
Finally, I'm going to do another clip that is only one beat long, and transpose it way down. This will give me another break tool. The easiest way to do this is to use the selection bar in the waveform. Copy the clip to another pool position, grab the right hand side of the selection bar, and drag it to create a selection only one beat long. Move it around (by dragging in the center of the selection bar), and find a cool one-bar loop. Drop the pitch to --17 (down an octave and a fourth), and you have another beat option — that is locked tightly into time.
So, the result is four clips that can be used for a quicky background track. Of course, the backing tracks for a real tune would require a lot more work, but I hope that this give you a feel for making quick work of your available samples!